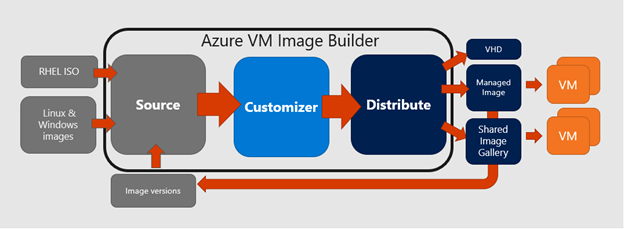
In these last and future posts we will be building an image with the Azure Image Builder. The Image builder takes a standard OS (from the marketplace or your image gallery) and runs a number of scripts against that image fully automated.
In this post goes into creating those scripts that the customizer can use to install your applications, set the default profile stuff and essentially making your image complete!
What we could do, is run a completely automated PowerShell script to create our base image. Or run individual scripts one by one from the input JSON file that we need for the ImageBuilder.
In this post I will introduce my “build” scripts, including a master script that can be called solely to build and manage the image.
To build my PowerShell script, I deploy a standard Windows 10 Enterprise multi-session, Version 1909 – Gen1 VM similar to before. Now don’t be alarmed by the manual deployment, we will build the PowerShell script and run it on this VM to go step-by-step.
The scripts
As we will run the installations from a script, lets build it. I have created multiple modules that can either be called independently, or ran from a master script. Using the master script allows for a single entry in the JSON file. But it is also possible to run each module separately to install for example only Chrome or only Edge..
Obviously, we want to make sure that we log what the script is doing, so each script will start by creating a directory on the C:\Deployment drive and enable a logfile that we can use. For the logfile I have 2 functions writelog and Runlog-Command. The first one just writes text in the logfile so we can keep track of what we are doing and such. The second function calls a command (like setup.exe) and records this command in the logfile as well. This gives us timing information on when a command was started and when it completed.
To call these functions we either use
WriteLog -message $Description -Logfile $LogFile, -Color "Green"
and
$Command = {setup.exe /option}
RunLog-Command -Description $Description -Command $Command -LogFile $LogFile -Color "Green"
We will need to download some executables. For this we can invoke a new download everytime, or write a function for it. In my case I have added a download with retry option. This function can be called using:
DownloadWithRetry -url $url -downloadlocation $folder -retries 3 -logfile $logfile
All functions are stored in the BuildCustomImage.psm1 and this file is downloaded and loaded in every module.
Now we know we have to download Edge Chromium, Google Chrome and some other applications. As we cannot always rely on these download locations not to be changed, I downloaded the files and uploaded them into an Azure storage account with public read access to the files only. This allows me to download the executables only if I know the exact location. If you further need to protect this, you can by using private endpoints or instead of the simple URL, use a SAS token.
In order to keep things a bit more clean, and allow you to replace or add the downloads, I created a small function that downloads an index file. This index file (indexfile.txt) contains URL’s that need to be downloaded as well as the setup scripts to be downloaded and run.
Indexfile.txt
;https://mydomain.com/CustomRegistry.ps1
This will download the CustomRegistry.ps1 file and run the ps1 file
Indexfile.txt
https://mydomain.com/installer.exe
This will download the installer.exe file and do nothing further
Indexfile.txt
https://mydomain.com/installer.exe;https://mydomain.com/installerscript.ps1
This will download the installer.exe as well as the installerscript.pss1 file and run the ps1 file
What we do in our master script is download all the URL’s and scripts, and keep the script names in an array. Then we run through the array, calling each individual script to install the respective installer.ps1 file. This way we can run through the installs 1-by-1 while controlling the installation itself. If you have a program you need to add to it, just add the installer and ps1 script in the indexfile.txt like:
Inside the myinstallscript.ps1, you can extract zip files, search for files and run unattended installations. I have placed a few examples on my github for Office, Teams, OneDrive, etc
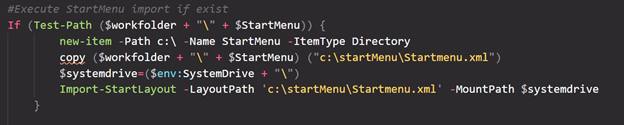
Start Menu
For the start menu, if you have deployed a single VM already and have setup the profile the way you like it, you can add the start menu script (https://mydomain/startmenu.ps1) to the downloads (a file called: customStartMenu.xml) and the BuildCustomImage.ps1 script will copy this file to C:\startmenu\startmenu.xml and import it into the system for the default users.
$StartMenu = "customStartMenu.xml"
File Extensions
If you create a file extensions XML file, you can add ;https://mydomain/fileassociations.ps1 it to the indexfile and the script will automatically import these as well.
$fileassociations="extensionassociation.xml"

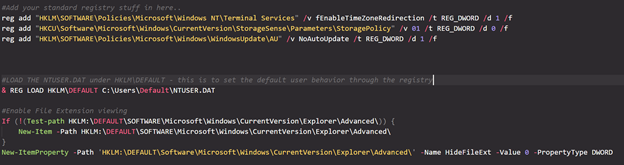
Custom Registry
In order to change the registry settings, there is also a customregistry.ps1 file. Not only does this file change the Local machine registry, it also loads the NTUSER.DAT for the default user. With that Hive loaded we can change the registry settings for the default user before closing it. If something would go wrong with the closing, a warning file will be created on the C:\ drive.
Which concludes all the scripting stuff for the image itself…
Whats next
In our next chapter we will schedule all of this in the JSON file. For now, checkout the repository and if you want to test it, install a Windows 10 VM and download and run the master script
Invoke-WebRequest -Uri https://raw.githubusercontent.com/RZomerman/AzureImageBuilder/master/BuildCustomImage.ps1 -OutFile BuildCustomImage.ps1
.\BuildCustomImage.ps1
Note that you will need to change the download locations for the executables in every script .. as else my Azure bill will go too high …:)
possible best to make a fork or your own GitHub repo to host your own scripts in..