With the release of an Application in Azure AD, the configuration of F5 publishing Kerberos backend applications have just been made a whole lot easier. This we cover in this post, but as an added bonus, the previous post adds the possibility of authenticating (Forest) trusted users on the same backend server using KCD (although that won’t work with the procedure in this post).
I will re-do the original post, and add the simplified version into the manual deployment as well (given that gives full flexibility on each element)
As posted by Alex Simons, Azure AD now has a “app” template for F5. It can be found in the application marketplace, and there is a guide available there as well. But don’t click away yet.. I’ll explain exactly how to configure it in this blogpost….
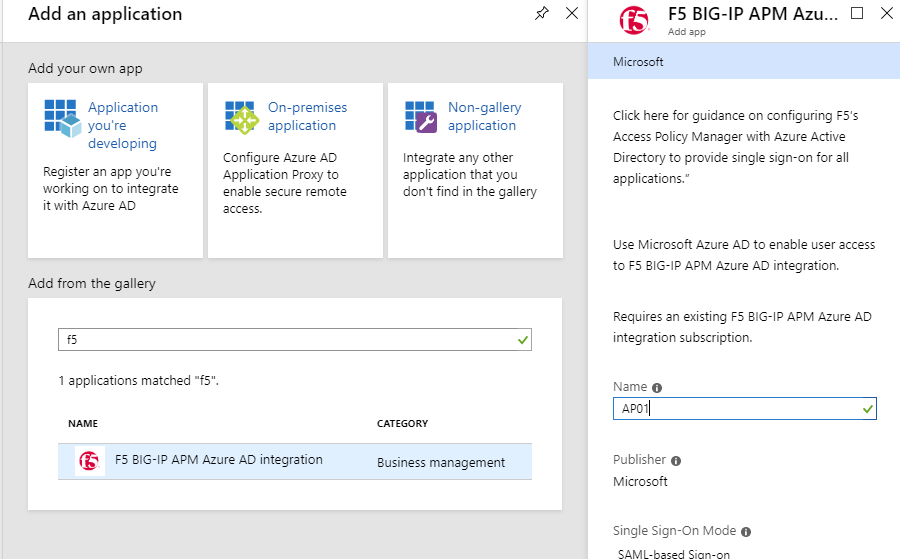
Add the application from the AAD Gallery
Login to your Azure AD through the Azure portal, go to Enterprise Applications
- Click New Application. Type F5 on the “Add from gallery” search field and select the ‘F5 BIG-IP APM Azure AD Integration’
Type the name of your (web) application and click Add
Once the application is added, select Users & Groups and add the users that need access to this application.
Then go to Single Sign-On and edit the Basic SAML Configuration
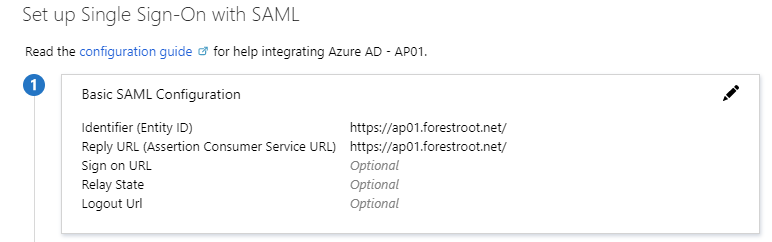
For the Identifier (Entity ID) and Reply URL type the URL of the application (make sure to use the exact same name later on in the configuration.) For example, https://AP01.forestroot.net
Go to the SAML Signing Certificate and download the Federation Metadata XML
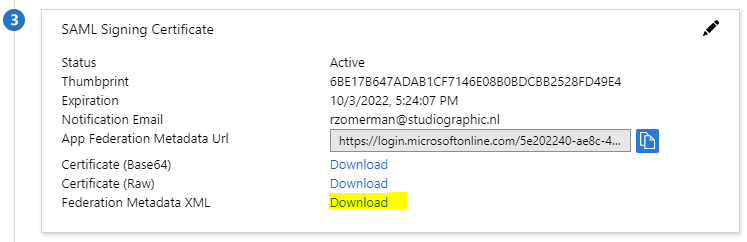
Note: When downloading the Federation Metadata XML file, make sure to remove any special characters (such as -) and spaces from the file.
This concludes the configuration in Azure AD.
Configure Active Directory
In Active Directory we need to configure some items as well. This includes:
- f5apm account
- set an SPN on the f5apm account
- set an SPN on the webserver account
- configure KCD for the f5apm account to forward credentials to the webserver
You can create the accounts through the AD Users & Computer GUI, but PowerShell will also work:
New-ADUser -Name “f5apm” -UserPrincipalName f5apm@forestroot.local -SamAccountName “f5apm” -PasswordNeverExpires $true -Enabled $true -AccountPassword (Read-Host -AsSecureString “MySuperD!perS3curePass”)
Next, setting the SPN’s:
The f5apm SPN : setspn -A host/f5apm f5apm
The webserver SPN: setspn -A HTTP/ap01.forestroot.net webserver01
Setting the delegation to the webserver (this needs to be done via PowerShell or GUI
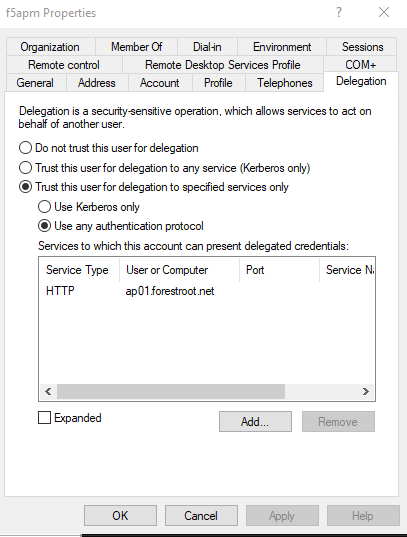
Browse to the f5apm user in AD Users & Computers, select the delegation tab and select Trust this user for delegation to specified services only – select Use any authentication protocol
Select Add and type the name of the webserver (or service principal) hosting the website where we registered the SPN HTTP/AP01.forestroot.net on. In the list shown, select HTTP/ap01.forestroot.net and click ok. Click OK to close the properties of the f5apm user.
This concludes the AD configuration.
F5 Configuration
SSL Certificates
Because we are publishing an SSL based website, we need to load an SSL certificate into the system. This certificate will be used by the Guided Configuration.
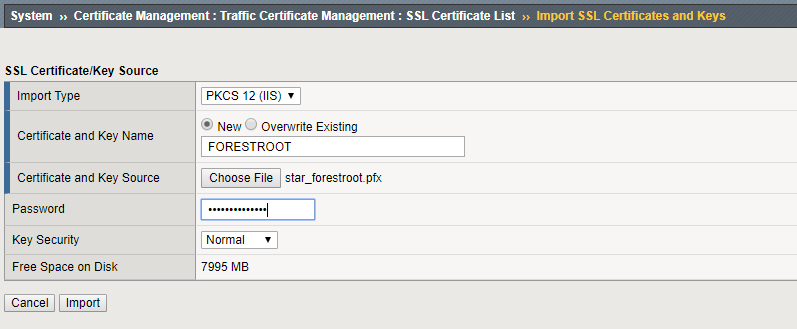
Go to, System, Certificate Management, Traffic Certificate Management, SSL Certificate List, Import
If you have a pfx file, set the Import Type to PKCS 12 (IIS), give the imported certificate a name, choose the pfx file and provide the password prior to clicking Import
Guided Configuration
When you have the full license for F5 APM (trial license is not enough), you should see the Guided Configuration blade. Once you open that one, you can select a Federation scenario
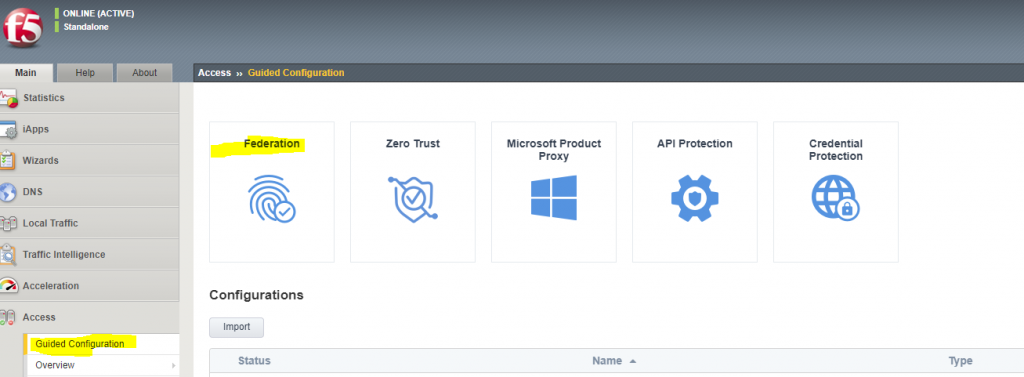
Select Federation and SAML Service Provider and the wizard will start:

The main page will show if you have the required configuration done, this includes DNS lookups (for Kerberos UPN lookups, NTP, interfaces and routes. It also shows you the steps and items related to the configuration.
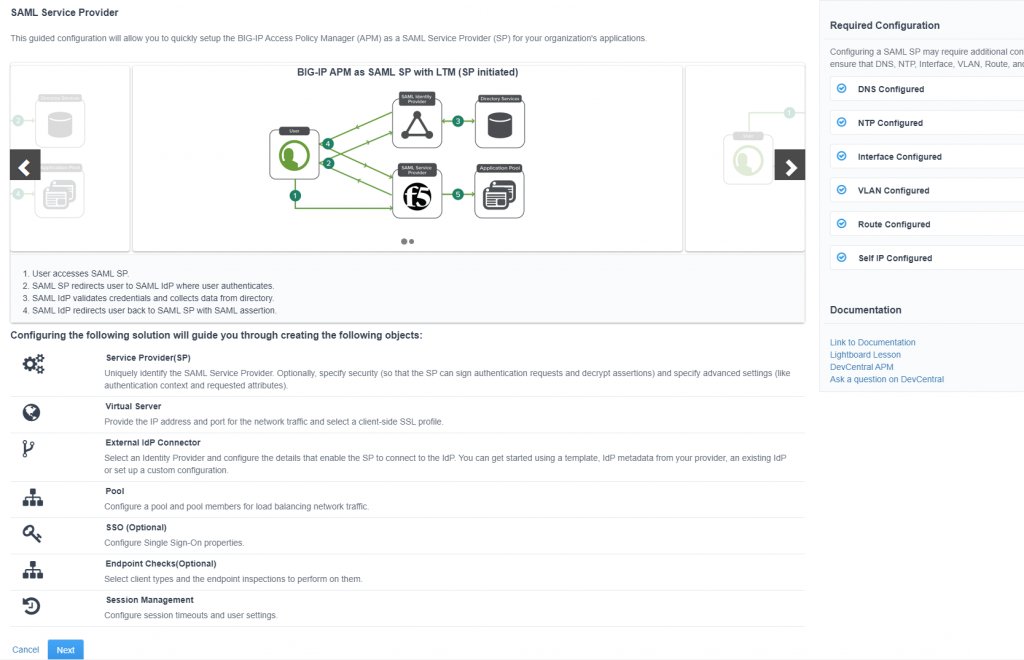
Click Next on the main page to update the Service Provider options:
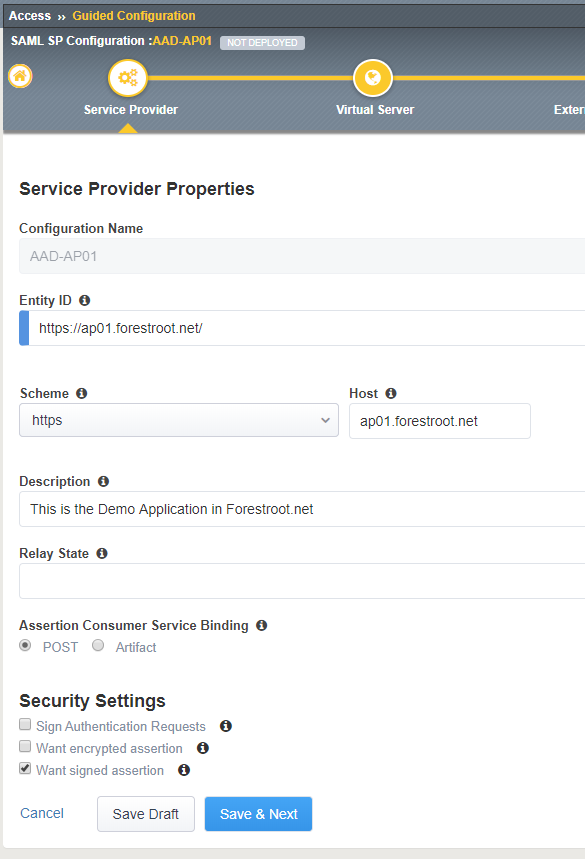
Give the configuration a name (must be unique), and type the Entity ID. This is the value that needs to match the Identifier (Entity ID) from Azure AD. For example; https://ap01.forestroot.net/
Under the host field, type the URL for the website, for example; ap01.forestroot.net
Type a description if required and click Save & Next
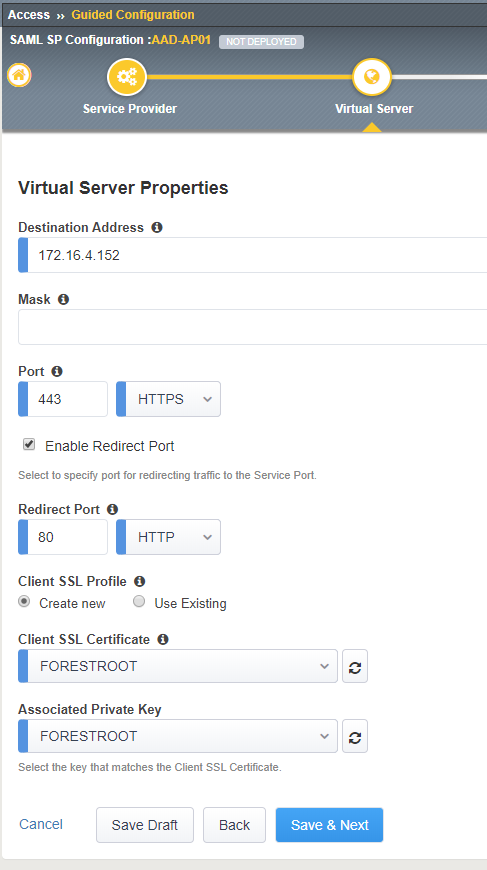
On the Virtual Server Properties page, the system requests the input for:
- Destination Address: This is the IP address the F5 will use to host the website on.
- Mask: not used
- Port: port used to host the website (should be HTTPS else AAD wont accept it)
- Enable Redirect port: (optional)
- Redirect Port: 80 (optional)
- Client SSL Profile: (select Create new)
- Client SSL Certificate: (select the uploaded certificate name)
- Associated Private Key: (select the uploaded certificate name)
Next the External Identity Provider, (Azure AD information) needs to be configured. Given we’ve downloaded the federation metadata xml file, we don’t have to configure things manually. Select the Metadata option from the dropdown list and click Choose File. Browse to the downloaded XML file from the AAD federation metadata XML field.
Note: Make sure special characters and spaces are removed from the file. Else the wizard will stall. If so, click cancel, go back to the main page and click the name of your guided configuration to continue where you left off.
Give the Identity Provider a name. For example; AAD-AP01
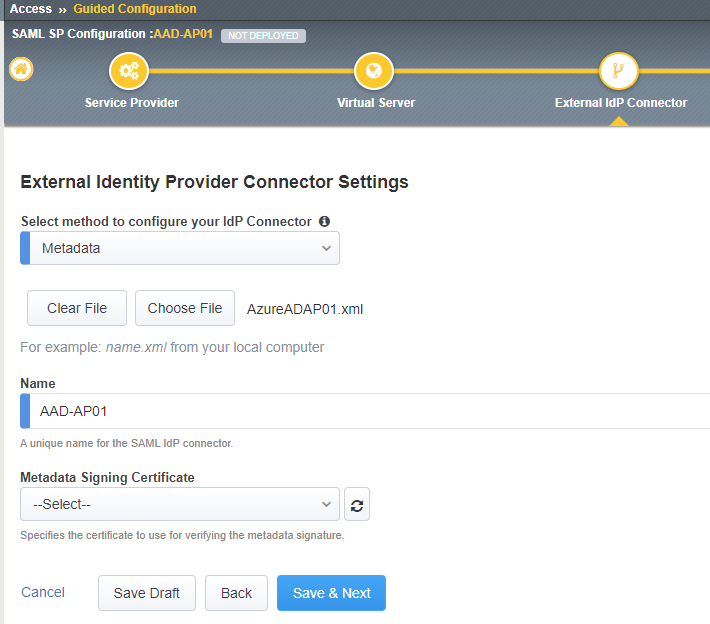
There is no need to upload / select the Metadata Signing Certificate.
Click Save & Next
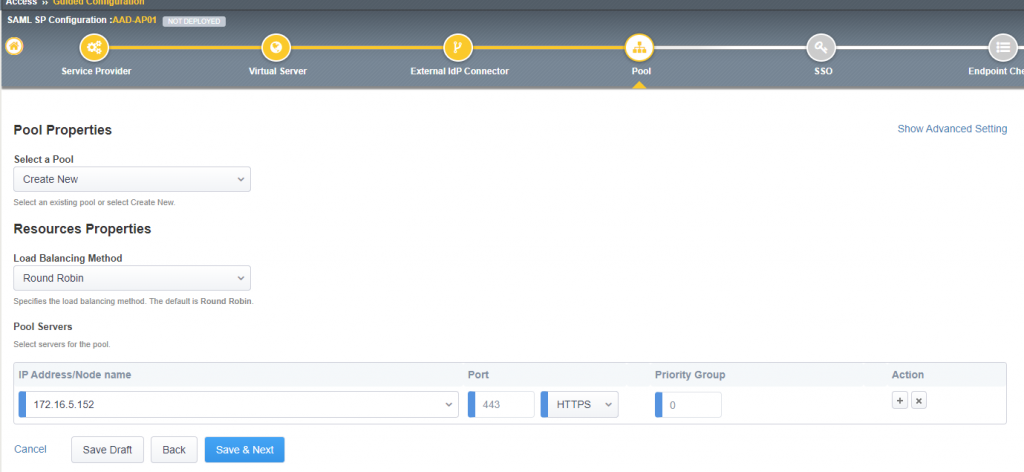
The Pool Properties page requires the information for the backend servers. In my example my webserver is running under HTTPS already, but it is also possible to run it under port 80 and have the SSL termination done at F5 level. Note that HTTPS is required for the reply URL’s in Azure AD.
Type the IP address of the webserver hosting the website and the port (and protocol) the website is running under. If you have multiple webservers load balancing a website, make sure to use a service account in the earlier steps (when setting SPN and KCD). You can also select the Show Advanced Setting and add a monitor to the webserver (for example HTTP).
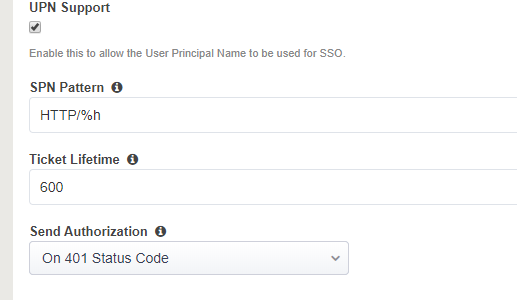
On the Single Sign-On page, click Enable Single Sign-On (optional) and select Kerberos as the type. Select Show Advanced Settings on the right top and fill in the following information:
- Username Source: session.saml.last.attr.name.Identity
- Kerberos Realm: the FQDN of your AD (FORESTROOT.LOCAL)
- Account Name: the F5 APM account (f5apm)
- Account Password: <the f5apm password>
- KDC: (optional IP address of a DC – if DNS is configured leave empty)
- UPN Support: (enable if no IP address provided in KDC)
- SPN Pattern: HTTP/%h

Note: some webservers require a 401 challenge prior to F5 providing the KCD. If that is the case, set the Send Authorization to On 401 Status Code
Click Save & Next
On the Endpoint Checks Properties, click Save & Next
On the Timeout Settings, click Save & Next
Review the settings, and click Deploy
And once that is done, click Finish
Test it now by browsing to the website!
1 thought on “F5 BIG-IP & AAD & KCD Simplified”
Comments are closed.
[…] Get settled in, this is going to be a long one…. or if you want the simplified version, just go here… […]