There are many tutorials already on WVD, but none that satisfied my needs for a full configuration with custom image. So why not create one myself…..
This tutorial describes the implementation of a Windows Virtual Desktop from a custom image up to publishing applications / desktop. This post is the first in a series of posts that you can find on https://blog.azureinfra.com/2020/03/17/windows-virtual-desktop-overview/
Let’s first take a look at some of the architectural components:
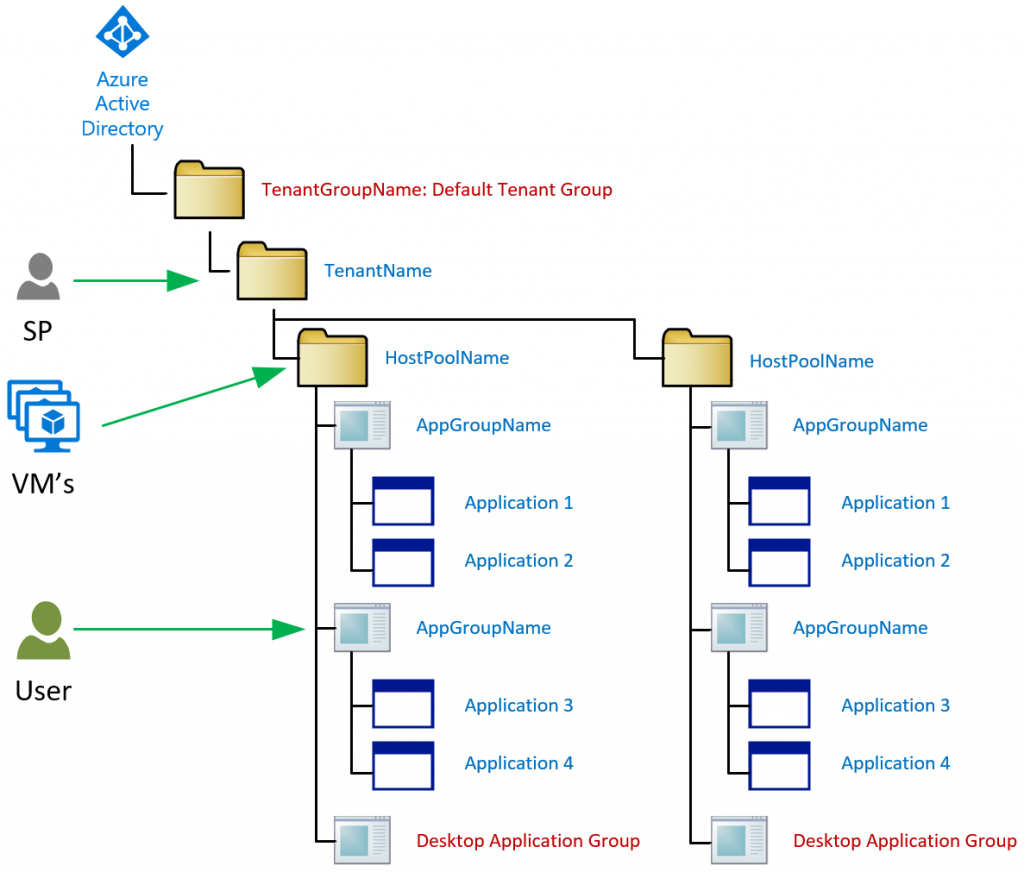
The Windows Virtual Desktop Environment itself is built as a tree under your Active Directory. Obviously there are backend services like Brokers, Web Portal and other stuff, but this is the logical build-up of items we have to keep in mind when deploying.
When you initiate your RDS (that’s running WVD) environment there is a tenant group. It’s displayed in red as the name for this, you cannot (should not) change. Under that default group you create a tenant name. Permissions for the RDS farm are set on tenant name level. You can create multiple tenants if needed for permission reasons.
Each Tenant then has one or more Hostpools. Hostpools are the pools of VM’s running your workloads. Each hostpool then has one or more AppGroup’s to which you assign users.
On the infrastructure side, the high-level picture looks like this:
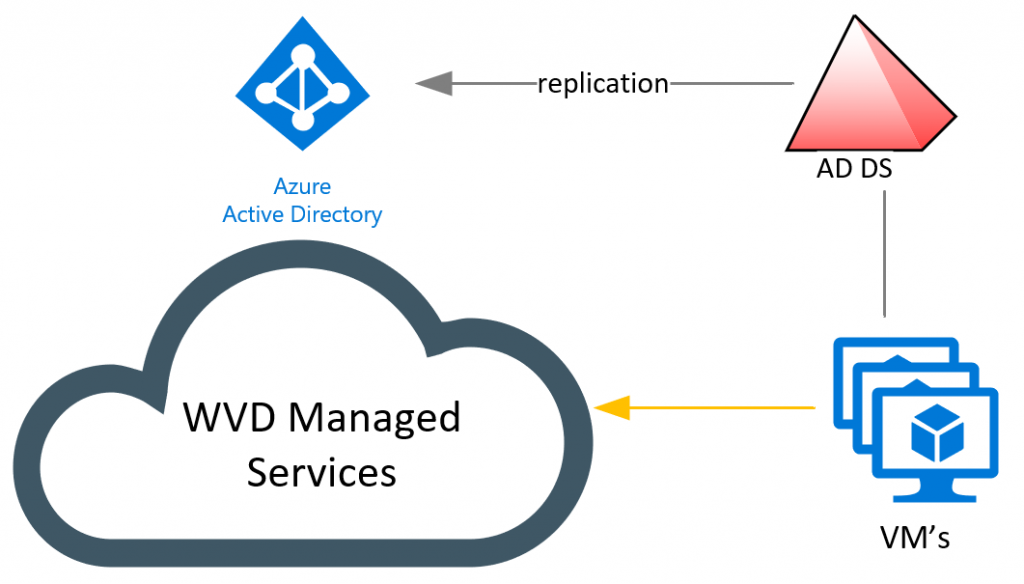
The VM’s you create as part of the WVD environment are joined to a regular domain. They are regular clients and can have group policy applied to them. The only thing that set’s these clients apart from your regular clients is an agent. That agent communicates to the WVD managed services in Azure and listen for any request. The WVD managed services are bound to your Azure Active Directory, which is why you need to have replication from your AD to Azure AD using Azure AD Connect, and users must exist on both identity services.
Building it
Let’s start with the prerequisites, in Active Directory that is. As our WVD clients will be AD domain joined, we will need an OU in there (copy the distinguished path – OU=VDI,DC=domain,DC=local from the properties/attributes). Also, we will need to set some policies on that OU to ensure that users / applications will work flawlessly. I can’t tell you which policies to set but start with the most recommended RDS policies. Secondly, we will also need an Active Directory account that can join our WVD machines to the domain. Yes, you could use a Domain Admin account, but please don’t. Create a new account, delegate it access to the just created OU and give the account permissions to join computers to the Domain (https://danielengberg.com/domain-join-permissions-delegate-active-directory/). – make sure to have a password set to >12 characters and save the UPN for the account (vdiadjoin@domain.local)
Creating an image
In our virtual desktop farm, there will be Windows 10 VM’s. Users will use these VM’s to login and use applications from, so we need to create a Windows 10 image that has these applications. The image will be the master for the WVD deployed machines and will have all the settings and applications that we need and that are specific to the enterprise. It is possible to create multiple images, and then multiple Host pools to publish these different images so each application has its own runtime and environment.
In Azure (or Hyper-V), deploy a Windows 10 Multiuser VM (if you want Office installed already, choose a preconfigured image). If you do not want to have a public IP address, make sure to connect the VM to an existing VNET. As the WVD image must be domain joined, also make sure to set the DNS on the VNET to your domain controller (or other DNS server pointing to your AD). Create a Generation 1 VM, with a managed disk.
After deployment, log-in to the VM and deploy your applications. If you only have web-applications, there is no need to create short-cuts in the start menu, as we can manually start an installed browser with the destination URL. For the other applications, make sure to either add them to the start menu or to keep track of the Executable path as we will need it later-on if we publish only the application instead of the full desktop.
For profiles, you are allowed to use the FXLogix application as part of the service. This ensures that profiles for your users are containerized in an VHD file and attached to the VM as soon as a user log’s in. The installation is pretty simple and only requires a fileshare to store the VHD files on. You can combine it with Azure AD-Domain Services, but I just deployed a standard file server, shared a folder on the E drive and configured the agent (through GPO or Registry) to use that shared path. (https://docs.microsoft.com/en-us/fslogix/install-ht)
Once your image is ready, it needs to be sysprep’d, but before we do that, we can make a snapshot of the drive, so we can later-on reuse the same image to tweak the final settings, or later-on continue with our image. For this, go to the VM and click the Disks option. Then select the OS disk and click + Create Snapshot
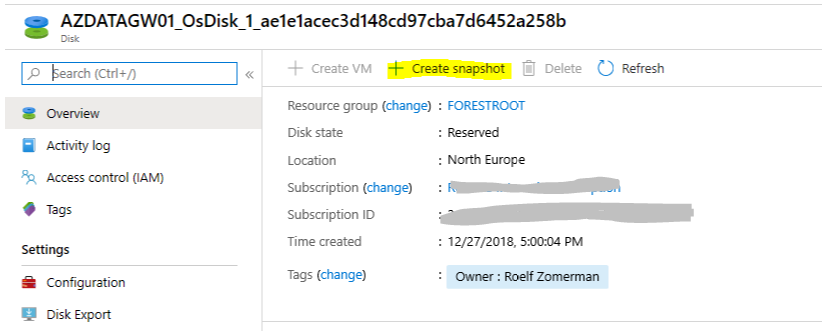

Create a HDD based snapshot. As the deployment of the image can still be on (Premium) SSD, the snapshot is only used as a reference image.
Next, we prepare our VM to serve as a master image, for this we need to run sysprep:
Start: C:\Windows\System32\Sysprep\Sysprep.exe
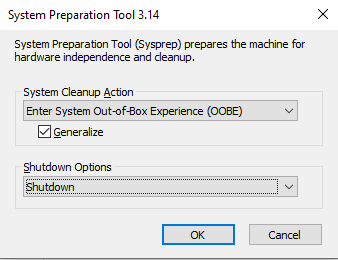
Set the options to Generalize, and options to shutdown and click OK.
Now that our image is ready, we can make a second snapshot of the drive and then copy that snapshot to a blob storage account.
The VM should now be shutdown, go back to the VM properties, select Disks, click the OS disk and select Create Snapshot, call this snapshot template<x>-postSysprep:
Now we can export the snapshot to a blob storage account, but first let’s set a few variables:
$location = "uaenorth"
$resourceGroup = "VDI-CoreComponents"
$storageAccountName = "vditemplatesforcompanyb"
$storageAccountContainer = "vditemplates"
$destinationVHDFileName= "Template1.vhd"
$snapshotName = "TheSnapShotName"
Then create a storage account <if not already exists>:
# Create a new resource group.
New-AzResourceGroup -Name $resourceGroup -Location $location
# Set the name of the storage account and the SKU name.
$skuName = "Standard_LRS"
# Create the storage account.
$storageAccount = New-AzStorageAccount -ResourceGroupName $resourceGroup `
  -Name $storageAccountName `
  -Location $location `
  -SkuName $skuName
 $ctx = $storageAccount.Context
If you already have a storage account, make sure to set the parameters as we will need them for copying the managed disk to the blob container
$resourceGroup = "myexistingresourcegroup"
$storageAccountName = "myexistingstorageaccount"
$storageAccount = Get-AzStorageAccount -ResourceGroupName $resourceGroup `
  -Name $storageAccountName
 $ctx = $storageAccount.Context
Then create the container (if not already exists)
# Retrieve the context and create the container.

 New-AzStorageContainer -Name $storageAccountContainer -Context $ctx
Next, export the managed disk snapshot:
#let’s grab the snapshot:
$SnapShot=Get-AzSnapshot -Name $snapshotName

#Get access to the storage account keys, and set the destination context:
$storageAccountKey = Get-AZStorageAccountKey `
 -resourceGroupName $storageAccount.ResourceGroupName `
 -AccountName $storageAccount.StorageAccountName

$destinationContext = New-AZStorageContext –storageAccountName $storageAccount.StorageAccountName -StorageAccountKey ($storageAccountKey).Value[0]

#grant access to the snapshot
$sas = Grant-AZSnapshotAccess -ResourceGroupName $snapshot.ResourceGroupName `
 -SnapshotName $snapshot.Name `
-DurationInSecond 3600 -Access Read

#And start the actual copy
Start-AZStorageBlobCopy -AbsoluteUri $sas.AccessSAS `
 -DestContainer $storageAccountContainer `
 -DestContext $destinationContext `
 -DestBlob $destinationVHDFileName

#Get the full URI for the blob to be used later in the wizard
(Get-AzStorageBlob -Blob $destinationVHDFileName -Container $storageAccountContainer -Context $ctx).ICloudBlob.Uri.AbsoluteUri
Retrieve the URL provided by the last command, as we will require that during the deployment of the WVD pool.
Creating the tenant
To create a tenant, we need to (just once) create the AAD applications for Windows Virtual Desktop. For this, browse to rdweb.wvd.microsoft.com with a global admin account. There you need to fill in the AzureAD tenantID which can be taken from the portal (under Azure Active Directory), or through PowerShell by logging into your tenant:
(Get-AzSubscription).TenantID
Fill in the TenantID on the web page, click Submit, then change the Consent option from Server App to Client App and click submit again.
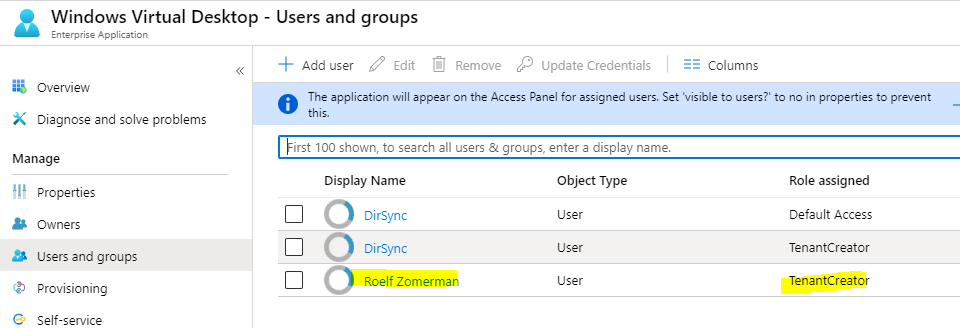
Now that the application is authorized, we need to add a user who will be the administrator for the WVD tenant. This is the user that will create the WVD (RDS) tenant and authorize people to actually use it. Obviously this could be a group, but could also be a single user. The user could be an AD user (replicated to AAD), but a native cloud user would work as well. Even if your admin shows up with “Default” access, add the admin user again, and give it the TenantCreator role.
Go to Azure Active Directory in the portal, and click Enterprise Applications. Search for Windows Virtual Desktop and open it’s properties. There select Add user, type the username and select TenantCreator as the role.
The next part is based on PowerShell. In there we will create a Tenant and a service principle we will grant access to this new tenant which we will need later to automate the creation of the WVD images and attach them to our deployed system.
To get the SubscriptionID, run: Get-AzSubscription and check the ID for the subscription you want to use:
Set the attributes we will need later on:
 $SubscriptionID='24890e81-blabla' #Azure SubscriptionID
 $RDSTenantName='AzureInfraRDS'
 $HostPoolName='NE-Pool10'

# Install the RDSWeb module if not already installed
 Install-Module -Name Microsoft.RDInfra.RDPowerShell

#Login to AzureAD
 Import-Module AzureAD
 $aadContext = Connect-AzureAD

#Log in with the new TenantCreator account
 Add-RdsAccount -DeploymentUrl https://rdbroker.wvd.microsoft.com

# Create the new tenant
 New-RdsTenant -Name $RDSTenantName -AadTenantId $aadContext.Tenant.id.guid  -AzureSubscriptionId $SubscriptionID

# Login with Azure AD – use an admin that can create SP’s
 $svcPrincipal = New-AzureADApplication -AvailableToOtherTenants $true -DisplayName "Windows Virtual Desktop Svc Principal"
 $svcPrincipalCreds = New-AzureADApplicationPasswordCredential -ObjectId $svcPrincipal.ObjectId
 New-RdsRoleAssignment -RoleDefinitionName "RDS Owner" -ApplicationId $svcPrincipal.AppId -TenantName $RDSTenantName
 Write-host ("AppID: " + $svcPrincipal.AppId) #==AppServiceID
 Write-host ("AppPW: " + $svcPrincipalCreds.Value) #==AppPassword
 Write-host ("AADID: " + $aadContext.TenantId.Guid) #==AADGuid
This concludes the PowerShell part for now.
Creating the Host Pools (actually deploying VM’s)
After the RDS tenant has been created, we can deploy the Host Pool. For this, go to the marketplace in the Azure portal and type Windows Virtual Desktop
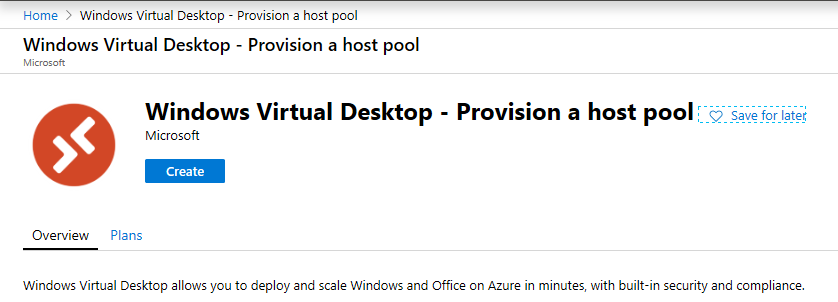
Click create to start the wizard.
Type the name for the resource group to be used, the region and the hostpool name. This name can be copied from the value we used in PowerShell earlier (UAE-Pool1).
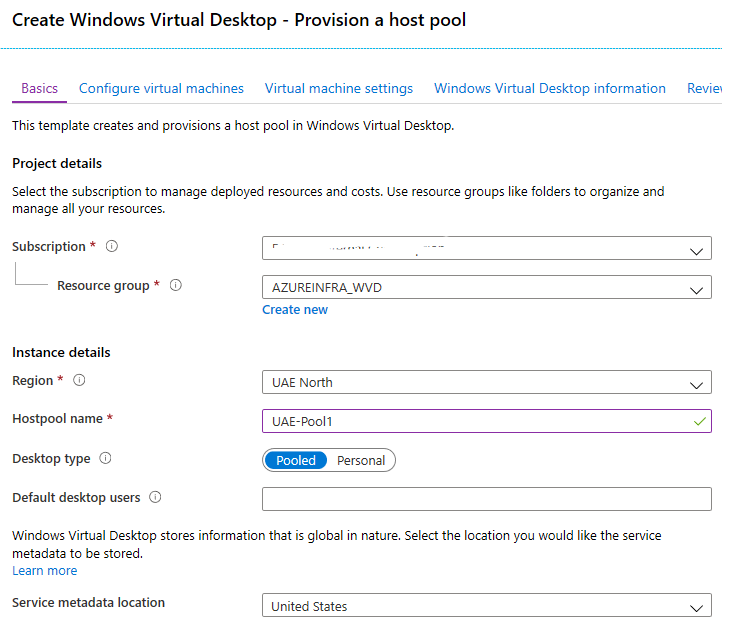
Here you can also select the Desktop type. If you want multiple users to share the same VM (at the same time), select Pooled. You can also use Personal, so each user will get his/her own VM to work on.
Next, select the VM size to use, and how many. The Usage Profile automatically suggests a size and amount of VM’s to use based on the profile and amount of users, but you may want to change those settings. Also set a prefix for the VM names. Say you say: UAE-WVD, the naming of the VM’s will be according to:
UAE-WVD-0
UAE-WVD-1
UAE-WVD-x
On the next page, you can provide the template in the form of the URL to the blob (exported earlier). And then select the disk-type. If you used Pooled, my advice is to set this to Premium SSD. Type the account (and password) for the AD Join account (in full UPN) and select Specify domain or OU. Type the domain name (domain.local) and the OU in distinguishedName format: OU=VDI,DC=domain,DC=local.
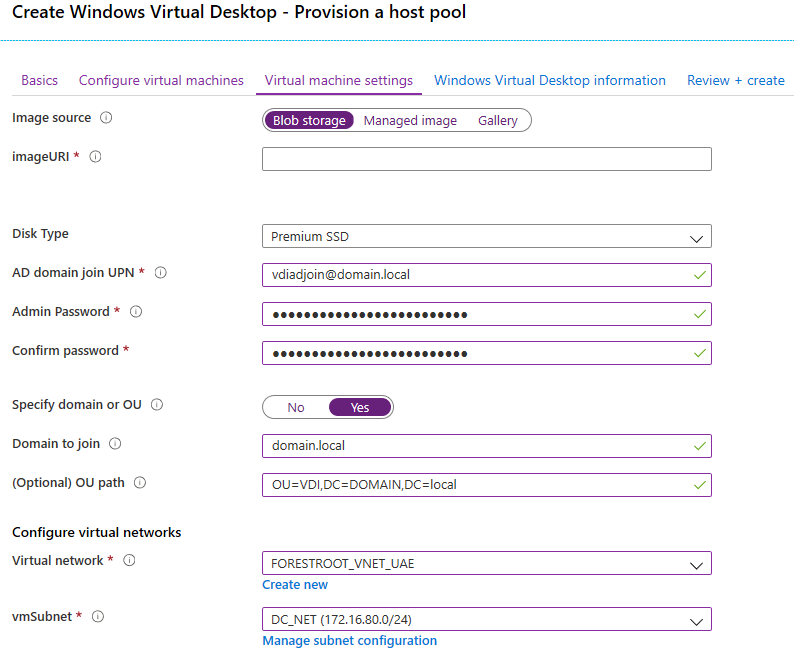
Configure the network and subnet (subnet DNS should be able to find your DC) and click next
Note: The WVD images will need to be able to connect to the RDSHostPool through internet. If you have disabled internet for the subnet (through routing or NSG’s), make sure to read the appendix.
On the next page , leave the Tenant Group Name as Default Tenant Group and set the Windows Virtual Desktop tenant name to the tenant name provided earlier: AzureInfraRDS
Next, set the RDS Owner to Service Principal and type the values retrieved from PowerShell for the $svcPrincipal and the AAD tenantID:
$svcPrincipal.ObjectId

$svcPrincipalCreds.Value

$aadTenantID

Click create and have the system create the image for you.
This action will deploy the number of VM’s specified from the template provided. If the deployment fails, it usually fails because of 3 reasons:
- AD join –
- your subnet is not configured to connect to your AD on L3
- DNS configured on the subnet (VM cannot find the domain controller)
- User password for domain join is wrong
- RDSHost Join –
- Your subnet does not allow outbound internet (VM cannot register itself in RDS)
- Your service principal is not created or doesn’t have permissions on the RDS Tenant
- Other (Azure /image related) –
- The number cores requested exceeds the core limit
- Your image was not prepared correctly
If your VM was deployed, you can login with administrative credentials from your AD (if joined) or reset the local administrator credentials, log-in locally and check the logfiles/event log.
Publishing Applications and Desktop
Now that your WVD pool is deployed, it’s time to publish applications or the entire desktop. To publish applications, we first need to create an Application Group. We will add users later to this application group and obviously the applications this group has access to.
$AppGroup1=New-RdsAppGroup -TenantName $Tenant.TenantName
-HostPoolName $hostpool.HostPoolName -Name "AppGroup1"
there are two options. First, we can get all the applications that are published on the start-menu
#Create an object with all start menu items
$AllApps=Get-RdsStartMenuApp -TenantName $Tenant.TenantName -HostPoolName $hostpool.HostPoolName  -AppGroupName $AppGroup1.AppGroupName
Let’s say we wanted to make Word available, we could filter the retrieved output:
#Search for *word* in the start menu (in variable $allApps)
$allapps |where {$_.FriendlyName -like '*Word*'}
The output would spit out Wordpad and Winword, so we could filter even more:
#Retrieve the application “Word” and put it in an object
$word=$allapps |where {$_.FriendlyName -eq 'Word'}
To publish this app (into the AppGroup) we need to issue the following command:
#Add an application from the start menu to an app group
New-RdsRemoteApp -TenantName $Tenant.TenantName -HostPoolName $hostpool.HostPoolName -AppGroupName $AppGroup1.AppGroupName -Name $word.FriendlyName -AppAlias $word.AppAlias
But what if we wanted to publish an (internal) website? For this we can use a custom application based on the installed browser. In this case, I’ll assume a very old website that only works under Internet Explorer
#Grab Internet Explorer application from Start Menu
$IE=$AllApps | where {$_.FriendlyName -eq 'Internet Explorer'}
$Name='Azure Infra Blog'
$URL='blog.azureinfra.com'

#Create a new Internet Explorer shortcut for a new application
New-RdsRemoteApp -TenantName $Tenant.TenantName -HostPoolName $hostpool.HostPoolName -AppGroupName $AppGroup1.AppGroupName -Name $Name -FilePath $IE.FilePath -CommandLineSetting Require -IconIndex $IE.IconIndex -IconPath $IE.IconPath -RequiredCommandLine $URL
And this is also how you can add applications that are not in the start menu:
$CustomAppName='Corporate App'

$CustomAppFilePath='c:\CorpApps\Myapp.exe'

$CustomAppIconPath='c:\CorpApps\Myapp.exe'

$CustomAppIconIndex=0

New-RdsRemoteApp -TenantName $Tenant.TenantName -HostPoolName
$hostpool.HostPoolName -AppGroupName $AppGroup1.AppGroupName -Name $CustomAppName
-FilePath $CustomAppFilePath -IconIndex $CustomAppIconIndex  -IconPath $CustomAppIconPath
Granting users access
Once you have all the applications in a group, you need to assign users to it. While it would be really easy to do this based on groups, the system doesn’t allow for that (yet). See the appendix for this. In the meantime, per user (who should exist in AAD + AD):
#Granting users access to an application group
Add-RdsAppGroupUser -TenantName $Tenant.TenantName -HostPoolName $hostpool.HostPoolName -AppGroupName $AppGroup1.AppGroupName -UserPrincipalName username@YourCompany.COM
So, what about a full desktop? While you can create multiple application groups (and assign those to users), there is also a default “Desktop Application Group”. A user can only be assigned to either induvial application groups or the Desktop Application Group. Once a user has full access to the desktop of a pool, the application groups (in that pool) will not be usable again for that user.
#Granting users access to the full desktop
Add-RdsAppGroupUser -TenantName $Tenant.TenantName -HostPoolName $hostpool.HostPoolName -AppGroupName 'Desktop Application Group' -UserPrincipalName username@YourCompany.COM
Granting access by AD Group
As users can only be added one-by-one through the above commands, I’ve written a script that will automate this for AAD groups. Just adding users to the AAD Group is enough to provide access to the AppGroup if the script runs automated.
See: https://blog.azureinfra.com/2020/01/04/windows-virtual-desktop-group-sync-script/
To login to the desktop/applications
Instruct your users to browse to https://rdweb.wvd.microsoft.com/webclient/index.html or install the Remote Desktop Client and subscribe to the RDweb url (or just login)
However, given the webclient URL is hard to remember, you can also deploy an Azure Web App and provide a redirect.
For this, deploy a new WebApp in Azure on at least a D1 app plan (under Dev/Test) as this is the smallest plan that allows for custom domains. Deploy the web app and go to the Advanced Tools. A new window will open. Go to Debug Console. There select either PowerShell or CMD. Browse to site/wwwroot and click the + sign on the top to create a new file
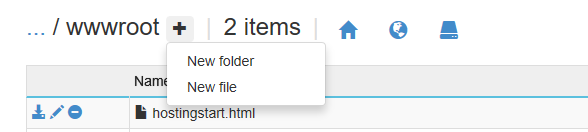
give the name web.config for the file and paste the following code in the file:
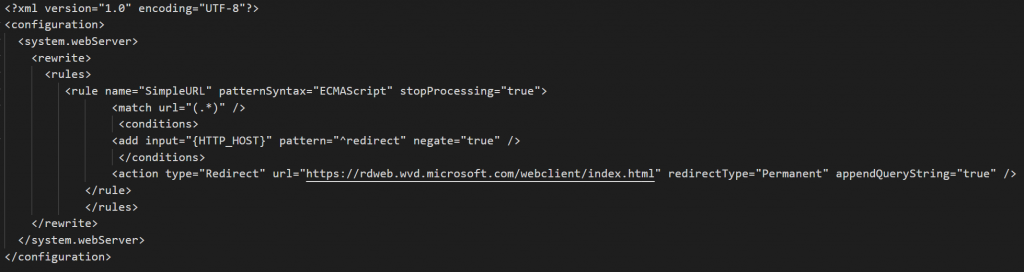
Next, configure a custom domain on the web app. I used remote.azureinfra.com, but you could use your own domain. Now instruct the user to use that custom domain and it will automatically redirect the user to the correct URL.
The leftover image
The template VM is still there, but it will not be bootable anymore. This as the sysprep rendered it useless. Delete the VM and the disk. The snapshot we created earlier can still be used later to provision a new template VM from. Which can be found on the following URL
Or if you leave the original template intact, you could redeploy it based on the snapshot as per the link below: