When we deployed our WVD VM’s, these VM’s are basically Windows 10 VM’s that allow multiple users to login. When users login to pooled VM’s they can be redirected to any of the available VM’s in a pool, and ideally we want to ensure that the users’ profile is the same on all of those.
In regular Domain joined VM’s we configure “Roaming Profiles” for users and ensure that this profile is stored on a fileshare somewhere. As Microsoft purchased a technology called FSLogix, this allows us to optimize the usage of Roaming Profiles.
With “regular” roaming profiles, all the files are copied individually from a fileshare. Causing a high overhead in IOPS and network utilization, and ultimately a slow copy of the file. With FSLogix, the entire profile is encapsulated in a “container” which is copied in full. So instead of copying hundreds or thousands of files, the system copies / mounts a single file which is a lot faster.
The installation of FSLogix is super simple. You install an agent and done. To configure the agent you can opt to add a registry key (directly in the image) or through group policy (through group policy preferences or through the ADMX files available in the installer).
The backend configuration requires a fileshare where “users” can store their container. This will be handled by the system. This fileshare can be on a standard fileserver, a NetApp appliance in Azure or Azure files with AD Domain Services or Azure AD Domain Services integration.
In this post, we will look at Active Directory Domain Services and Azure Files as the backend as this seems to be the most cost effective.
Azure Files and AD integration
I already have Active Directory Domain Services up and running. This as it is obviously required for Windows Virtual Desktop to operate.
Storage Account creation
I’ve created a new storage account with the following details:
- Name: azureinfrafiles
- Location: UAENorth
- Performance: Standard
- Account Kind: Storagev2
- Replication: LRS
- Access Tier: Hot
- Networking: PrivateEndpoint
- Name Azureinfraendpoint
- Location: uae
- Sub-resource: file
- Virtual-network: WVD-Network
- Subnet: WVD-Pool
- Integrate with private DNS: no
- SecureFileTransfer: Required
- LargeFileShares: Enabled
- BlobSoftDelete: Disabled
- Data Lake Gen2: Disabled
- FileShare: Files
As you can see, I created a private endpoint. This means that the fileshare is not publicly available and only our WVD VM’s (and our setup VM) can access the fileshare and configuration of the fileshare.
Next, make sure to have a domain joined VM on the subnet with the private endpoint. Secondly, make sure that VM can connect to the storage account by adjusting the hostsfile or by adding a DNS entry in the DNS server (storagename == privateIP of storage account). – for DNS see below:
Once confirmed that the full storage accountname (azureinfrafiles.file.core.windows.net) points to the private IP (by ping / nslookup) we can continue with the configuration.
Run the configuration as per https://docs.microsoft.com/en-us/azure/storage/files/storage-files-identity-auth-active-directory-enable. You need to download a PowerShell script and execute the link between Azure Files and Active Directory. In order to execute this, make sure the logged-on user (that is executing the script) has “create privileges” in the specified OU for either service accounts or computer accounts. In my configuration I specified a Computer object and the WVD OU:

The downside here is that the OU needs to be a top-level OU (as it’s specified as OU name and not distinguishedName).
Setting file permissions on the share
When the integration is done, we now need to set permissions on the fileshare. Note that computers wont be able to utilize the file share under their account, but users and groups should not be a problem. Given I’ve already written a script to replicate users in a group to WVD, it would make sense to use the same groups in Azure AD to assign permissions to the fileshare.
So, I’ve added the WVDDesktopUsers (and other WVDappusers) groups to the fileshare IAM blade as Storage File Data SMB Share Contributors

We should now have an Azure Files share with AD integration ready.
Testing the Azure File Storage AD integration
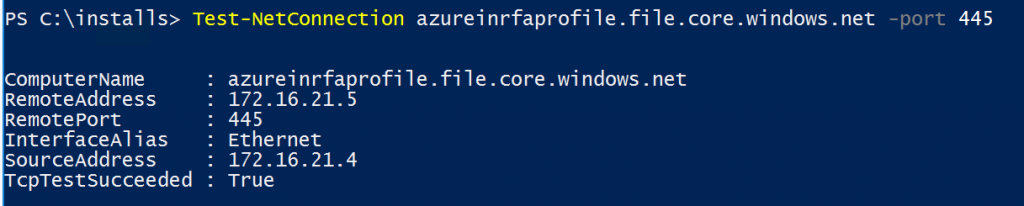
I’ve deployed a VM on the virtual network that will be my WVD pool network. I added a DNS entry for the storage account so, it will be available through the private IP address on that same subnet only. Next is to test the SMB share access:
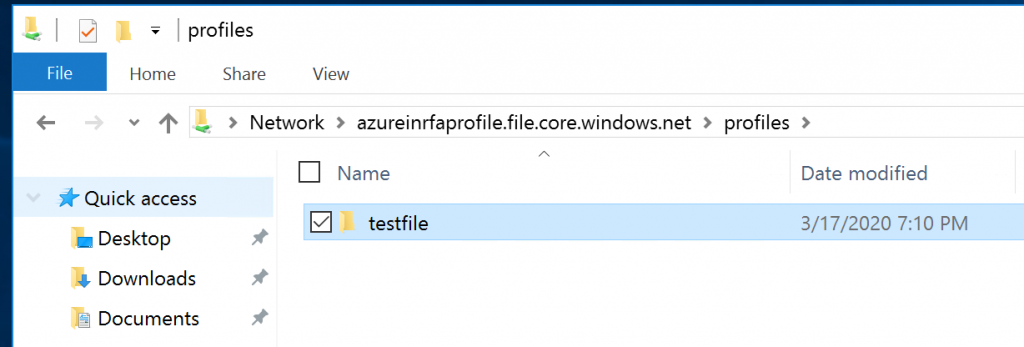
And finally, if you login with a user to the machine that is a member of the group that has been granted access to the share, you should be able to open the share directly:
FSLogix Deployment
On the WVD Template install the FSLogix plug-in. Instructions can be found on https://docs.microsoft.com/en-us/fslogix/install-ht. you will only need to install the FSLogixAppSetup.exe.
For the configuration, there are multiple ways, you can either install the Group Policy extensions, or configure a group policy preference (avoids copying files into the group policy editor).
- Group Policies via ADMX files: The FSlogix install includes an ADMX and ADML file.
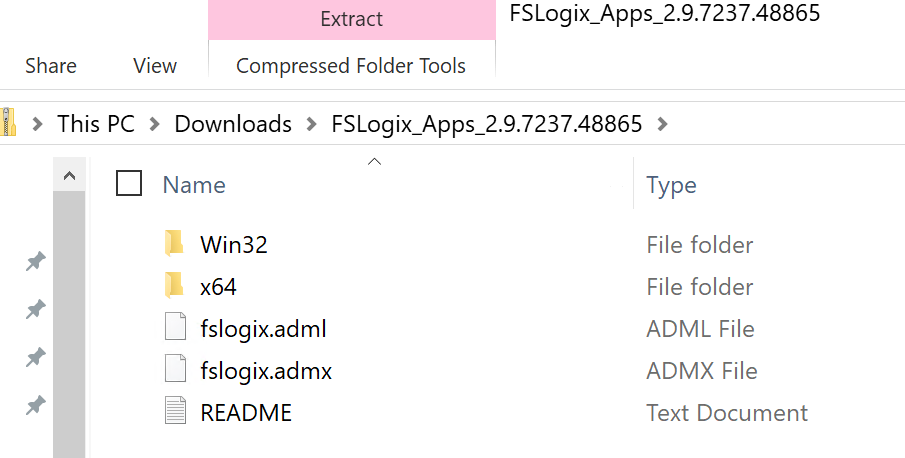
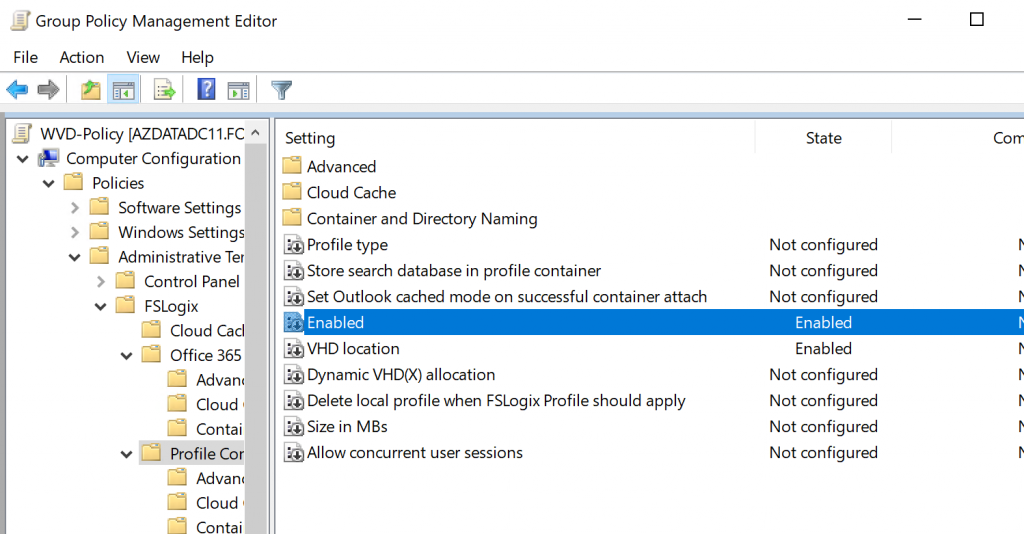
Copy these files on your domain controller to the Group Policy folder (the ADMX file goes into C:\Windows\PolicyDefinitions and the ADML goes into C:\Windows\PolicyDefinitions\En-US) or your shared Group Policy folder on Sysvol if you have enabled a central store for group policy definitions: https://support.microsoft.com/en-us/help/3087759/how-to-create-and-manage-the-central-store-for-group-policy-administra Next, fire up a Group Policy editor and create and link a new policy to the OU destined for the VDI computers (the one specified in the deployment of the pool). Under Administrative Templates you should now see FSLogix.
There are a lot of settings and you might be overwhelmed. Rest-Assured the top level is solely about logging in case things do not work as expected. The most important settings are under Profile Containers\VHD Location and Profile Containers\Enabled. Fill in the path to the file share we created earlier. In my case, \\azureinrfaprofile.file.core.windows.net\profiles
2. Using GPO to set a registry key – you can also set the VHD location using a Group Policy Preference or directly in the registry editor of the template image. For this, create the following regKey and value: HKLM\SOFTWARE\FSLogix\Profiles.
Enabled – DWORD – 1 (mandatory)
VHDLocations – MULTI_SZ – \\fileserver\fileshare
And that is it.. you can now deploy your WVD pool as desired with Azure Files backing your users profile
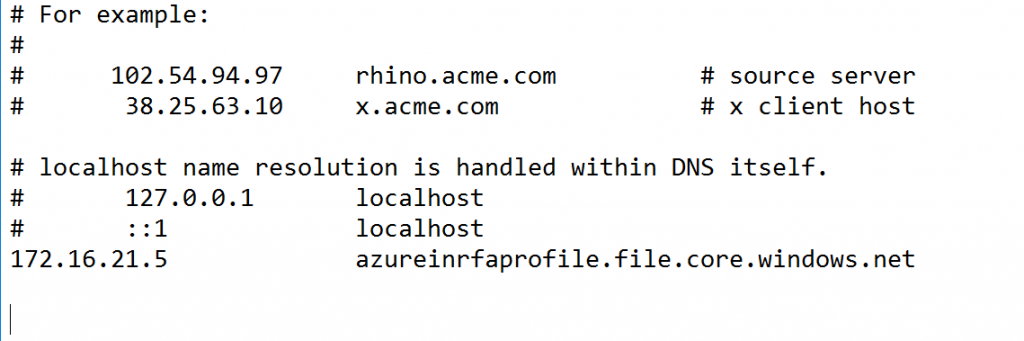
DNS entry for AzureFileShares
As indicated above, instead of manually editing the hosts file of every node (or template) you can also control the name resolution through DNS. For this, open DNS on your domain controller (or other DNS server), create a new zone (I chose AD integrated – no dynamic updates) and give it the name of the full private endpoint. Next when the zone is created, create 1 entry without a name and only the IP address of the private endpoint of your storage account:

1 thought on “Windows Virtual Desktop – Profile Management with Azure files & FSLogix”
Comments are closed.
[…] ← Windows Virtual Desktop – Profile Management with Azure files & FSLogix […]