One the of most annoying things is passwords. And as you might know, Microsoft is on a quest to remove them: which includes you users access to WVD. But unfortunately this is only possible in certain architectures where you have your users authenticate to AAD using ADFS, have a backend (Windows 2008 or higher) PKI system and some technical tricks up your sleeve.
Note that a problem in the LSASS.exe process could make the VM’s in WVD using this SSO configuration unresponsive or blue-screen, do not use this in production yet as it is not supported by Microsoft, but if you want to test it – Let’s dive in:
Architecture (in short)
The way it works (in simple terms) is that users authenticate to ADFS to authenticate to AAD when they reach the WVD portal. Once they click a desktop or application, the WVD system will use its own federated trust to request a smartcard login certificate from the PKI service (through ADFS) and uses that smartcard certificate to login to the backend WVD VM that the user.
Which brings us directly to the components and what we need to setup:
AAD + ADFS
If you have your AAD setup with ADFS (Windows Server 2016 or 2019), make sure to have a fully supported setup. This should be easy and if not installed, it can be fully managed from Azure AD Connect. https://docs.microsoft.com/en-us/azure/active-directory/hybrid/how-to-connect-fed-whatis
Certificates / PKI
You will need an enterprise AD integrated based PKI solution. This can be installed through the Active Directory Certificate Services role.
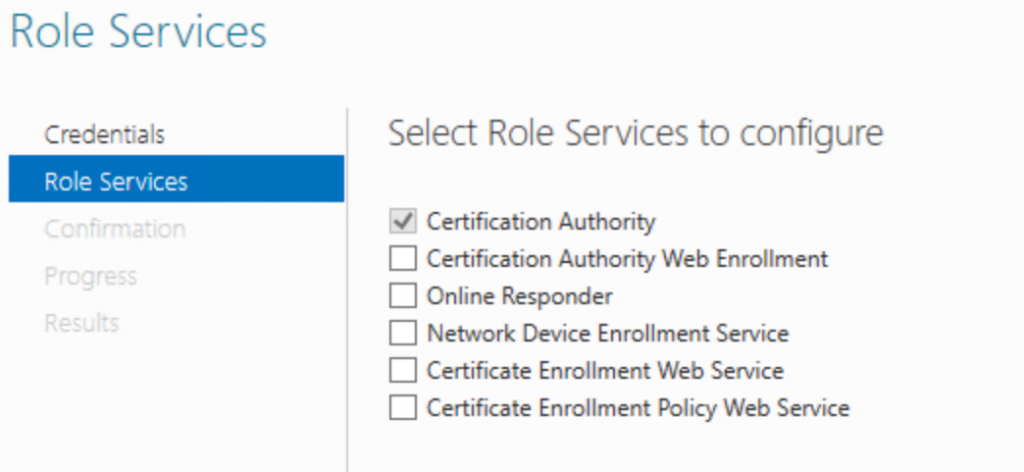
Make sure that the CA is AD integrated and configured.
Next is the creation of the certificate templates that the ADFS server will use. We need to create 2 new certificate templates:
- ADFS WVD Enrollment Agent (a copy of the Exchange Enrollment Agent (offline request) template)
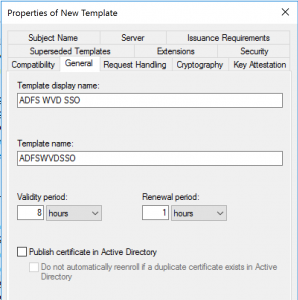
- ADFS WVD SSO (a copy of the Smartcard Logon template)
Go to Certificate Templates (on the CA server or install the ADCS management tools) and right click the Exchange Enrollment Agent (offline request) template and click duplicate.
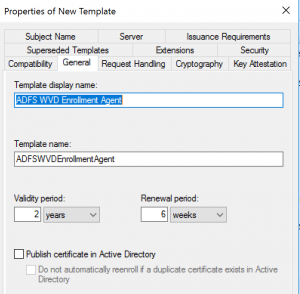
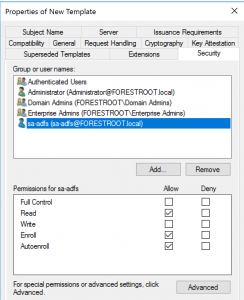
In the General tab, rename the certificate to ADFS WVD Enrollment Agent and write down the TemplateName for later use. Next, go to the security tab and click add…. Select the ADFS service account (if installed via Azure AD Connect this is aadcsvc$) and grant the Enroll and Autoenroll permissions. Click OK to close and save the template.
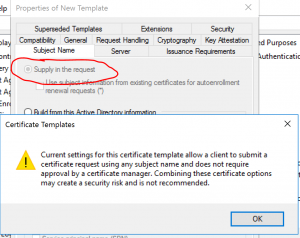
Right click the Smartcard Logon certificate and select duplicate. In the general tab type ADFS WVD SSO and write down the TemplateName for later use. On the same tab, set the Renewal Period to 1 hour and the Validity Period to 8 hours.
Go to the Subject Name tab, and select supply in the request (Accept the warning shown) and then go to the Issuance Requirements tab. There, select, The number of authorized signatures… and set it to 1. For the application policy field select Certificate Request Agent. Lastly, go to the security tab and add the service account for the ADFS server and select Enroll and AutoEnroll permissions.
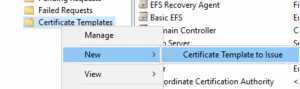
On the Issuing PKI server – go to Certificate Templates, right click it and select New … Certificate Template to Issue and select both newly created templates.
ADFS Setup
Next, on your 2016 or 2019 ADFS server you need to enable the ADFS service and make it an enrollment agent. To do this, open PowerShell on the ADFS server and type:
Set-AdfsCertificateAuthority -EnrollmentAgentCertificateTemplate
'ADFSWVDEnrollmentAgent' -LogonCertificateTemplate 'ADFSWVDSSO'
-EnrollmentAgent
Note that the values should come from the noted-down earlier TemplateNames from the certificates (without spaces).
For the next part, it is best to have your ADFS server (and your username) to have full internet access (or at least access to Azure / AAD / WVD). You will need to run a script, the script essentially creates a new Relying Trust on the ADFS server.
Download the script from: https://www.powershellgallery.com/packages/ConfigureWVDSSO/1.0.0.0/Content/ConfigureWVDSSO.ps1
Or install it through a single command: Install-Script -Name ConfigureWVDSSO
Once it is installed, run the following command:
$config = .\ConfigureWVDSSO.ps1 -WVDClientAppApplicationID
"fa4345a4-a730-4230-84a8-7d9651b86739"
-WVDWebAppAppIDUri "https://mrs-prod.ame.gbl/mrs-RDInfra-prod"
-RelyingPartyClientName “WVD ADFS Logon” -ADFSAuthority
"https://myadfs.mydomain.com/adfs" -RdWebURL https://rdweb.wvd.microsoft.com
Where the only changes you must make is to replace myadfs.mydomain.com with your actual ADFS URL. The rest (applicationID, AppIDURI etc etc stays exactly as stated in the command).
This will add a relying party to your ADFS server.
The command will provide an output. You must copy the output to another server if your ADFS server does not have the RDS PowerShell CMD’lets available.
RDS Configuration
Login to the RDS tenant:
Import-Module -Name Microsoft.RDInfra.RDPowerShell
Add-RDSAccount -DeploymentUrl https://rdbroker.wvd.microsoft.com
For each WVD tenant that you have run the following command:
Set-RdsTenant -Name "MyTenant"
Set-RdsTenant -Name  MyTenant -SSOADFSAuthority $config.SSOADFSAuthority -SSOClientId $config.SSOClientId -SSOClientSecret $config.SSOClientSecret
Where the values of $config.SSOADFSAuthority, $config.SSOClientId and $config.SSOClientSecret are the ones retrieved from the earlier script. Once you have set this for all your tenants that you want SSO on, make sure to reboot the VM’s of those tenants to ensure the new settings are applied.