When deploying Active Directory, it has been a tradition to set the DNS IP addresses on clients to match the nearest Domain Controller to the clients. This means that every DHCP scope in the organization has to have different IP addresses for the name servers and administrators have to manually ensure everything is configured correctly.
There’s a number of downsides to this implementation. When the “primary DNS” server is rebooted, clients are impacted as they need to failover to their secondary configured DNS server which in some cases does not work as expected. When changing the IP address of a domain controller, DHCP scopes have to be reconfigured and all clients rebooted and in short – it’s annoying to “find the IP address of the nearest DC in this site”, and to have to remember which secondary IP is used.
So, what if all your domain controllers could have 1 IP address that you can use for all your clients. As in…. 1 IP address you can configure on any client (Windows, Linux, Network, etc) which resolves to any domain controller on the network at any given location – with fault tolerance and network path optimization built-in?
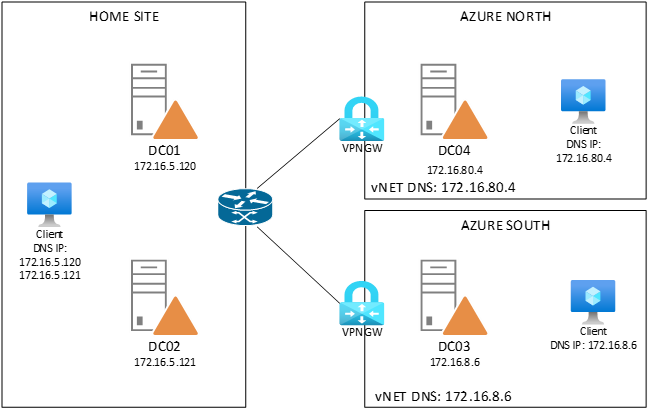
Since Windows Server 2016 – you can – with something called Anycast, and it works because of smart usage of BGP. The protocol that advertises routes through a network. In the picture below is my setup showing 4 domain controllers in 3 sites. For the fun of it, I’ve added 2 sites in Azure (so we’ll see how to inject the routes to the vnet). As you can see, each domain controller has a primary (regular) unique IP address that matches the subnet of the site. Each DC also has an extra IP address that is the same for all DC’s: 51.51.51.51.
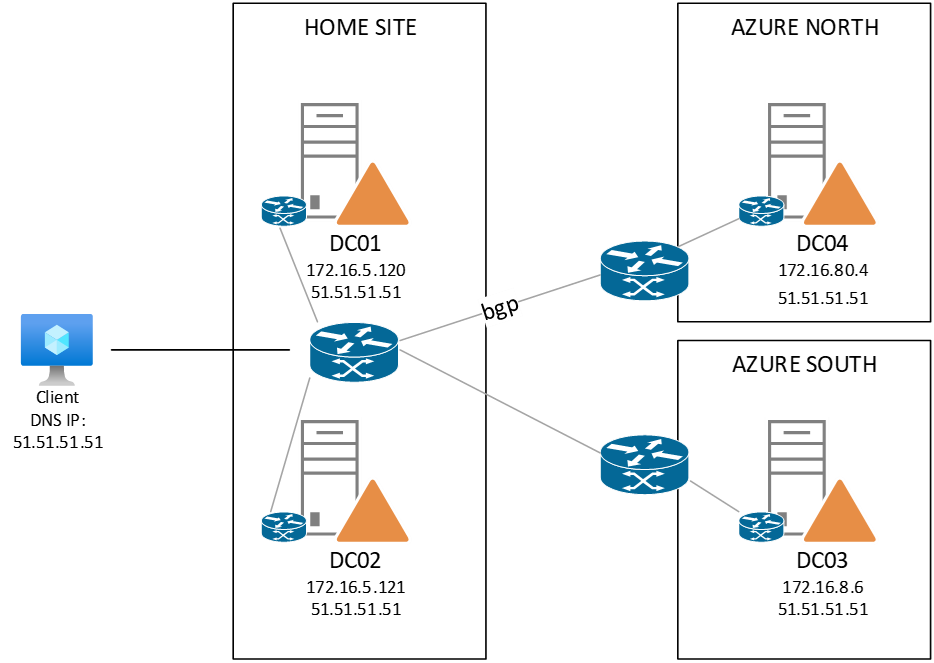
The extra IP address is added on a loopback adapter that is installed on the DC. The adapter has some specific services disabled (such as register this connection in DNS) to avoid conflicts, but the services of the domain controller are available on the 51.51.51.51 address.
In short – we want to ensure that our client on the left can be configured with a DNS primary server of 51.51.51.51 and that ANY domain controller in the network can help that client with DNS queries.
(small note on the AnyCast IP: 51.51.51.51 is a public IP address – I wanted to keep this post aligned with my other AnyCast posts, but internally I have changed my AnyCast IP for DNS to 172.16.51.51/32 to avoid publishing public IP’s on my internal network – so you can find-replace any 51.51.51.51/32 to whatever internal /32 IP you want)
Now that ‘’51 address is not advertised in the network at all and is “isolated” within every DC. So, every DC also gets routing and remote access installed and will act as a router itself between the primary IP (172.16.x.x/24) and the secondary IP (51.51.51.51/32). Meaning if we were to create a static route on our client, we would specify route add 51.51.51.51 mask 255.255.255.255 172.16.x.x. But instead of putting in manual routes, we will have the routers on the Windows Servers (DC’s) publish a custom route to the network. Meaning; each DC will advertise the 51.51.51.51/32 network through BGP on our routers and as all DC’s do the same thing, we now get multiple routes to the 51.51.51.51/32 network – each handled by the DC’s primary IP’s

(Example of published route – over multiple IP’s in this case a /24)
This allows us to publish ALL the DNS services of a domain controller on a single IP address. As soon as a DC gets rebooted or has it’s IP address change, the BGP information removes that route to the primary IP address and the DNS client will be rerouted automatically by the network to another DC / DNS server.
Creating the local network adapter
Each domain controller (or DNS server) gets another loopback adapter that we give the “Anycast” IP address. In our case 51.51.51.51/32 and we ensure that non-essential services are disabled on it. This can be done via PowerShell on Windows Server 2016 or higher:
$primary_interface = (Get-NetAdapter |?{$_.Status -eq "Up" -and !$_.Virtual}).Name
$loopback_ipv4 = '51.51.51.51'
$loopback_ipv4_length = '32'
$loopback_name = 'Loopback'
Install-Module -Name LoopbackAdapter -MinimumVersion 1.2.0.0 -Force
Import-Module -Name LoopbackAdapter
New-LoopbackAdapter -Name $loopback_name -Force
$interface_loopback = Get-NetAdapter -Name $loopback_name
$interface_main = Get-NetAdapter -Name $primary_interface
Set-NetIPInterface -InterfaceIndex $interface_loopback.ifIndex -InterfaceMetric "254" -weakHostReceive Enabled -WeakHostSend Enabled -DHCP Disabled
Set-NetIPInterface -InterfaceIndex $interface_main.ifIndex -WeakHostReceive Enabled -WeakHostSend Enabled
Set-NetIPAddress -InterfaceIndex $interface_loopback.ifIndex -SkipAsSource $True
Get-NetAdapter $loopback_name | Set-DNSClient –RegisterThisConnectionsAddress $False
New-NetIPAddress -InterfaceAlias $loopback_name -IPAddress $loopback_ipv4 -PrefixLength $loopback_ipv4_length -AddressFamily ipv4
Disable-NetAdapterBinding -Name $loopback_name -ComponentID ms_msclient
Disable-NetAdapterBinding -Name $loopback_name -ComponentID ms_pacer
Disable-NetAdapterBinding -Name $loopback_name -ComponentID ms_server
Disable-NetAdapterBinding -Name $loopback_name -ComponentID ms_lltdio
Disable-NetAdapterBinding -Name $loopback_name -ComponentID ms_rspndr
Note that the install-module and new-loopbackadapter commands download modules from internet (PowerShell Gallery) The scripts results in the following changes on GUI level:

But this only created the network adapter itself. We also need to be able to route to the adapter through routing and remote access. Don’t worry, the remote access part won’t be installed and your server is not magically opened to the outside world. We want to use the routing capabilities of RRAS only and then on top of that the BGP components of RRAS. To install on Windows Server 2016:
Install-WindowsFeature RemoteAccess
Install-WindowsFeature Routing
Install-WindowsFeature RSAT-RemoteAccess-PowerShell
Install-RemoteAccess -VpnType RoutingOnly
Which leaves us with the configuration of BGP. Now in my scenario I have multiple devices that can do BGP and Azure is another section in itself (covered later). For now, let’s stay on-premises and configure the BGP peering on my Juniper central firewall. As you might have seen in my previous posts, BGP can be very complicated, but we will keep it simple here. BGP has a “peering IP” (the IP address that it publishes BGP information on) – and an AS number. When setting up a peering, the peering IP and ASN must match. That’s about it (for now). In a drawing it looks like:

And this establishes the connection between the two routers. In order to do this, on the Windows Server we use PowerShell to configure the Peer-IP and add the connection to the Juniper:
Add-BgpRouter -BgpIdentifier "172.16.5.120" -LocalASN 65511
Add-BgpPeer -Name "Juniper" -LocalIPAddress 172.16.5.120 -PeerIPAddress 172.16.5.1 -PeerASN 8075 –LocalASN 65511
Finally, we need to push the route “51.51.51.51/32” pointing to the primary IP of the DC to the Juniper which we can do by issuing in PowerShell an add-bgproute
Add-BgpCustomRoute -Network 51.51.51.51/32
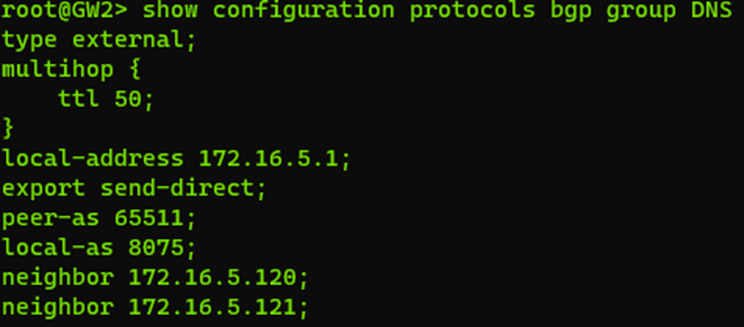
Juniper side
On the Juniper side we need to configure the BGP configuration also. While I won’t go into detail on all the configurations (this is covered in an earlier post) – the following configuration was made:
And this concludes the on-premises configuration. In order to test, we can take our client and actually ping the 51.51.51.51 address and it should respond. Now before we go and change all the DHCP scopes, we also need to ensure DNS is responding on this address and we can actually perform a failover as well. By performing nslookup and setting the server manually to 51.51.51.51 and querying we can test and also validate 51.51.51.51 is not present in the DNS records:
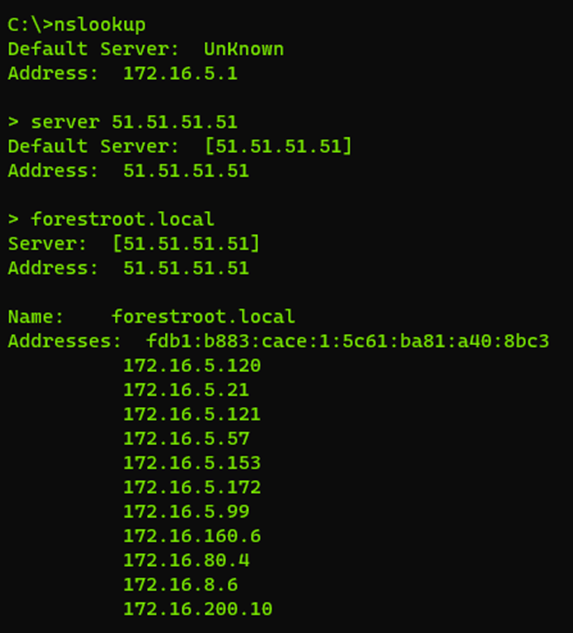
While performing nslookups, you can reboot domain controllers or remove the BGPCustom route temporarily and see the failover happening for clients.
Azure
Which leaves us with Azure. Now in Azure, configuring BGP is a bit more tricky, or at least it used to be. In Azure we now have something called Route Server. This component injects the routes published to it into the vNET (and peered vNETs if configured). This means that we can now publish the specific DNS IP address from our VM into the Azure vNET using the same technique. So, we need to deploy a route server, which is where the problems begin to arise. In order to deploy route server you need to have a /27 subnet called “RouteServer” which is only the start. If you already have deployed a VPN gateway you need to make sure it’s in an active-active mode.
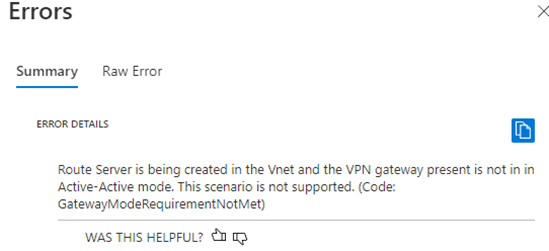
Switching to Active-Active mode is relatively easy and can be done on the configuration blade in the portal or through PowerShell – but be aware that this changes the “azure BGP” addresses for the gateways and therefore you have to reconfigure your FW/VPN configuration as a result.
After the route server is deployed, you first have to enable branch-to-branch traffic via Update-RouteServer -AllowBranchToBranchTraffic or the switch on the portal under the configuration blade. Also take a note of the private IP addresses and ASN provided to the RouteServer which are visible on the “overview” blade in Azure. Once that is done, we need to add the Peer (the domain controller/DNS server in Azure) so under peers I added the DC’s IP address and peer ASN.

Lastly, I added the peer on the DC using the same PowerShell commands as above.. and behold:
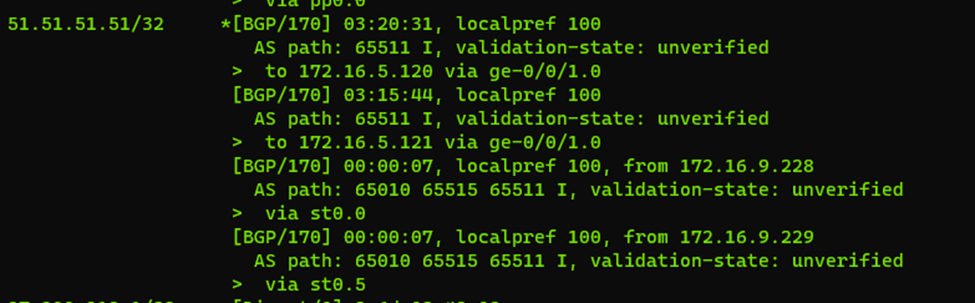
In our Juniper BGP (the default gateway for all my on-premises machines) I have 4 entries for my 51.51.51.51/32 address space. Where two of these are via the redundant VPN connections to the DC in Azure and two of these are to the local DC’s. I’ll add the 4th one later, as that one is on a peered network, but it should all be the same. As soon as the DC/router publishes the 51’ address to the route server in Azure – it will show up here as well.
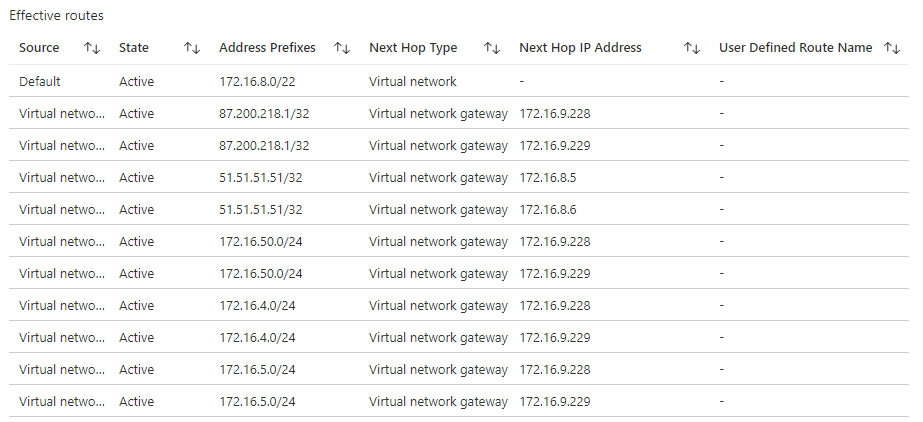
The Azure problem
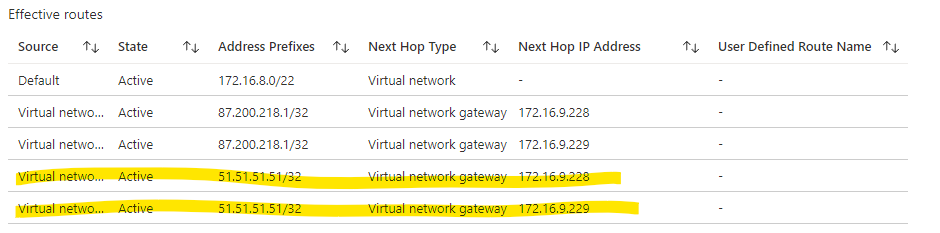
While I managed to send the published routes from my Juniper to the Azure VPN GW (and they are visible as published routes on the Azure VPN GW) – the Azure Route Server does not seem to like these routes because the local (Azure advertised route) takes precedence. This means that the unique IP address 51.51.51.51/32 as advertised from on-premises stops working as soon as an Azure VM publishes the same route. VM’s on the VNET containing the Route Server can send their route information – and this will be active on the vNET itself, even in a redundant configuration.
So it would still be possible to use the same unique IP address on-premises and in Azure, but the on-premises routes are not active on the vNET until all Azure BGP advertising services for that subnet go offline..
To publish my learned routes from Juniper to Azure, I added the following statement to the bgp DNS group in the configuration
#protocols bgp group DNS
vpn-apply-export
In summary:
- Juniper can send it’s learned routes from the DC/DNS servers to Azure and they show up in the VNET route table
- As soon as an Azure VM advertises the same route(s), the Juniper routes are discarded and Azure based advertised routes take over
- As soon as the Azure VM stops advertising, the Juniper routes take over again
meaning we now have a fully redundant setup
I also tried to link up my Juniper directly with the Route Server – to push my routes directly into that, but that didn’t seem to work either and it looks like RouteServer only accepts Azure based BGP traffic..
so, we are left with a ‘split-brain’ architecture in most cases as you usually want to have your DC/DNS servers in Azure anyway, but given DNS is highly resilient and redundant anyway.. this looks like the way to go.. and failover will happen anyway as soon as the Azure advertised routes are dropped
What’s next
As some of you (with way more knowledge on BGP) might have figured out, I’m no expert at it.. but I can get it to work. There’s probably a lot of optimization that can be done with the ASN numbers left and right. So you might want to consult with a real network architect on BGP Dampening, Communities etc etc.. and all the security features I did not implement in this small PoC.
What have I learned?
Well.. the old method of multiple DNS entries for a client is out of date, you can now run a single private isolated IP through BGP and configure your DNS on that. It will give you better redundancy and faster failover of the service.. but wondering.. did anyone do this in production on Windows DNS? I heard about BlueCoat doing implementations like this.. but as always.. Windows Server DNS services rock!
(reference: Anycast DNS overview | Microsoft Docs)