When deploying Windows Virtual Desktop in Azure you can use all the administrative credentials you can find as per the guide. But what if you are in a more “regular” environment where you don’t have “Domain Admin” and “Global Admin” permissions?
In that case, you follow this post where we will look at who needs to do what to make this all work…
In our scenario we will use the following accounts:
- Azure Admin
- To grant access to a resource group and a VNET
- Global AAD Admin
- To create the Enterprise Applications & Service Principal
- Domain Admin
- To create the OU, assign permissions and a GPO object
- AAD WVD Admin
- To manage WVD/RDS objects in Azure
- AD WVD Admin
- To join computers to the domain and run scripts
You could combine the first two accounts (don’t) and you could also combine the last two accounts (with a synchronized user account from AD). In my example I will keep all of them separate.
Azure AD Tasks
Now the guide published by Microsoft is not incorrect. You need to have some administrative permissions here and there to create the right users, set the right permissions and more. But you need them for:
- Azure Active Directory Global Admin
- Creating / Approving the WVD Applications in AAD
- Assigning the Tenant Creator / or setting the owner of the applications
- Creating an OU in Active Directory and setting up the initial group policies
So, let’s start with the first one, creating the applications in Azure AD. For this you will need to be Global Admin.
Let the AAD Global Admin login to the Windows Virtual Desktop server app, and then to the Windows Virtual Desktop client app.
The next thing the AAD Global Admin needs to do is create a service principle we will use later on during our deployment. This Service Principle will be granted access to the RDS tenant we will create and then used by the SessionHosts to connect to the tenant.
Import-Module AzureAD
$aadContext = Connect-AzureAD

$svcPrincipal = New-AzureADApplication -AvailableToOtherTenants $true -DisplayName "Windows Virtual Desktop Svc Principal"
$svcPrincipalCreds = New-AzureADApplicationPasswordCredential -ObjectId $svcPrincipal.ObjectId
Write-host ("AppID: " + $svcPrincipal.AppId) #==AppServiceID
 Write-host ("AppPW: " + $svcPrincipalCreds.Value) #==AppPassword
 Write-host ("AADID: " + $aadContext.TenantId.Guid) #==AADGuid
The output of the above is an AppID, an AppPassword and the AAD Tenant GUID. Write down these values for the AADWVDAdmin as they will need it later when deploying the host pool.
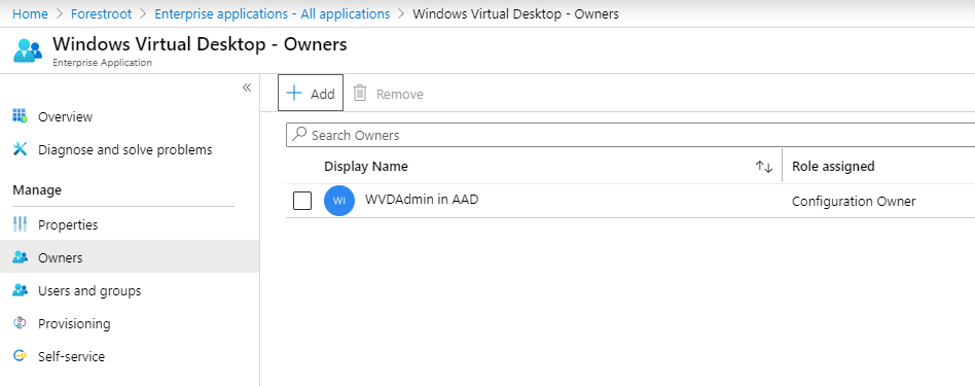
Next, we are delegating ownership of the Windows Virtual Desktop applications to our new AADWVDAdmin for management. For this we login to AAD, create the user and then assign the permissions to the Enterprise applications.
I created a the aadwvdadmin@mydomain.onmicrosoft.com account and assigned it Owner permissions to the Windows Virtual Desktop and Windows Virtual Desktop Client applications.
Note that you could technically have a separate account for the Client application as well.
Azure Tasks
To deploy our new WVD service we need to have access to a resource group in Azure and be able to deploy virtual machines in that resource group. We also need access to the join these new VM’s to an existing VNET that is setup according to the pre-requisites with DNS and Active Directory access.
First things first. An Azure subscription owner needs to setup a resource group and assign permissions to our AADWVDAdmin to deploy resources.
Login to the target Azure subscription (as subscription owner) with PowerShell, create a new Resource Group and give it a name.
$ResourceGroupName='WindowsVirtualDesktop'
$ResGR=New-AzResourceGroup -Name $ResourceGroupName -location NorthEurope
Next, assign permissions to the resource group. We will assign VM contributor access so that the AADWvdAdmin cannot deploy any other service:
$AADWvdAdmin='aadwvdadmin@mydomain.onmicrosoft.com'
New-AzRoleAssignment -ResourceGroupName $ResourceGroupName -SignInName $AADWvdAdmin -RoleDefinitionName 'Virtual Machine Contributor'
Next is the VNET / Subnet configuration, where we need to assign permissions to the network object itself in order for the VMs to connect to the VNET:
$VnetName='Corp-VNET'
$SubnetName='WVDSubnet'
$Vnet=Get-AzVirtualNetwork -Name $VnetName
$subnet=Get-AzVirtualNetworkSubnetConfig -VirtualNetwork $vnet -Name $SubnetName
New-AzRoleAssignment -scope $vnet.id -SignInName $AADWvdAdmin -RoleDefinitionName 'Network Contributor'
New-AzRoleAssignment -scope $subnet.id -SignInName $AADWvdAdmin -RoleDefinitionName 'Contributor'
Note that currently the WVD deployment requires Write access on the VNET level. This means we need to provide Network contributor access on VNET level until they remove that in the wizard. Once that requirement is removed, Reader on the VNET and Contributor on the Subnet should be enough.
Active Directory Tasks
The next part happens in Active Directory and therefore need to be performed by someone with access to AD and permission to:
- Create an OU
- Create a GPO and link it to the OU
- Assign permissions to add Computers to the domain
Log-in to the domain and open Users&Computers. First is the creation of our AD-WVD admin account. This account will be used to join the WVD computers to the domain and install software on these clients.
Create a regular user anywhere in the domain (ADWVDADMIN@forestroot.local). Given I do not want to synchronize this user to AAD (as I have fully separated accounts) I made sure to add it to an OU that is not replicated by Azure AD Connect. Make sure that the password for this user is between 12-23 characters as that will be mandatory for the deployment.
Next is the creation of a new ou. I’ve added an OU “OU=VirtualDesktops,OU=Services,DC=FORESTROOT,DC=local” in the root of the forest, but obviously it can be anywhere.
Right click the newly created OU and select Delegate Control. Click next on the wizard, add the newly created account and click next again. Then select a Create a custom task to delegate. On the next page, select only the following objects in the folder and select Computer Objects
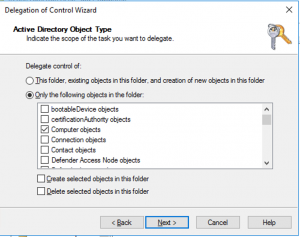
Select next and select Full Control on the permissions page. This allows the newly created AdWvdAdmin to create, manage and delete computer objects in the newly created OU. The admin won’t be able to create new users or other objects. Finish the wizard.
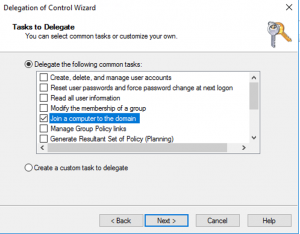
The next part will be required, as regular users cannot continuously register computers in the domain. There is a limit to how many users can join computers by default, and most organizations even deny regular users from joining computers to the domain. Right click the domain name in AD Users & Computers and select Delegate Control.Click next, click add, find the newly created admin and click next. For the task to delegate, select Join a computer to the domain, then next and finish.
Next, we need to make sure that our new admin becomes a local administrator on the deployed virtual machines to have the scripts install the extensions and make the required configurations. To do this, we will use Group Policies Preferences. Also, we will use the same GPO later-on to make adjustments to the VM’s.
Open Group Policy Management Console and right click the OU and select Create a GPO in this domain and Link it here… Give the policy a name and edit the policy.
Under computer configuration, Preferences, Control Panel Settings right click Local Users and Groups and select new, Local Group. For the action select Update and for the Group Name type Administrators or select the Administrators (Built-in) group.
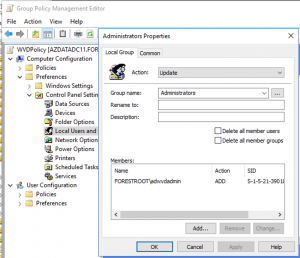
Click Add and type the name for the AD WVD admin user. Click ok and close the group policy.
Optionally (and highly recommended – you can also add DOMAIN Admins and set the action to REMOVE – as Domain Admins should not be able to login or be an admin on any member server/workstation)
Deploying the service
Now we have delegated the main parts to our admins, which means our deployment can start using the “regular” accounts – AADWvdAdmin.
First our AADWvdAdmin needs to add him/herself to the TenantAdmin role in the Windows Virtual Desktop application. To do this, login to portal.azure.com and find the Azure Active Directory / Enterprise Applications blade, find the application, go to users and groups, add the AADWVDAdmin account and select TenantCreator as the role.
But in this example, we can also assume access to the Active Directory blade through the portal is blocked for non-admins. In that case we need to powershell our way out of it. Login with the AADWVDAdmin to AzureAD and setup the account for MFA if needed.
#Connect to Azure AD with the AADWvdAdmin Account
$aadContext = Connect-AzureAD

#Get the AppID for Windows Virtual Desktop application
#Assign permissions to the logged in user (AADWvdAdmin)
$app_name = "Windows Virtual Desktop"
$app_role_name = "TenantCreator"

# Get the user to assign, and the service principal for the app to assign to
$user = Get-AzureADUser -ObjectId (Get-AzureADUser -ObjectId $aadContext.Account.id).objectID
$app = Get-AzureADServicePrincipal -Filter "displayName eq '$app_name'"
$appRole = $app.AppRoles | Where-Object { $_.DisplayName -eq $app_role_name }
New-AzureADUserAppRoleAssignment -ObjectId $user.ObjectId -PrincipalId $user.ObjectId -ResourceId $app.ObjectId -Id $appRole.Id
Now that the AADWvdAdmin is a tenant creator, we can create the first tenant, assign permissions to the service principle created by the AAD Admin and deploy our service.
What we would need to create our WVD Tenant is the following information:
- An Azure Subscription ID
- The AAD GUID (from Global Admin)
- The WVD Service Principal and password (from Global Admin)
- The desired Tenant Name
First, let’s login to the RDS (WVD) system using our the AADWvdAdmin account and create the TenantName
#Login with aadwvdadmin@mydomain.onmicrosoft.com
Add-RdsAccount -DeploymentUrl https://rdbroker.wvd.microsoft.com

#change to your values
$SubscriptionID='b36802c2-xxxx-xxxx-xxxxx-xxx
$RDSTenantName='AzureInfraRDS-Delegated'

$Tenant=New-RdsTenant -Name $RDSTenantName -AadTenantId $aadContext.Tenant.id.guid -AzureSubscriptionId $SubscriptionID
Next is adding the service principal from the AAD Global Admin to our tenant:
#The AppID should be retrieved from the AAD Global Admin - created in an earlier step
$AppId='6b7bbb50-xxxx-xxxx-xxxx-xxxxxxxx'
New-RdsRoleAssignment -RoleDefinitionName "RDS Owner" -ApplicationId $AppId -TenantName $RDSTenantName
Pool Deployment via Portal
And next is the deployment via the Portal, through the marketplace deploy Windows Virtual Desktop – Provision a host pool
for this you will need the following information:
- A pool name (any name – not specified earlier)
- The location to deploy in
- the VNET / subnet to use
- the AD WVD userPrincipalName + Password
- the OU to deploy in
- the FQDN of the AD domain
- the Tenant Name ($RDSTenantName=’AzureInfraRDS-Delegated’)
- The AppID + Password
- the AAD ObjectGuid
After logging in to portal.azure.com, the AADWVDAdmin user should only see a single subscription and resource group to deploy in. Go to the marketplace and deploy a Windows Virtual Desktop – Provision a host pool (hint; just type pool in the search field). Click create and follow the gudie. Provide the Hostpool Name (any name) and configure the number, size and name of the VMs.
Next are the Virtual Machine Settings. In here, provide the details from the AD Administrator (the ADWVDAdmin@mydomain.local user, its password, the OU location and the domain name).
On the next page, type the TenantName, set the identity to service principal and enter the AppID+Password+AADObjectGuid and click Create
Further delegation in WVD/RDS
Further delegation can be done using the built-in RDS roles, more on that on an excellent blog by Ryan Mangan https://ryanmangansitblog.com/2019/11/14/delegated-access-windows-virtual-desktop/