In November 2019 at the Microsoft Ignite conference there was a demo on how to extend your on-premises network to Azure. While embedded in a regular Azure session, one might think this allows you to do a L2 extension of your network into an Azure network, its actually not. Yes, you can have overlapping subnets which allow you to run your workloads on the ‘same’ subnet, but it’s not a full layer 2 connection.
Why? First of all, broadcast traffic is not shared, your MTU will be reduced due to the virtualization overhead and much more. What is it and what are the limitations? You can find that on the ipspace blog: but in this post, we will go hands-on with this technology!
The warnings
The “virtual L2” connection we are creating here should be used as a last resort. It is always better to have L3 connectivity to Azure as it is way easier to control, troubleshoot and have it perform well. Also, there is no redundancy in this model (as far as I know know), so a crash of 1 VM would terminate the connection, regardless of S2S redundancy.
Finally, the addresses are not automatically learned. New deployments will have to be added to the configuration manually!
The Architecture
Before we can dive into the technical bits, always start with a drawing so we know what we are dealing with:
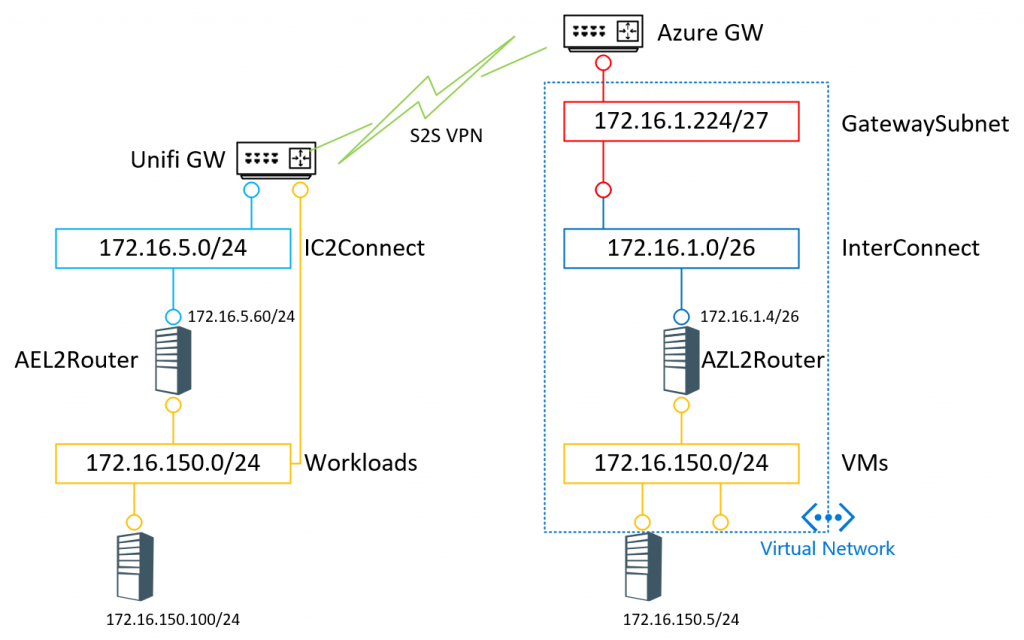
On the left side we have my home setup. With 2 VLAN’s. One being the workload VLAN;s that we are going to extend. Obviously these workloads have direct internet access through the unifiGW. But I also created a new VLAN 172.16.5.0/24 which is my IC2Connect. This VLAN also get’s internet access through the same firewall. The UnifiGW has a S2S connection to a VNET in Azure through the Azure Virtual Network Gateway.
The VNET in Azure has 2 address spaces, the first being 172.16.1.0/24 and the second one being 172.16.150.0/24. There will be two servers on the 172.16.150.0 subnet (one in my home Hyper-V, one in Azure) that need to talk to each other.
To make this happen we will deploy 2 “Routers”, one on each side and configure them with Azure Extended Networking capabilities.
Phase 1 – preparing the VM on-premises
First install the “AEL2Router” server using Windows Server 2019 between 172.16.150.0/24 and 172.16.5.0/24.
I used Hyper-V for this and installed a VM with 2 NIC’s and as this solution highly depends on virtualization, I also needed to expose the virtualization extensions to the VM by issuing the following command on the Hyper-V Host:
Set-VMProcessor -VMName VMName -ExposeVirtualizationExtensions $true
Next, in the VM, install Hyper-V and create virtual switches for each of the NIC’s and enable management connections for both of them: You can run ipconfig /all to see the adapter names and the networks they are connected to, as you will need the adapter name in the Hyper-V network configuration
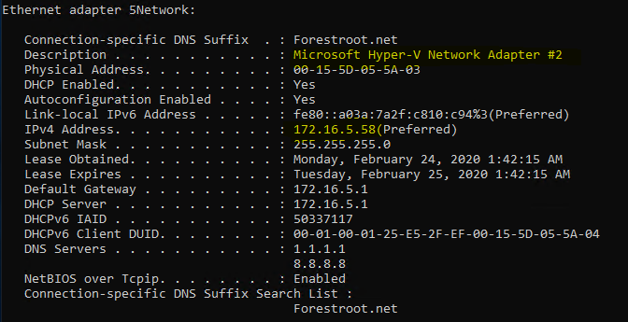
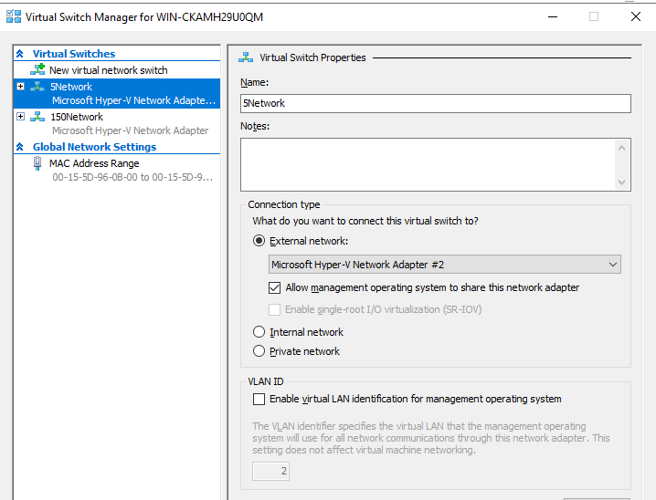
Your AEL2Router should now have 2 Hyper-V switches installed, both with a host management adapter (meaning the VM should still have an IP in both subnets).
Disable the Windows Firewall on the VM
(In my setup, I had to disable the Windows Firewall on the VM to make the connection successfully).
Phase 2 – S2S connections
I have the unifiGW connecting to an Azure Gateway (on the right). The GW is connected to a single VNET hosting 172.16.1.0/24 and 172.16.150.0/24 that has the following subnets:
- GatewaySubnet (172.16.1.242/28)
- InterConnect (172.16.1.0/26 )
- VMs (172.16.150.0/24)
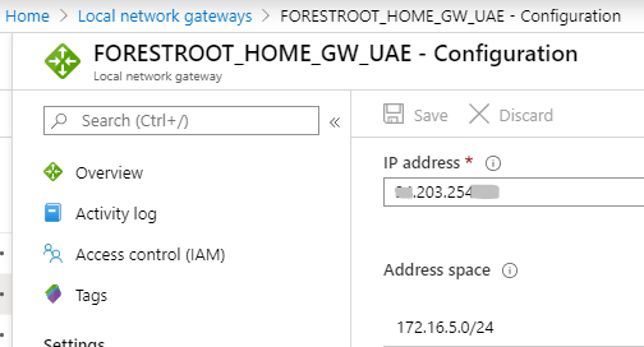
In the external FW and in the “local network gateway” object I did not include the 172.16.150.0 subnet, but only the 172.16.1.0/24 and 172.16.5.0/24
  |
After the S2S VPN / ER setup, you should be able to connect from 172.16.5.0/24 to 172.16.1.0/26 and vice versa (You can deploy a test VM in Azure for example).
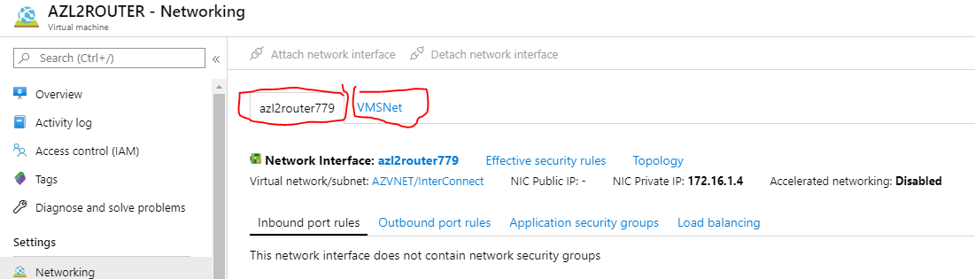
Phase 3 – VM in Azure
Deploy a VM on the InterConnect subnet – and as the VM needs to support nested virtualization it needs to be a v3 VM. (I used a D2S_v3).
Next, stop the VM and add another NIC to the VM, connecting it to the same VNET, but then to Subnet 172.16.150.0/24
Boot the VM and install Hyper-V on it, configuring the virtual switches on both networks and providing management connectivity similar to the other VM. (the S2S/ER connection should allow you to login to the VM without a public IP).
Disable the Windows Firewall on the VM
(In my setup, I had to disable the Windows Firewall on the VM to make the connection successfully).
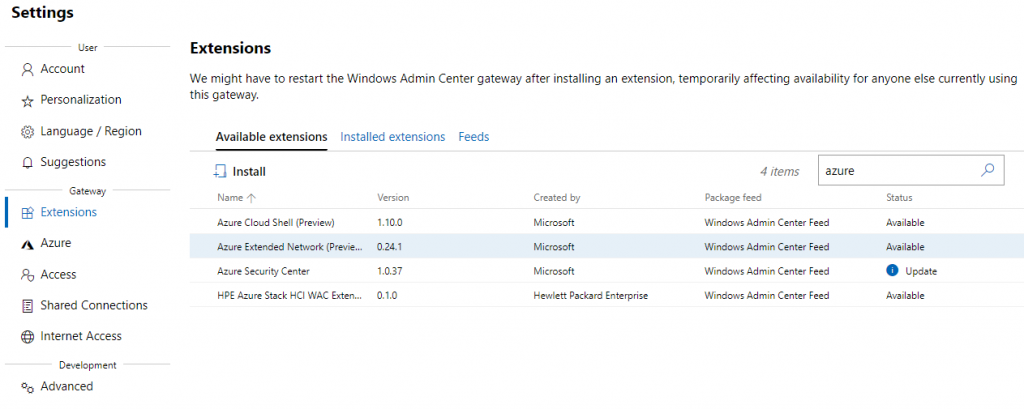
Phase 4 – Windows Admin Center
I installed the Windows Admin Center on my Hyper-V host and added the on-premises VM (AEL2Router) to it. Login to the Windows Admin Center portal and connect it to Azure (click Settings, then Azure and click sign-in – it will start a wizard to onboard). Just follow the wizard and login as the subscription owner (and AAD Admin to approve the app).
Next in settings, click extensions and select Azure Extended Network and click install
By now we should have the following prerequisites ready:
- A virtual network in Azure that contains the same subnet prefix as the on-premises subnet that you want to extend, and one additional non-extended subnet.
- A virtual machine in Azure that has two network adapters, one connected to each of the above networks.
- Connection from the virtual network to on-premises network using an Azure Virtual Gateway using site-to-site VPN or Express Route.
- A virtual machine on-premises with two network adapters, one connected to the on-premises network you want to extend, and the other connected to a network that will not be extended.
- On each virtual machine: Hyper-V role installed with a virtual switch with a management adapter on each of the network interfaces.
Phase 5 – The configuration
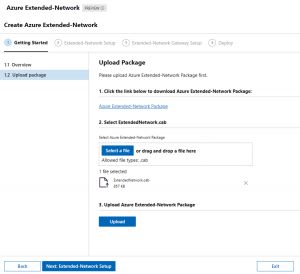
In the Windows Admin Center, go to the on-premises server (AEL2ROUTER), and click on the Azure Extended Network blade. First, we need to download an executable that holds a cab file. Download it to any computer extract it and then upload the extracted cab file through the Admin Center as instructed.
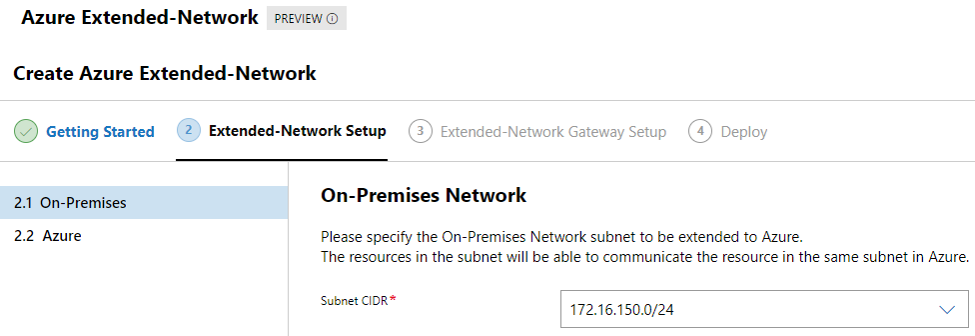
Click next to advance in the setup process to select the “to be extended” network. In my setup this will be the 172.16.150.0/24 network
Click next, and login to your Azure Subscription and select the resource group, network and extended subnet.
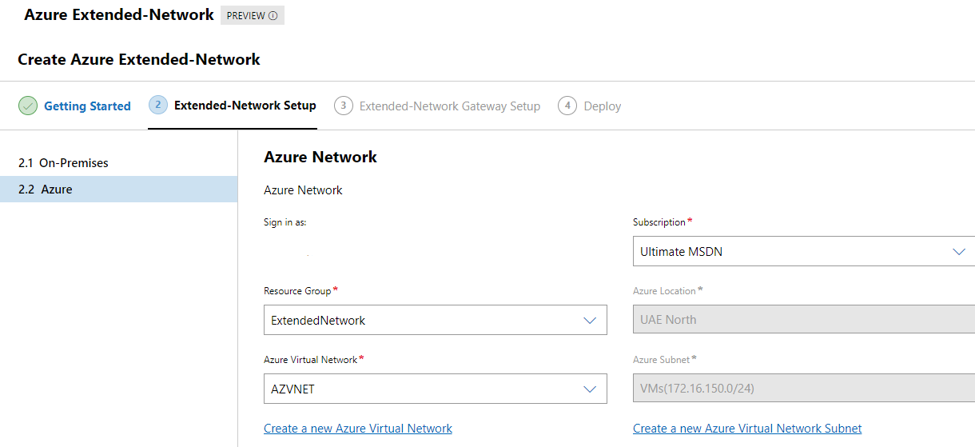
(the subnet should be grayed out, as this subnet should be the same as on-premises)
Next, select the Azure router VM we provisioned earlier (running Hyper-V) – select the resource group it is in and configure the networks.
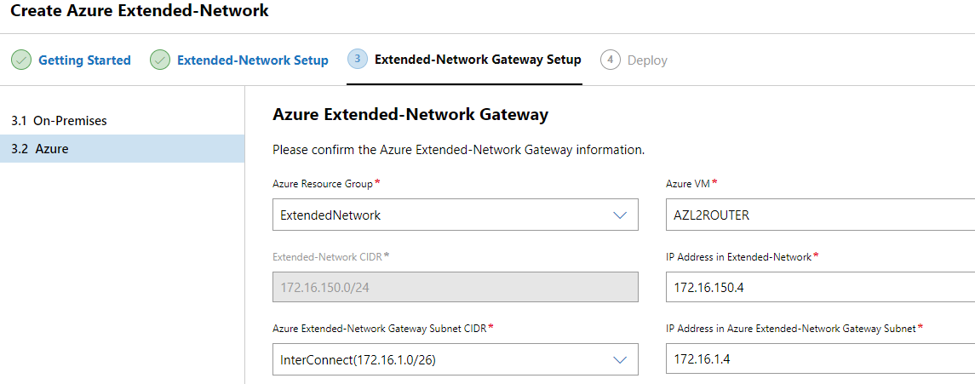
Review the configuration and deploy…
After the deployment a new screen will open which allows us to add the individual IP addresses and where they are located. Note that you have to deploy a VM first in Azure after which it will become available in the portal after a few minutes to be added to the extended Network routing tables.
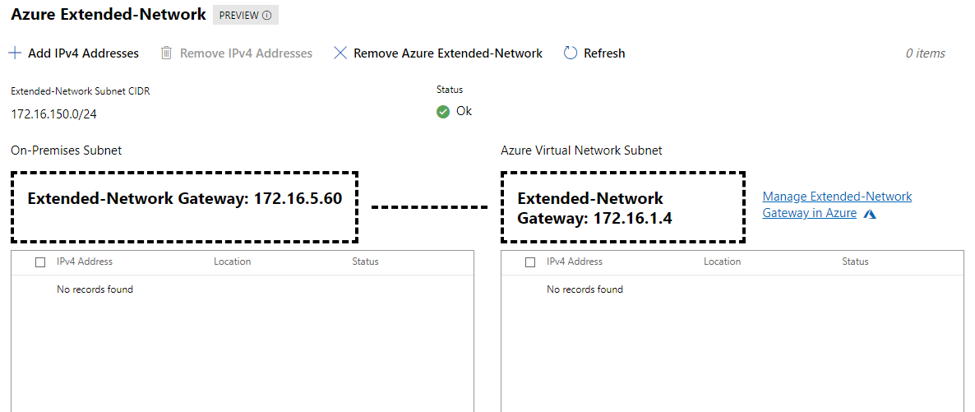
Phase 6 – Adding IP addresses and Testing
The system will not “automatically detect” VM’s or better IP’s on both sides. Manual configuration will be required to add the IP addresses into the configuration.
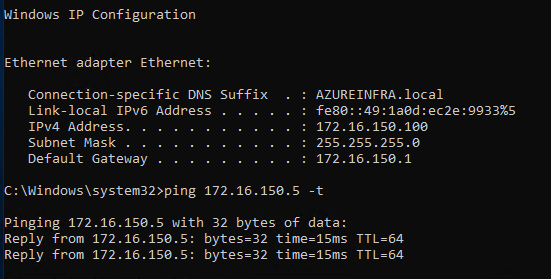
Deploy a VM on the internal network (172.16.150.0) and a VM on Azure on the VMs subnet (172.16.150.0). Make sure to not have the same IP on both ends and try to connect between the two (If you are performing a ping between 2 Windows servers make sure to allow Ping through the firewall), this connection should fail.
Then in the Windows Admin Center, go to Extended Network and click Add IPv4 Addresses and select the addresses you have on-premises and the ones you have in Azure for your machines and click Submit.

The addresses will be added and a connection should be established.
Conclusion
It works.. still have to do a lot of investigation how stable this is, what the performance is etc.. but very nicely done by the product team!..