In earlier posts I talked about my favorite authentication protocol ‘Kerberos’, but obviously there are many more authentication protocols such as HEADER based authentication. While we won’t be sending the password of users straight to the backend webserver we can send additional information. Azure AD App Proxy in combination with Ping Access can already do this, but your F5 can do exactly the same! Which unlocks publishing your Oracle, SAP and other JAVA applications that use Headers… That is why in this post we will be looking at injecting HEADERS, but as with many configurations in the real world, we will also be querying an external LDAP store to retrieve additional information to put in the header.
The Architecture
As you might notice, this architecture itself also doesn’t use an Active Directory, so it’s applicable to the non-AD setups as well. The 3rd party lookup in my case is against an AD-LDS LDAP store, but this could be easily replaced by OpenLDAP, Open Enterprise Server or any other LDAP server you might have.
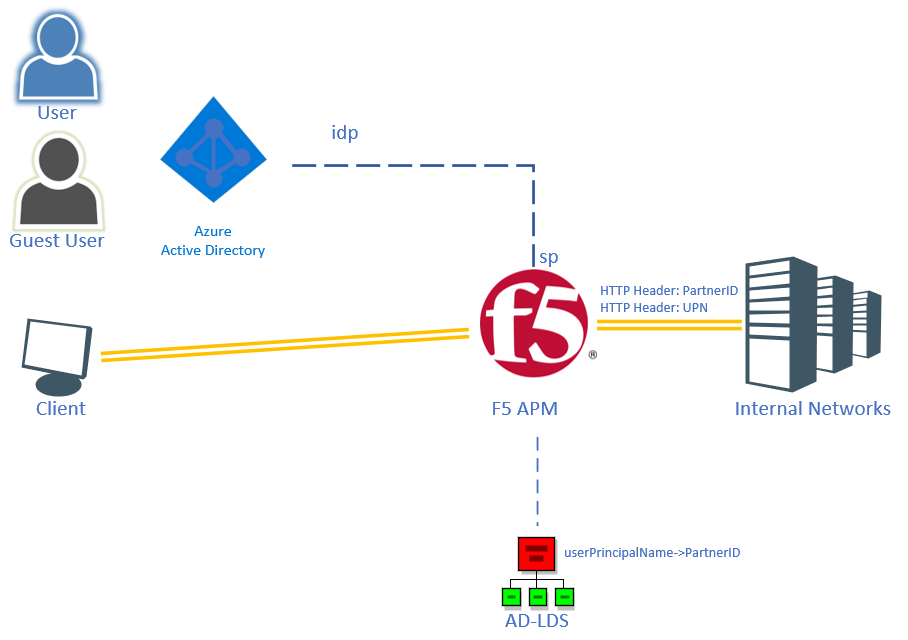
Users from Azure AD (members or guests) will be using the F5 APM/LTM modules to access the backend webservers. After the initial SAML authentication (against AAD) – the APM module will query the AD-LDS store using the SAML Identity attribute (userPrincipalName) for a “PartnerID” hosted in the LDAP store. Then an iRule in the LTM module will inject the SAML Identity into a header called UPN and the PartnerID into PARTNERID.
Creating the LDAP connection
To setup the LDAP store itself, please check https://blog.azureinfra.com/2020/09/10/f5-ldap-active-directory-lightweight-services/
For F5 to be able to query our LDAP store it needs to have a connection to the LDAP server with a username and password.
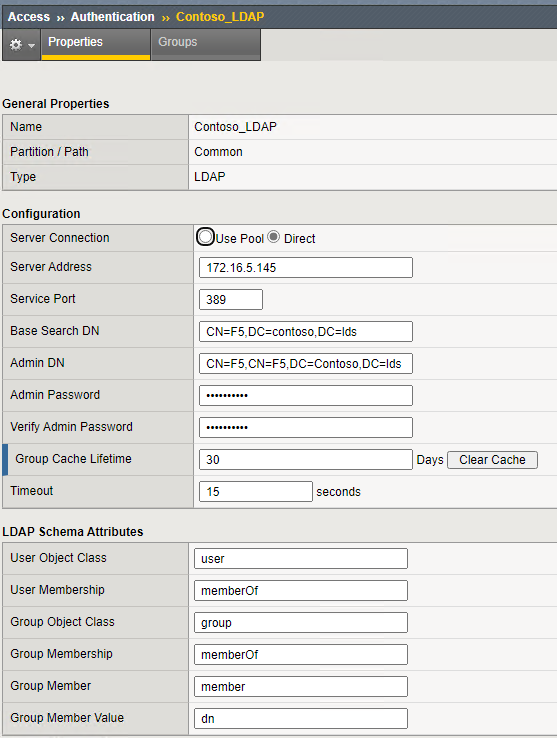
- In the F5 admin console, go to Access >> Authentication : LDAP and click Create…
- Provide a name for the LDAP server entry in F5 <Contoso LDAP> and configure the server connection (either Direct or Pool)
- In this scenario we will use Direct and put the IP address of the LDAP server
- Set the service port to the <LDAP port> and set the <Base DN>
- Provide the LDAP username and its password and click Finish
Adding LDAP query to Access Profile
Once the LDAP server is configured it can be added to the Access Profile to retrieve additional information for the logged-in user.
- Go to Access >> Profiles / Policies : Access Profiles (PerSession Policies) and click
the earlier created <Header App> access profile - Click **Edit** under the Per-Session Policy column
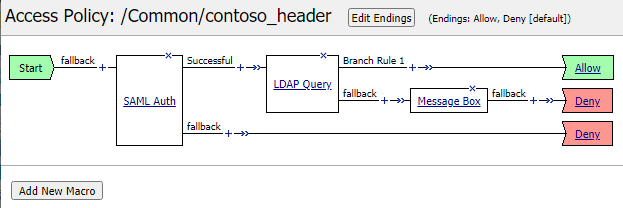
- A new window will open with the Access Policy showing <start> + <SAML auth> – Successful – <Allow> | – fallback – <Deny>
- Click the + sign on the Successful leg. A pop-up will be shown
- In the pop-up, select the Authentication tab and there select LDAP Query and click Add Item
- A new popup will be shown for the LDAP Query configuration. In the Server dropdown list
select the earlier created LDAP server (/Common/<Contoso LDAP>) - For the searchDN type the DN of where the LDAP objects are <CN=F5,DC=CONTOSO,DC=lds>
- For the searchfilter type
<(userPrincipalName=%{session.saml.last.identity})> - Click Add new entry and type the requested LDAP attribute(s) – <PartnerID>
- Click the Branch Rules tab
- Remove the default User Group Membership rule by clicking (X)
- Click Add Branch Rule and under expression click change
- In the popup, select Add Expression and set
- Agent Sel:LDAP Query
- Condition: LDAP Query Passed
- LDAP Query has: Passed
- Click Add Expression and click Finished
- click Save
As the SAML auth as well as the LDAP auth fallback results in a deny, you might want to add an alert for the user if
the LDAP lookup itself fails. That way, the user can call the helpdesk if access is denied with a more specific error.
- Click + in the LDAP fallback branch
- In the pop-up select the General Purpose tab
- Select the Message Box and click Add Item
- In the pop-up under the message text file, type a meaningful error message (“Your Partner ID was not found”)
- click Save
Adding iRule
Headers need to be added through an iRule. iRules are executed on the connection and provide advanced capabilities for
session management. In our case we want to add the PartnerID as an HTTP Header to the backend server.
- Go to Local Traffic >> iRules : iRule List and click Create
- Provide a name for the iRule <Contoso_HeaderInjection>
- In the Definition paste the following code:
when RULE_INIT {
     set static::debug 0
 }
 when ACCESS_ACL_ALLOWED {
 set PARTNERID [ACCESS::session data get "session.ldap.last.attr.PartnerID"]
 set UPN [ACCESS::session data get "session.saml.last.identity"]
 if { $static::debug } { log local0. "PARTNERID = $PARTNERID" }
 if { $static::debug } { log local0. "UPN = $UPN" }
 if {!([HTTP::header exists "PARTNERID"])} {
     HTTP::header insert "PARTNERID" $PARTNERID
   } else {
     HTTP::header replace "PARTNERID" $PARTNERID
   }
 if {!([HTTP::header exists "UPN"])} {
     HTTP::header insert "UPN" $UPN
   } else {
     HTTP::header replace "UPN" $UPN
   }
 }
4. Click **Finish**
When the rule is activated, it will only start when Access is allowed (Allow from the Access Rule) – it will then fill a variable
<PARTNERID> with the session variable session <ldap.last.attr.PartnerID> which is retrieved through the LDAP Query.
It will also set another variable <UPN> by the SAML session variable <session.saml.last.identity>.Then it will inject the PartnerID as a Header to the backend webserver. If an existing Header is present, it will be replaced by the <PARTNERID> from the LDAP Query (to prevent someone injecting their own). The same happens to the UPN of the user in a “UPN” Header.
Creating a Virtual Server entry
Now that the initial configuration is complete we can publish a backend webserver. This will combine the created Access Policy
and iRule. The Access Policy will provide the authentication and LDAP Query and the iRule will be injecting the retrieved
LDAP attribute into an HTTP Header.
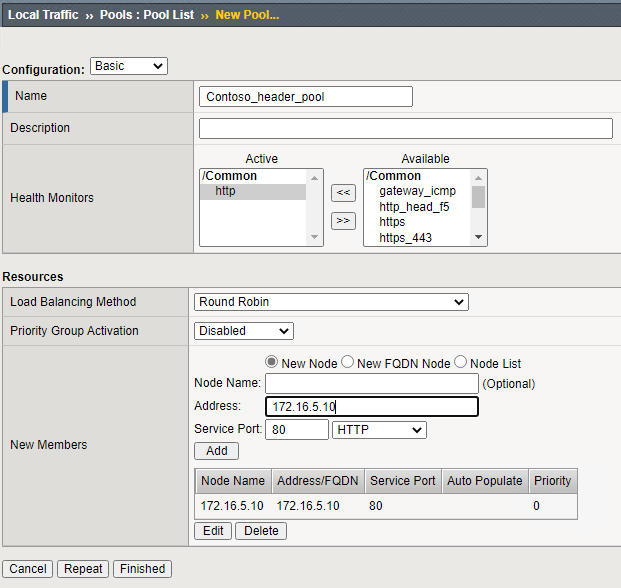
First we will need to create a backend pool. An object containing the servers / ports for the backend web application.
- Go to Local Traffic ›› Pools : Pool List and click Create…
- Give a name for the new pool <Header_App_Pool>
- Set a health monitor by adding http to the Active selection under Monitoring by clicking http and then <<
- Under Resources \ New Members \ Address type the FQDN or IP address of the backend webserver
- Under service port set the port <80> and the service type to HTTP and click Add
- Click Finished
To publish the backend webserver
- Go to Local Traffic ›› Virtual Servers : Virtual Server List and click Create…
- Provide a name for the virtual server <Header_App> and provide a destination address / mask.
This will be the IP address F5 will be listening on. - Set the service port to 443 and the service to HTTPS
- Under configuration for the HTTP profile set it to http
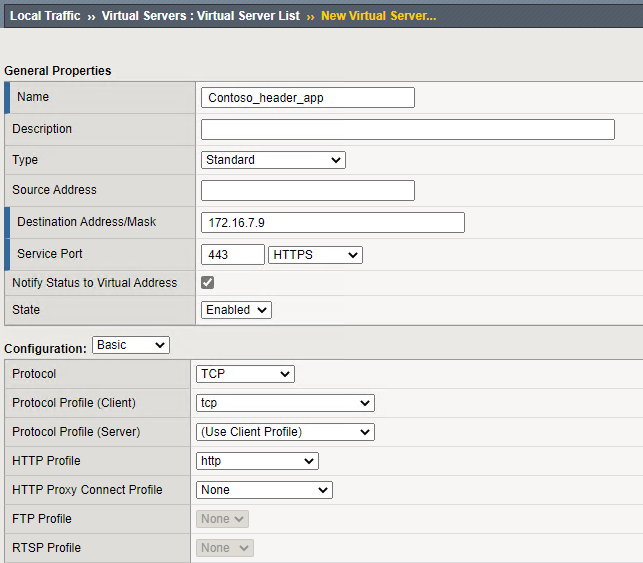
- Under Configuration for the SSL Profile Client, add your SSL Client profile created earlier <Contso_SSL>
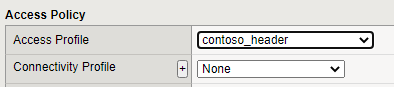
- Under Access Policy for the Access Profile, set the value to the earlier created Access Profile <Header App>
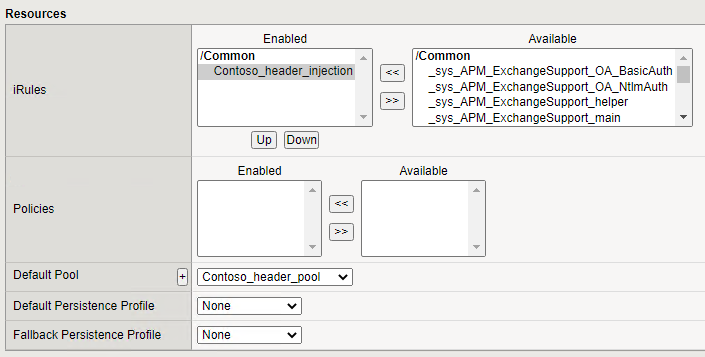
- Under the Resources option, add the earlier created iRule <PartnerID_HeaderInjection>
- Under the Resources option set the pool to the earlier created pool <Header_App_Pool>
- Click Finished
The Virtual Server should have a green indicator in front of the name ensuring the backend webserver is available. This concludes the configuration.
Testing
Prior to users being able to connect to the website, the FQDN of the website needs to be resolvable.
While theoretically the certificate doesn’t have to match the URL this is highly advised. Make sure your test client can find the IP
address of the virtual server for the configured name for the website. This can be done through DNS or by manipulating the
local hosts file on the test client.
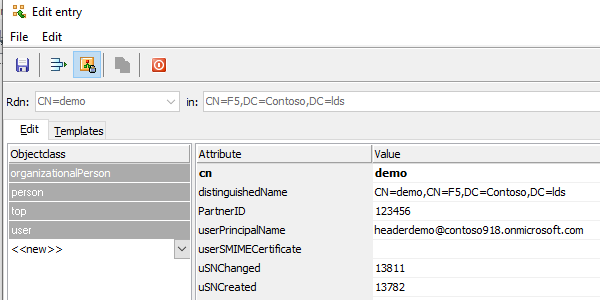
In order to test the web publication, an user with the same userPrincipalName as our Azure AD user will have to be existent in the
LDAP store and have its PartnerID provisioned.
Once the user logs in to Azure AD (myapps.microsoft.com) they can click the <Header_App> in the portal. This will send them to the FQDN configured for the application.
If all is well, F5 will authenticate the user using the SAML token and then perform the LDAP lookup prior to injecting the HTTP header and sending the user to the backend website.
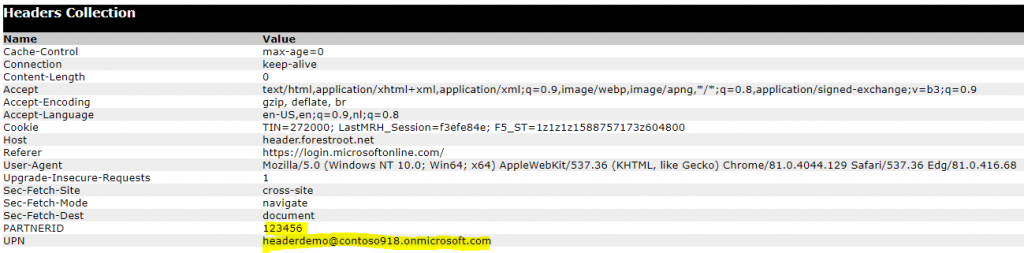
I created a default.aspx webpage with the following contents: <%@ Page Language=”C#” trace=”True”%> and browsed to the URL.
Immediately I need to authenticate to Azure AD and after that, I see the following headers:
Conclusion
You can use external attribute stores to enhance the functionality of Azure AD in combination with F5. This allows organizations to publish Header based applications through their existing infrastructure using Azure AD and all the advantages that it brings along (conditional access, MFA, Guest Access, etc etc).