I’ve posted a lot already on the integration between F5 APM and Azure AD to achieve SSO, improve the user experience and even link VPN’s to Azure AD.
This post is the first in a short series that uses another Azure AD feature, the NPS agent that allows the Network Policy Server (Radius) in Windows Server to act as an MFA provider using Azure AD MFA.
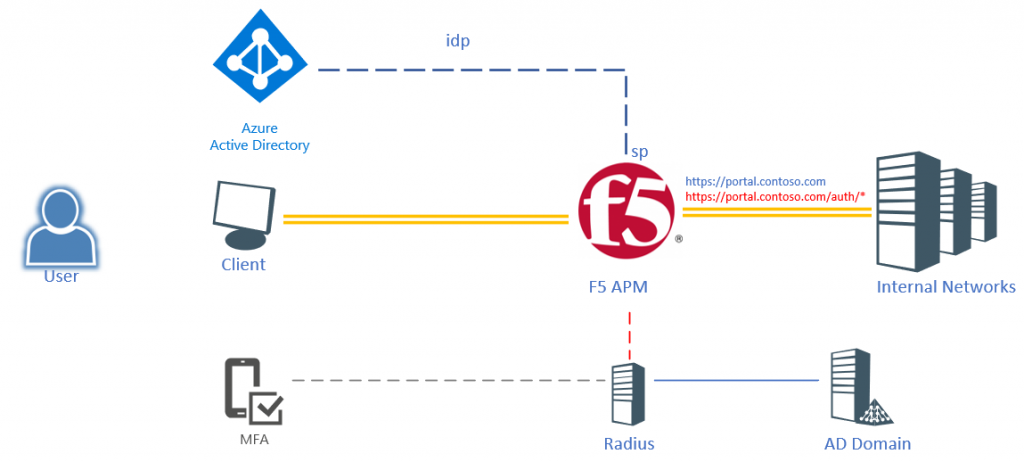
The scenario here is a user logging into an F5 published portal using their Azure AD credentials (only user+password). But as soon as the user hits a sub-URI (/auth/*) the user will be required to provide MFA. Obviously we could create another Azure AD Application, but it would be hard to configure and it would send the user back to Azure AD to provide authentication. Easier would be to invoke the Azure MFA NPS extension and run this through a regular Radius call.
F5 & Radius (Azure MFA NPS Agent)
You can integrate F5 with an external radius server, this is not something new. What is new is that that Radius Server can now also have the Azure MFA NPS extension installed. This tutorial will discuss the integration for radius authentication with the Azure MFA NPS agent. When you install the default Azure MFA NPS agent the default policies in NPS dictate a call needs to have username & password, but this tutorial also covers using the radius servers as a step-up MFA provider.
Installing NPS
Network Policy and Access Services are a role within the Windows Server system. After installing a Windows Server (add the server to the domain – the NPS agent maps the users to AD), add the role through the server manager (or powershell) and open the configuration:
Install-WindowsFeature NPAS -IncludeManagementTools
#To open the Firewall ports, run
New-NetFirewallRule -DisplayName 1812 -Profile 'Any' -Direction Inbound -Action Allow -Protocol UDP -LocalPort 1812
Installing the NPS agent
The full installation guide for the NPS agent can be found on: https://docs.microsoft.com/en-us/azure/active-directory/authentication/howto-mfa-nps-extension
- Make sure to disable IE Enhanced security – as the NPS Azure MFA agent will trigger a login through the built-in web browser
But in short, download the package from: https://aka.ms/npsmfa and install the agent on the NPS server. Next open PowerShell in an administrative prompt and run:
cd "C:\Program Files\Microsoft\AzureMfa\Config"
.\AzureMfaNpsExtnConfigSetup.ps1
- Sign in to Azure AD as an administrator.
- PowerShell prompts for your tenant ID. Use the Directory ID GUID
- PowerShell shows a success message when the script is finished.
Configuring the NPS Client
- Next, a client needs to be configured (the F5 connecting into the radius server). For this, go to Radius Clients and Servers -> Clients
- Add a new client and give it a name (F5) and set the IP address for the client – matching your F5 IP address (internal or closest route).
- Provide a client secret or generate a new one. Copy the client secret as this will be required in a later step.

Next is the configuration of the policies, there are 2 policies in NPS, Connection Policies and Network Policies.
Policies
Radius by default expects a username and a password, which in many cases is required to provide a secure authentication. But in this case we will rely on the NPS/MFA server to only provide step-up authentication based on the username. A federated login (or user without password) will not be able to provide the password in the system and thus we will only require the username. This means we need to disable the authentication for the Radius Client. While it is possible to alter the built-in policy (use Windows authentication for all users), this tutorial will describe the creation of a new policy that is only applied to the F5 client created earlier.
- Create a new Connection Request Policy by right clicking Connection Request Policies and selecting New.
- Provide a name for the policy (Unauthenticated MFA)
- And leave the type of network access server to unspecified
- On the specify conditions page, select Add
- Go to Radius Client Properties
- Select Client IPv4 Address and click Add
- In the pop-up type the IP address of the F5 device and click OK

- Click Next
- Under the Specify Connection Request Forwarding select Accept users without validating credentials under the Authentication tab.

- Click Next
- On the configure settings page, click Next
- Review the settings and click Finish
- Change the order so the newly created policy is on top

Next a network policy needs to be configured.
- Right click Network Policies and select New
- Provide a name for the policy “Unauthenticated MFA”
- Set the type of network access server to Unspecified
- Click Add on the conditions window
- Select Client IPv4 Address under Radius Client Properties

- Click Add
- In the pop-up type the IP address for the F5 device (same as Radius Client) and click OK and click Next
- Click Granted Access in the specify permission window and click Next
- On the Configure Authentication Methods window, select Unencrypted Authentication (PAP, SPAP) and click Next, click No on the pop-up
- Click Next on the constraints window
- Click Next on the Configure Settings window
- Review the settings made and click Finish

The NPS server is now configured.
F5 Radius configuration
F5 Access policies can make use of the radius server configured in NPS. When F5 now sends the username to the radius server, the Azure MFA agent will kick-in and request the user to perform an MFA (note that only response is possible in this scenario – no code challenge). In order to configure the NPS server as the Radius server in F5:
- Go to Access >> Radius and click Create
- Provide a name for the radius server <azure_mfa>
- Select Authentication for the mode
- Set the Server Connection to Direct (or pooled if you create multiple NPS installations)
- And provide the IP address of the NPS server
- Leave the port to 1812
- Type the secret used earlier in NPS – when creating the Client in NPS
- Set the Timeout to 60 seconds
- Click Finish

This concludes part 1.. the preparation.. in the next post we will be creating the step-up configuration
1 thought on “F5 – Azure AD – Radius MFA agent – part 1”
Comments are closed.
[…] This post is the second in a short series that uses another Azure AD feature, the NPS agent that allows the Network Policy Server (Radius) in Windows Server to act as an MFA provider using Azure AD MFA. – read the first post on: https://blog.azureinfra.com/2020/05/28/f5-azure-ad-radius-mfa-agent-part-1/ […]