This post is the second in a short series that uses another Azure AD feature, the NPS agent that allows the Network Policy Server (Radius) in Windows Server to act as an MFA provider using Azure AD MFA. – read the first post on: https://blog.azureinfra.com/2020/05/28/f5-azure-ad-radius-mfa-agent-part-1/
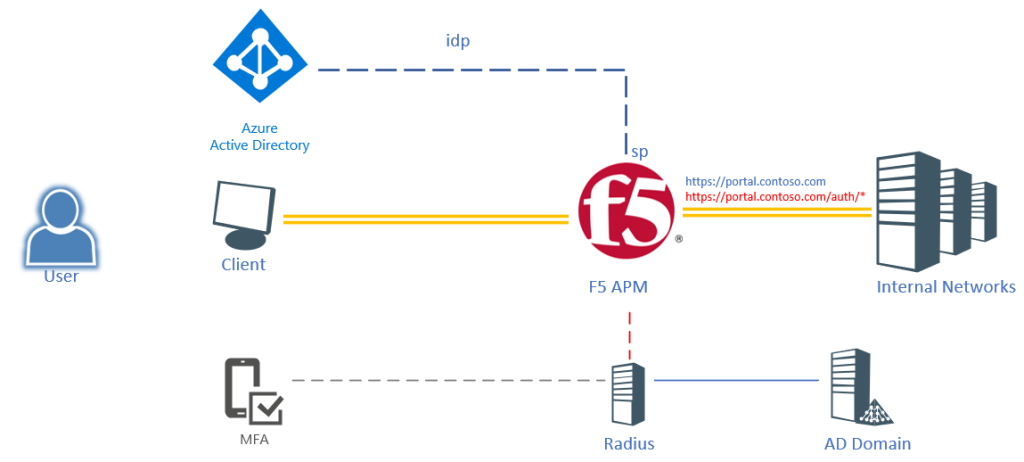
The scenario is still a user logging into an F5 published portal using their Azure AD credentials (only user+password). But as soon as the user hits a sub-URI (/auth/*) the user will be required to provide MFA. Obviously we could create another Azure AD Application, but it would be hard to configure and it would send the user back to Azure AD to provide authentication. Easier would be to invoke the Azure MFA NPS extension and run this through a regular Radius call.
The initial website will request SAML authentication from Azure (with or without MFA), but will require the user to perform an MFA when reaching a particular URL within that website.
- /* regular SAML authentication
- /auth/* step-up MFA authentication
Prerequisites
To get started, you need the following items:
- an application in Azure AD according to: F5 – Creating an Enterprise Application in Azure AD
- A configured Access Profile in F5 according to: Manual Configuration of AAD as SAML provider
- A configured Radius Server in F5 according to: F5 – Azure AD Integration – Radius based MFA [note]only create the Radius configuration but do not apply to the access policy
Per-Request Policy
In order to implement this, we need to have a Per-Session policy as well as a Per-Request policy.
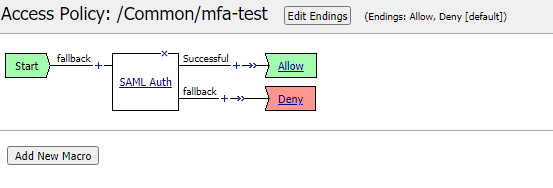
The per-session policy will authenticate the user based on SAML (Azure AD) and grant access to the base of the website.
The Per-Request policy will be implemented to monitor the URLs used and request the user to perform Radius Authentication if /auth/ is being accessed. Obviously the URL can be more strict. To create the Per-Request policy:
- Go to Access >> Profiles / Policies : Per Request Policies and click create..
- Give a name to the policy [contoso-portal-mfa] and click Finished
- Once the policy is created, click Edit in the Per-Request Policy column
- A new window will be shown with Start–+–Allow
- Click Add New Subroutine
- Give the routine a name [Radius-MFA]

- Click Save
- Open the subroutine: Radius-MFA by clicking the + sign in front of it
- A new flow is shown with In—>+–>Out
- Click the + sign and a new window will open
- Select the authentication tab and choose Radius Auth
- Set the AAA server to the earlier created Radius entry [azure_mfa]
- For the username source set it to: %{subsession.logon.last.username}
- Click Save to put the Radius Auth in the flow
- Click Edit Terminals to change the outcome
- Click Add Terminal to add a second output
- Rename Terminal 1 to Deny
- Rename Out to Accept
- Click ^ on the Accept terminal to move it up

- Click Save
- Click the Accept terminal for the Radius Auth fallback branch and change it to Deny
- Click the + in front of the Radius Auth (In-+-Radius Auth)
- In the pop-up window select the Assignment tab
- Select Variable Assign and then Add Item
- On the pop-up window, select Add new entry
- click change to create an assignment
- On the left side of the window, select Custom Variable and Secure
- In the text field type: subsession.logon.last.username
- On the right side of the window select Session Variable and type: session.saml.last.identity
- Click Finished
- Click Save

This completes the subroutine creation.
- In the Per-Request Policy flow, click +
- In the pop-up window, select the General Purpose tab
- Select the URL Branching object and click Add item
- In the pop-up window for URL Branching select the Branch Rules tab
- Change the name from Allow to step-up and select change
- Click Add Expression
- For the Agent Sel: select URL Branching
- For the Condition, select Glob Match
- For the URL glob pattern: /auth/
- Click Add Expression

- On the overview page, click the X to remove the URL Contains: domain.com to remove that condition.

- Click Finished
- Click Save
- The URL branching object will be added with 2 branches – step-up & fallback
- Click the Reject in the fallback branch and change it to Allow
- Click the + on the step-up branch
- In the pop-up select Subroutines
- Select the Radius-MFA subroutine created earlier and click Add Item

- The policy is now complete
Assigning the policy to a virtual server
The policy needs to be added to the published website, this can be done through the properties of the virtual server.
- Go to Local Traffic >> Virtual Servers and select the virtual server hosting the webpage
- Under the Access Policy section, select contoso-portal-mfa under the per-request policy
- Add the SAML authentication policy under Access Profile

- Click Update to make the change active
Testing
Open the main page (https://portal.contoso.com) and login to Azure AD (access policy). Go to the /auth/ url (https://portal.contoso.com/auth/) and the user will be triggered to perform an MFA. Note that it will only be a push notification or phone call.
Troubleshooting
If it doesn’t work like expected, add Logging items in the policies to see where things go wrong. Session logging can be viewed by going to:
Access >> Overview : Active Sessions
or
Access >> Overview : Access Reports