In a previous post I talked about using F5 in front of an Header based application using AAD as the identity provider. While we managed to convert claims into headers, we did not yet integrate the capability of user roles into the equation. Perhaps your application uses “roles” based on headers and users are assigned based on roles into the application.
Why would you use application roles compare to groups? In the “old” days, we would simply validate if a user is a member of a group. Within AAD we can do a similar thing by adding specific claims into the SSO configuration, but this is A; not really nice and B; requires a lot of interaction between the AAD admin (for creating application specific groups). And essentially we have a better way for this.

When the application owner assigns users to the application, that is where the application owner should decide which role is assigned upon login as this gives a better overview of the actual role of a user in a simple view.
While this role assignment is fairly common in cloud based applications, it isn’t that common in Secure Hybrid Access scenario’s where we usually still rely on backend systems to perform the transformation for us (for example by querying an LDAP store for role information as also demonstrated). But it is possible to also configure this for AAD and F5 as you will see in this post.
Configuration
First of all, we need to determine which roles we want to add. In my case I added UserAccess and AdminAccess as the two roles, but obviously you can name it whatever you want, and also how many you want.
In order to add the roles to the AAD application, we need to edit the application manifest file (I already configured my application in AAD and configured F5 with header based conversion):
- Go to Azure Active Directory and select App Registrations
- Select the created F5 application and select Manifest on the left side
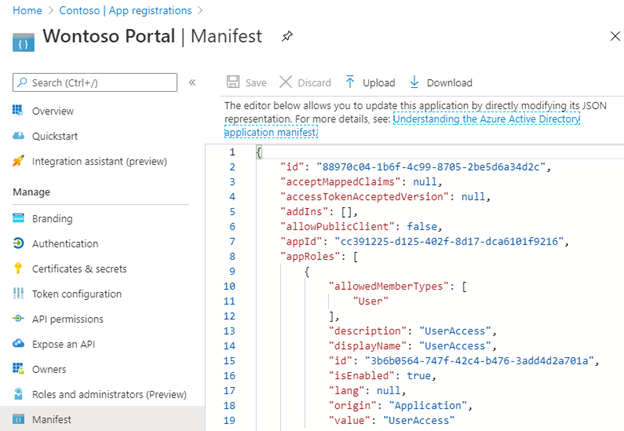
The window will show the existing manifest file that includes the default “appRoles” entry. To add new roles we have to follow the manifest guide (https://docs.microsoft.com/en-us/azure/active-directory/develop/howto-add-app-roles-in-azure-ad-apps). But essentially copy and paste the following code (but change the ID GUID’s to something unique – https://www.guidgenerator.com/online-guid-generator.aspx)
    "appRoles": [
        {
            "allowedMemberTypes": [
                "User"
            ],
            "description": "UserAccess",
            "displayName": "UserAccess",
            "id": "3b6b0564-747f-42c4-b476-3add4d2a701a",
            "isEnabled": true,
            "lang": null,
            "origin": "Application",
            "value": "UserAccess"
        },
        {
            "allowedMemberTypes": [
                "User"
            ],
            "description": "AdminAccess",
            "displayName": "AdminAccess",
            "id": "3b6b0564-747f-42c3-b476-3add4d2a701a",
            "isEnabled": true,
            "lang": null,
            "origin": "Application",
            "value": "AdminAccess"
        },
        {
            "allowedMemberTypes": [
                "User"
            ],
            "description": "msiam_access",
            "displayName": "msiam_access",
            "id": "3b6b0564-747f-42c3-b434-3add4d2a701a",
            "isEnabled": true,
            "lang": null,
            "origin": "Application",
            "value": null
        }
    ],
    "oauth2AllowUrlPathMatching": false,
- Save the manifest file
- Go to the Enterprise Applications in Azure AD, then to Users and Groups and configure the access roles for your users (or groups).
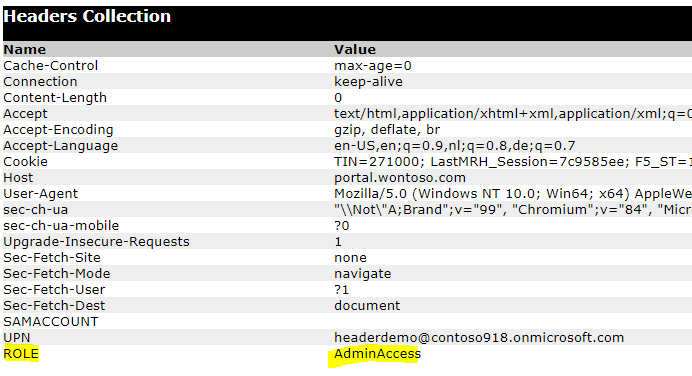
Once a user performs a login to F5 (using AAD) the AppRoles are added in a session variable; session.saml.last.attr.name.http://schemas.microsoft.com/ws/2008/06/identity/claims/role
- To inject the role as a header, in the iRule (created before), add the conversion:
  if {!([HTTP::header exists "ROLE"])} {
    HTTP::header insert "ROLE" $ROLE
  } else {
    HTTP::header replace "ROLE" $ROLE
Making the full iRule:
when RULE_INIT {
    set static::debug 0
}
when ACCESS_ACL_ALLOWED {
set SAMACCOUNT [ACCESS::session data get "session.saml.last.attr.name.onpremisessamaccountname"]
set UPN [ACCESS::session data get "session.saml.last.identity"]
set ROLE [ACCESS::session data get "session.saml.last.attr.name.http://schemas.microsoft.com/ws/2008/06/identity/claims/role"]
if { $static::debug } { log local0. "SAMACCOUNT = $SAMACCOUNT" }
if { $static::debug } { log local0. "UPN = $UPN" }
if { $static::debug } { log local0. "ROLE = $ROLE" }
  if {!([HTTP::header exists "SAMACCOUNT"])} {
    HTTP::header insert "SAMACCOUNT" $SAMACCOUNT
  } else {
    HTTP::header replace "SAMACCOUNT" $SAMACCOUNT
  }
  if {!([HTTP::header exists "UPN"])} {
    HTTP::header insert "UPN" $UPN
  } else {
    HTTP::header replace "UPN" $UPN
  }
  if {!([HTTP::header exists "ROLE"])} {
    HTTP::header insert "ROLE" $ROLE
  } else {
    HTTP::header replace "ROLE" $ROLE
  }
}
Note that the code above not only injects the “ROLE” straight from the role claim, but also replaces any existing ROLE header. This is to ensure that users/hackers cannot inject their own ROLE in a request and essentially elevate their privilege.
This injects the Role as a header and you (or actually your application admin) can now assign application permissions straight from AAD.
Conclusion
This quick post shows you that not only can you use AAD as the identity provider, but also the role provider for your application. And while many developers and administrators still have a Group based mindset, you can also use appRoles to assign permissions to backend applications which gives more flexibility and overview of who has access and which level.