With the release of v16 of the Big-IP software, F5 has created a fully guided integration with Azure AD. This allows F5 administrators to publish their published services directly into Azure AD including assignment to the application to users and groups. This post goes over the step by step guide and shows you the field mapping between the F5 Guided configuration and Azure AD.
In my setup I have a Header based application that I want to publish. I chose header based as that is a bit easier to configure than Kerberos, but obviously that works as well.
Configuration time
We start by creating a self-signed certificate. Yes, while Azure AD by default creates a certificate when you create an application, F5 insists that you control the private key of your signing certificate. Note that this certificate is not used by your clients browser to access your applications, but rather between Azure AD and your published F5 application, hence it can be a self-signed certificate. While you can generate a certificate on a linux machine, I used PowerShell on my Windows server.
Open a PowerShell prompt in Administrative mode and type:
New-SelfSignedCertificate -CertStoreLocation cert:\LocalMachine\My -DnsName <MyApp>
The <myapp> is the subject of the certificate and it does not really matter what the name is. I used MyApp as an example, but the value itself isn’t actually used. Once the certificate is created, go to mmc.exe export the certificate with the private key and note the passphrase/password for the certificate. You should now have a .pfx file with a password.
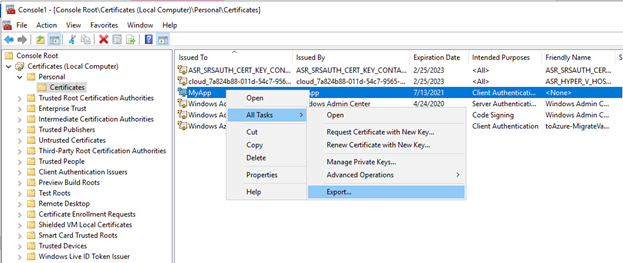
Next is uploading this certificate into the Big-IP device so we can use it during the guided configuration wizard.
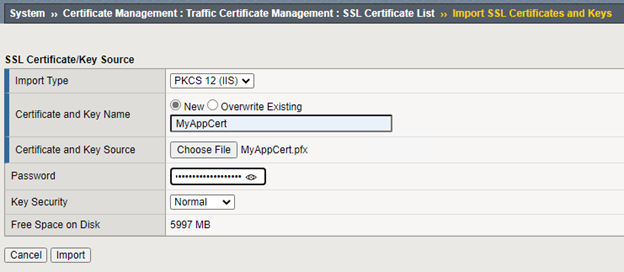
- Login to the Big-IP device and go to System ›› Certificate Management : Traffic Certificate Management : SSL Certificate List and click Import
- Set the import type to PKCS12 (IIS) and give the certificate a name (MyApp)
- Click Choose File and select the pfx file exported earlier and also type the password in the password field, then click Import
The certificate to be used as the signing certificate is now loaded into the system.
Next is the Azure AD configuration. As the BIG-IP needs to be able to create applications, assign (therefore read) users and groups, it will need permission to do so. For this we create a single App Registration in Azure AD with the right permissions. To do this:
- Login to Azure AD and select App Registrations
- Create a new application by clicking + New registration
- Provide a name for the registration (such as Big-IP registration)
- Leave the account in this organizational directory only (single tenant)
- Leave Redirect URI (optional) empty
- Click Register
- Once the application is created click the API Permissions blade
- Click + Add a permission and then select Microsoft Graph and select Application permissions
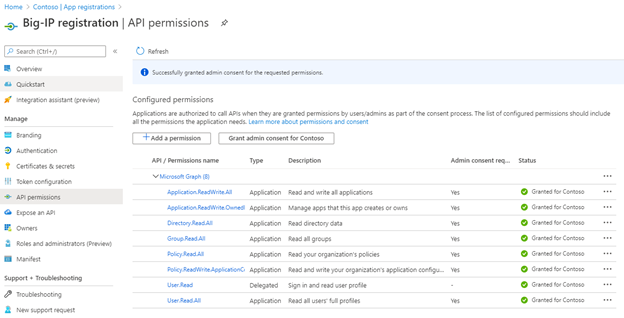
- Under the select permissions tab, add the following permissions:
Application\Application.ReadWrite.All
Application\Application.ReadWrite.OwnedBy
Directory\Directory.Read.All
Group\Group.Read.All
Policy\Policy.Read.All
Policy\Policy.ReadWrite.ApplicationConfiguration
User\User.Read.All - Click Add Permissions
- In the configured permissions click Grant admin consent for …. And in the pop-up click Yes
- On the left side menu, select Certificates & secrets and click + New client secret
- Type a description on the add a client secret window and set an expiry timeframe and click add
- Copy the value created (it will only be shown once) and save it locally
- Go to the overview blade of the application and copy the Application (Client) ID and the Directory (tenant) ID values.
Next is the actual configuration of the Big-IP device using the guided configuration. Please note that the App registration created is allowed to create as many applications as you need. This is a one-time configuration/registration for your device although the wizard will ask you every time for these registration credentials, but you can copy the values from an earlier (guided configuration) deployment.
BIG-IP Guided Configuration
Starting from version 7 of the guided configuration templates you have the ability to integrate the BIG-IP guided configuration wizard with Azure Active Directory. As we have loaded the certificate to be used for our application as well as the attribute values for the app registration we can start.
- Go to Access >> Guided Configuration and choose Microsoft Integration
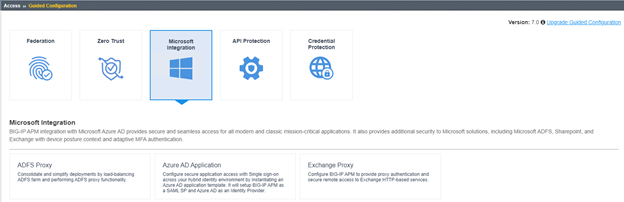
- Select Azure AD Application to start the guiding wizard
- On the main page, make sure to have NTP, DNS and routing configured and read through the details if you want to and click Next on the bottom of the page
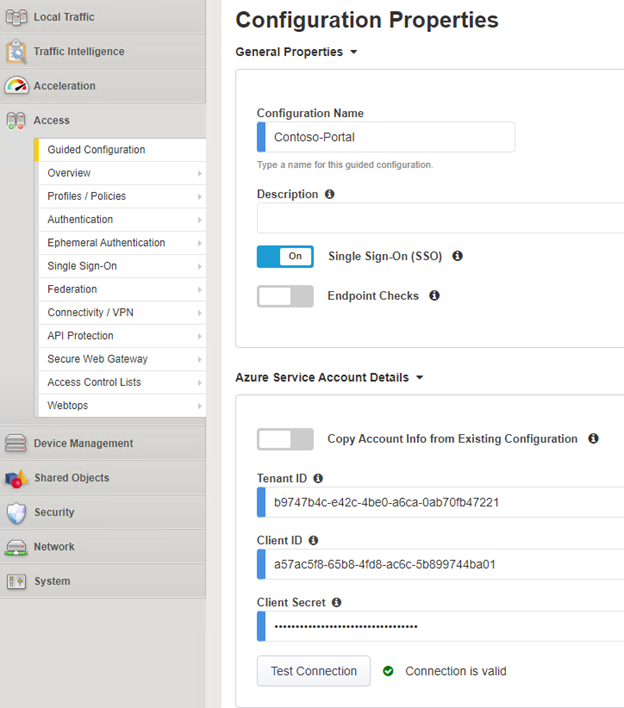
- On the Configuration Properties window, you will need to enter Configuration Name just choose any name to distinguish this configuration in your BIG-IP system.
- If you need to enable Single-Sign-On flip the switch, this allows the system to either get a Kerberos token or perform Header based conversion based on the SAML attributes.
- Next is the Azure Service Account Details. Paste the Tenant ID (Directory (tenant) ID) and the Client ID (Application (Client) ID) and the Client Secret noted earlier when creating the App Registration. Click Test Connection to validate that the BIG-IP can connect to the service and authenticate.
Note that it does not perform a check on GraphAPI permissions!
- It is possible to use an existing application and reconfigure that application by the BIG-IP. In that case Azure AD Admins can pre-create empty objects that the BIG-IP Administrators can connect to, but for now we will create a new application, click Save & Next
- In the Service Provider window you will need to put in the HOST and the Entity ID. This is a bit confusing, but the Host is the actual URL of your application. So if your URL is portal.contoso.com, just type that and the system will make it into https://portal.contoso.com/blabla and automatically use that (https://<host>/Name_of_the_application) as the entity ID. Click Save & Next
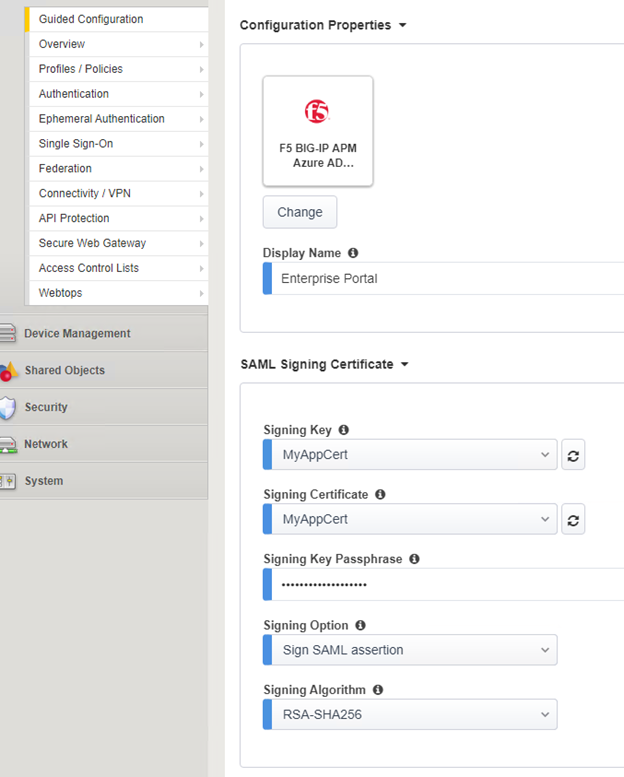
- This is where we have the Azure AD integration itself. As there are (now) 3 types of applications available for BIG-IP in the Azure AD Marketplace, all three will be shown. In our case, select the F5 BIG-IP APM Azure AD… and select Add
- The page will show additional settings to be filled in, beginning with the application name. This is the name that appears in Azure AD for your end-users.
- You can also select the SAML Signing Key & Certificate to match our imported self-signed certificate
- As the private key needs to be protected when moving it across to Azure AD (that will actually receive the private key), put it a Signing Key Passphrase (random) or use the actual key if the private key is protected inside BIG-IP. The same password will be used for moving the private key to Azure AD. Leave the other options on their default.
- Additionally, you can add users and or groups to the application by clicking Add under the User and User Groups field.
- If you have specific attributes that need to be sent from Azure AD to the BIG-IP (for example for Header conversion or specific Kerberos configurations), select the User Attributes & Claims tab on the top of this page and add them as additional claims
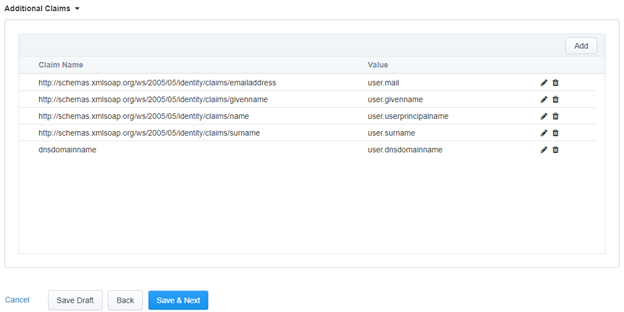
- Click Save & Next
- Next is the Virtual Server Properties page. In here we configure the backend server IP and port as well as the SSL certificate to be used to publish the application. Note that this SSL certificate does need to be trusted by end-user computers in order to avoid pop-ups. The destination address is the “front” end address of the BIG-IP system. Either the public IP address or forwarded private address from your firewall. The service port and possibly redirect ports speak for themselves. The Client SSL profile is the SSL certificate profile to be attached. Then click Save & Next
- This brings us to the Pool properties. This is the configuration of the backend server and listening ports. Create a new pool, or re-use an existing one. Configure it and click Save & Next
- If you have enabled the Single-Sign-On settings, this is the next page that shows up. If you configure HEADER based SSO, this is where to configure the mapping for the incoming claims to headers and for Kerberos to configure the credentials source and SSO REALM and account details. These are the same as I blogged earlier. Click Save & Next
- Next is the session management, leave the defaults and click Save & Next
- Finally, click Deploy to create the configuration in BIG-IP and Azure AD. And click Finish after the deployment.
After the deployment is complete a new application shows up in Azure AD. When it’s created you can manage it from F5 (by adjusting the Guided Configuration) or directly in Azure AD. But users can only be provisioned once from the BIG-IP system upon creation of the application, afterwards the wizard does not allow you to manage the users/groups from BIG-IP anymore. Also the application is created without an application owner, so if you want you can still configure that as well.
Conclusion and result
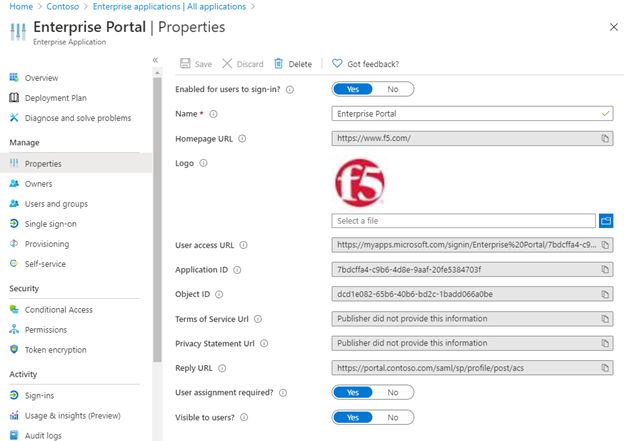
The integration allows for quick setup of applications through the guided wizard and sets the properties for the SP integration with F5. When looking at the SSO tab (regardless of the SSO configuration in F5 as that is more of an SSO towards the backend application, not SSO towards F5 from Azure AD) we can see the fields populated earlier and how they relate:
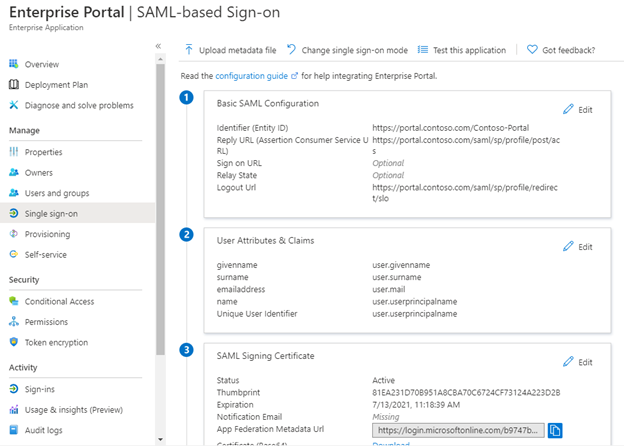
The Basic SAML configuration is the Entity ID (https:// <host> /Configurationname) and the Reply URL is automatically populated based on the Host information from the guided configuration wizard (https:// <host>/saml/sp/profile/post/ac) as well as the logout URL (https://<host>/saml/sp/prfile/redirect/slo).
Important: User attributes and claims however is NOT automatically configured as its still based on the default configuration and as we added dnsdomainname as an optional attribute in the BIG-IP appliance, we still need to manually configure it in the Azure AD application for it to work.
The signing certificate is our self-signed certificate with expiration date. As the certificate is custom created with a specific roll-over date (1yr by default), it is wise to also configure the notification e-mail to notify an administrator when the certificate is going to expire.
And that’s it.. Seems F5 still needs to work on the optional attribute population but in short.. it works..