First of all, I have a confession to make: I’m not a developer to the extend that I cannot write an API from scratch or any other application that isn’t based on pure PowerShell or VBS scripting. Which means integrating an API into External Identities is going to be a challenge for me. I wish I was able to create advanced approval workflows with Outlook/OWA integration in .net, java or python or whatever language some can write in. Luckily, we have Azure which brings us Logic Apps. Easy (visual) development of API’s (and other stuff) that I can use to create whatever I want. If you are like me, or if you just want to create a simple workflow in an API, go Logic Apps!..
But before I start writing my first API, let us first check the picture again of where an API call can be made:
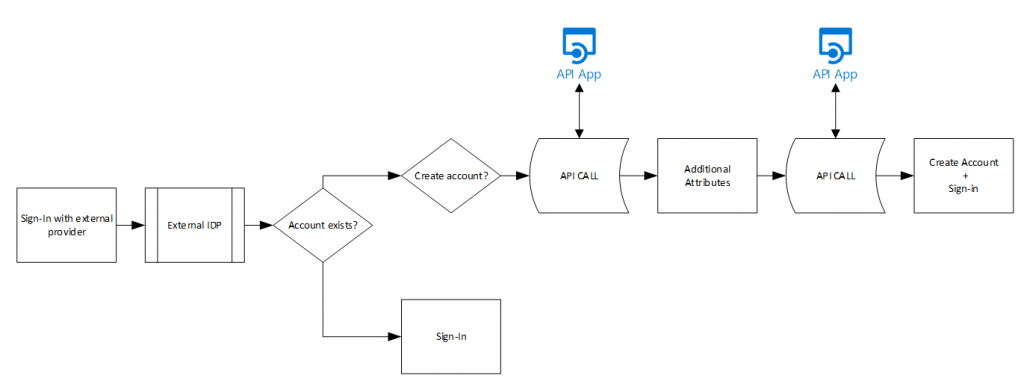
Azure AD External Identities can send an HTTP JSON request on 2 points in the creation flow – which we can pick-up in Logic Apps and then perform some stuff, and then have it answer with an HTTP response to continue the process. Each API can answer with 3 options, 200:Continue, 200:ShowBlockPage and a 400:ValidationError. This controls the behavior of the sign-up process which we will need later on.
I created a separate Logic App that retrieved the user request to sign-up, I could validate the email address (or just send an email to someone saying user x signed-up) and I thought lets put it into the External Identities flow. Which resulted in problems that I will explain how to solve in this post.
Create a basic Logic App
First of all we need to create the Logic App. Apart from whatever it is going to do, it will receive a JSON content based request with information on the user trying to sign-up. The JSON contents include attributes such as email, identity provider and some other stuff. So we need to make sure we import a JSON schema into the HTTP request receiver.
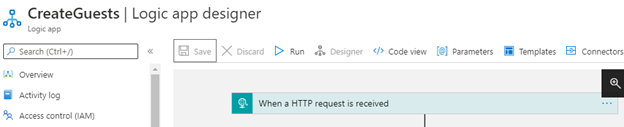
- Open the Logic App Designer and on the welcome page select “When a HTTP request is received” or is you are already in the designer – click on the + Next step to open the object selector. Search for HTTP and choose the “When a HTTP request is received”
- For now, we will keep the schema simple and just copy paste the following JSON text:
{
    "type": "object",
    "properties": {
        "email": {
            "type": "string"
        },
        "identities": {
            "type": "array",
            "items": {
                "type": "object",
                "properties": {
                    "signInType": {
                        "type": "string"
                    },
                    "issuer": {
                        "type": "string"
                    },
                    "issuerAssignedId": {
                        "type": "string"
                    }
                },
                "required": [
                    "signInType",
                    "issuer",
                    "issuerAssignedId"
                ]
            }
        },
        "displayName": {
            "type": "string"
        },
        "ui_locales": {
            "type": "string"
        }
    }
}
- Save the Logic App
This just creates a near empty Logic App that we can use later – but we defined a few variables already when receiving the HTTP request, such as email, displayName, ui_locales and sign-in information. But before we can call this API from External Identities, we need to setup basic authentication.
Azure API Management – Basic Authentication
The External Identities API call must use basic authentication. And Logic Apps do not support basic authentication which meant I had to put something in front of it. In my case, as Azure is my platform, I added API Management in front of my logic app and configured APIM to perform the basic authentication and then to call the Logic App.
So, let’s start with that. I deployed a standard API Management instance and I have my Logic App with the “When a HTTP request is received”.
In APIM publish the Logic App by
- Select APIs on the left menu.
- Select + Add API and choose Logic App
- Click Browse and select your created Logic App
- Type a string in the API URL suffix to make this API URL unique to this Logic App (for example the same name as the Logic App)
- Click Create

Now that the Logic App is added, we need to configure the basic authentication and make sure the API is able to respond with HTTP 200 as well as HTTP 400’s. Let’s begin with the basic authentication.
Inbound processing
Basic authentication can be added to the inbound processing rules. By default, basic authentication works by providing an HTTP header in the form of “Basic BASE64(user:pass)”. In this example I will set a standard username and password inside the inbound processing rule. This is the easiest way, but as username and password are now in clear text in my APIM code probably not the best. Perhaps I will later write the code to integrate this with KeyVault but for now, lets try this.
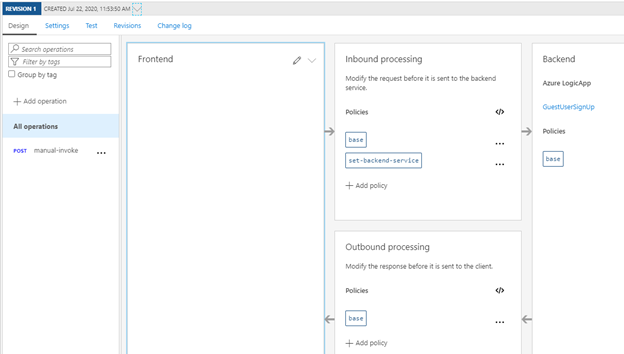
- Clicking the </> under inbound processing will open up the code editor for APIM where we see the following code:
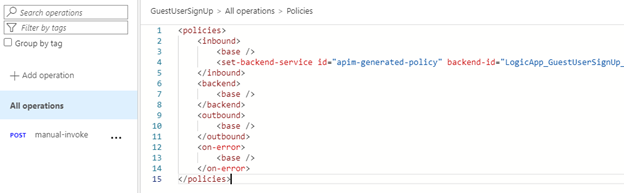
- Copy line 4 as you will need it later and replace the entire code with the following, but change Username:yourPassword with your specific username and password.
<policies>
    <inbound>
       <set-variable name="isAuthOk"
value="@(context.Request.Headers.ContainsKey("Authorization")
            && context.Request.Headers["Authorization"].Contains("Basic " + Convert.ToBase64String(Encoding.UTF8.GetBytes("UserName:yourPassword")
                )
              )
              )" />
        <base />
        <choose>
            <when condition="@(context.Variables.GetValueOrDefault<bool>("isAuthOk"))">
                <YOUR COPIED LINE FOR THE LOGIC APP GOES HERE />
                <set-header name="Authorization" exists-action="delete" />
            </when>
            <otherwise>
                <return-response>
                    <set-status code="401" reason="Unauthorized" />
                    <set-header name="WWW-Authenticate" exists-action="override">
                        <value>Basic realm="someRealm"</value>
                    </set-header>
                    <set-body>Wrong username or password</set-body>
                </return-response>
            </otherwise>
        </choose>
    </inbound>
    <backend>
        <base />
    </backend>
    <outbound>
        <base />
    </outbound>
    <on-error>
        <base />
    </on-error>
</policies>
- Replace line 13 (<YOUR COPIED LINE FOR THE LOGIC APP GOES HERE />)with the line you copied earlier.
- Click Save
- Next is the addition of the HTTP codes (as 200 is added by default, but 400 is not).
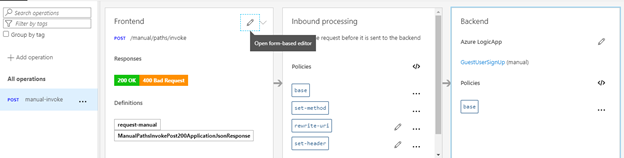
- Click on POST manual-invoke under the operations section.
- In the front-end section click the pencil and select the Response tab.
- Click +Add Response and type 400, select 400 Bad Request and click OK
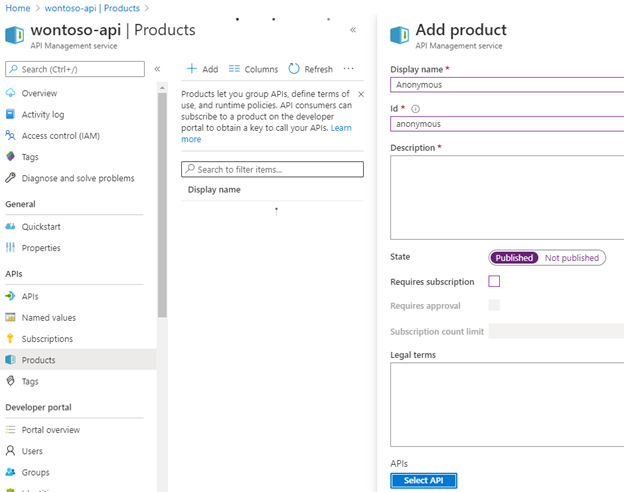
The next thing we need to do is to configure Anonymous authentication as a “product” as the basic authentication will be handled in our published Logic App in APIM and by default “subscription” is required for external authentication.
- Go to Products on the API Management service
- Select + Add
- Give the product a name (such as anonymous)
- Set the state to enabled
- Disable Requires subscription
- Click Save
- Click Select API
- Add the created API for the Logic App
- Click Save
And this prepares our Logic App to be used by External Identities. To validate, configure it in Azure AD and try to sign-up.
To get the URL of the APIM / published API/Logic App
- select the POST manual-invoke under the operations section.
- Select the Test tab and the URL will be under the Request URL section:

- Copy this URL
- Go to Azure AD External Identities and select the All API Connectors option in the menu
- Click + New API Connector and provide the displayname, the URL copied earlier in step 2 and the username/password as well as the attributes that need to be sent to the API as well as the ones expected to be sent back (leave everything default for now).
- Try a user sign-up and open the logic app history to see that it has executed.
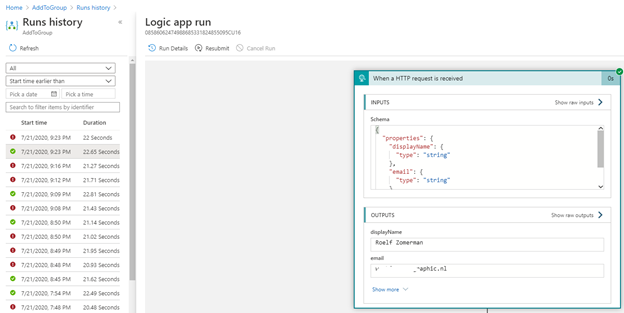
- The “When a HTTP request is received” window can be opened by clicking on it once and you will see the inputs as well as the outputs and the objects that where created from the input. In the picture above I have 2 variables in my Logic App now called displayName and email both with values.
If you select show raw outputs you will see other attributes that are available, but where not converted into variables. If you would like to use one of those, make sure the JSON schema in the connector uses the right variable names
Conclusion
This concludes post 2 around Logic Apps in combination with External Identities. As we have now received the HTTP request and the information provided by a user that signs-up to our Azure AD we can start playing around with it!