In our previous post we talked about the scripts that can install applications and set settings automatically without even login-on to the system. In this post we will see how we can use those scripts in a JSON file, together with the Azure Image Builder.
Within the JSON file we specify which OS we want, what executables / content we want to download, applications to install and much more. As it would be hard writing this from scratch, we can use the GitHub examples on DanaielSollondon’s page.
When you look at the JSON file you will notice the standard parameters, variables and resources hives. We won’t use any variables at the moment but concentrate mostly on the resources hive only.
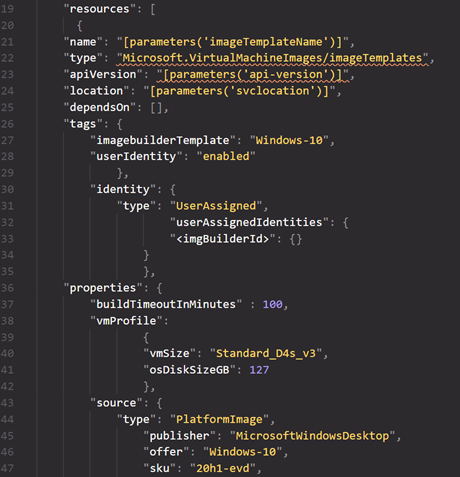
You will notice that it has a few top level entries (name of the template, api version, and identity). But the actual configuration is under the properties section of the hive. This determines the build template VM (it will actually spin up a VM in the background with the mentioned size – so if you need to build an image for Autocad for example, make sure to put a GPU based VM type here). By default this is a Standard_D1_v2 vm, but as I want my VM to be built a bit faster and not hit the build timeout limit (above it) I will change this to a Standard_D4s_v3. So, what I did was download the entire JSON file, opened up my favorite editor (VS Code) and created a new JSON file and copied the example JSON into my new file and changed these settings.
Why
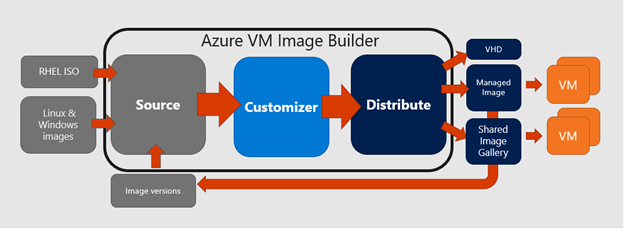
Why would we use the Image Builder or any automation to build our images. Well, in on-premises we’d use image building software to make sure each complete image consists of a master and then building blocks we can apply. This way if there is a software update or another application that needs to be added to the image, we can easily build our new image on the basis of the old image. By using JSON files we now made building a Golden image easy, fast and without any interaction required. It’s reusable and we can integrate this completely in a DevOps pipeline.
The source image
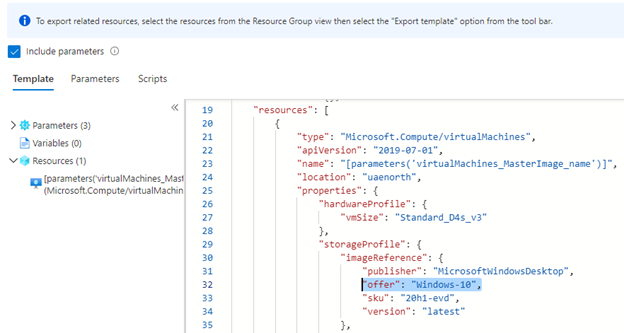
The Golden image will be created from a source image, this source can be a marketplace, a previously created image or a shared image from your image gallery. In my case I want to start with a Marketplace Windows 10 Enterprise Multi-User (Gen1). If you don’t know the values of the image you want to use, you could deploy a standard VM based on this image and then go to Export Template on the VM to see the variables used.
After we know your base image, next is the customization section.
Customization
With our base image settled, we can now work on the customizer section. There are many types of customizations possible: PowerShell, Windows restarts, File downloads and Registry settings.
Each action that we want to perform on our image is configured as a block in the JSON file under the Resources/customize hive and each block consists of:
- Type
- Name
- Specific attributes for the action
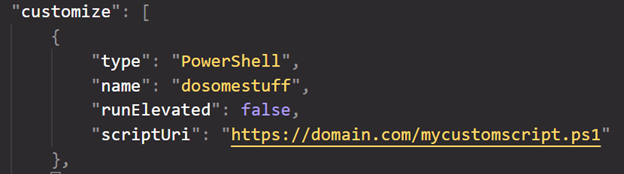
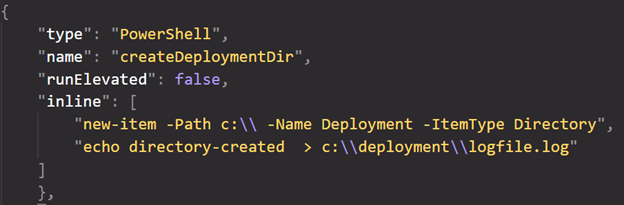
For example, to start a PowerShell script you would use:
Or if we want to run a simple command, without downloading files and such, we can embed the command into the PowerShell configuration like (the below shows a DOS command inside the PowerShell window):
Remember, this image build will need to be completely without any user interaction. This means that any application we want to install, any script we want to run needs to be fully automated without any interaction.
We can add as many customize actions as we would like, as long as the total runtime for building the image doesn’t exceed the set timeout in the JSON file.
Running our PowerShell Script
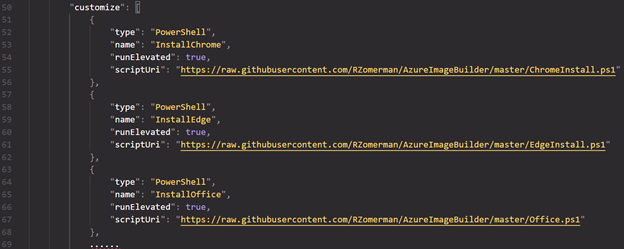
When we created the scripts for installing software, I created independent scripts for the applications and one master script that calls on all of these in sequence. In theory we now have 2 options to build our image. We could either call 1 script from the JSON file and control the image building process from the master script and indexfile.txt or we can add each script individually from within the JSON file. The first option would look something like this:
While the second option (using separate installers) would look like this:
If you want to download files, you can also provide a command for that;

In combination with the PowerShell commands, you could even download a ZIP file, extract it and then install it all from the JSON file itself.
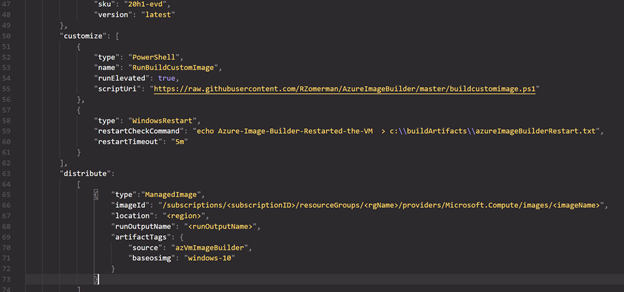
Distribute
The last part of our JSON file is the distribute hive. In here we provide what must happen to be built image. We can store the image as a Managed Image or as a Shared Image Library image. Part of this is obviously what to call the image, but also where to store it in terms of SubscriptionID, resourceGroup and location.
Note that you could later on variablize these settings (next blogpost I guess), but for testing, just put in hardcoded values, replacing the <> parts in the JSON.
And that’s all there is too it..
Prerequisites
Except that is only half of the story. The next thing is actually submitting this JSON file to build the image. In order to build the image (spin up the VM, execute PowerShell scripts and such) we will need to have a service account, or in this case Managed Identity – to perform all of this for us. Not only do we need to create that managed identity, we will also need to give it permissions on our resource group, shared image gallery, network, etc.
Managed Identity
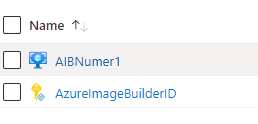
A managed identity is mandatory (and we will add it to the JSON file after creation). I will use the PowerShell example here for creating it, but there is also a cli version available. First, we install the Managed Service Identity module, then create the identity in the specified resource group (Images-RG)
Install-Module -Name Az.ManagedServiceIdentity
$identityName="AzureImageBuilderID"
$imageResourceGroup="Images-RG"

# create identity
New-AzUserAssignedIdentity -ResourceGroupName $imageResourceGroup -Name $idenityName
We now have a managed identity, but it will need to have some rights. We could just grant the identity owner or contributor rights on the resource group where we will host the images, but it doesn’t need those permissions, it would only need specific read/write permissions on the Compute.Images control plane. While we could manually set all those permissions, the product group actually created a JSON file we can import, adjust and execute:
#Set variables here
$subscriptionID="24xxxe81-xxxx-xxxx-xxxx-xxxxxxxxx"
$ResourceGroup="Images-RG"

#First we need to make the role definition unique just in case someone else has the same definition in the same AAD
$timeInt=$(get-date -UFormat "%s")$imageRoleDefName="Azure Image Builder Image Def"+$timeInt

#Download the JSON master file invoke-webrequest -uri 'https://raw.githubusercontent.com/danielsollondon/azvmimagebuilder/master/solutions/12_Creating_AIB_Security_Roles/aibRoleImageCreation.json' -outfile aibRoleImageCreation.json

((Get-Content -path aibRoleImageCreation.json -Raw) -replace '<subscriptionID>',$subscriptionID) | Set-Content -Path aibRoleImageCreation.json

((Get-Content -path aibRoleImageCreation.json -Raw) -replace '<rgName>',$ResourceGroup) | Set-Content -Path aibRoleImageCreation.json

((Get-Content -path aibRoleImageCreation.json -Raw) -replace 'Azure Image Builder Service Image Creation Role',$imageRoleDefName) | Set-Content -Path aibRoleImageCreation.json
Now that we have the role definition XML, we need to assign it to the Managed Identity. For this we request the ClientID of the managed identity and use that for the assignment:
 #Get the Identity and ClientID
$Identity=(Get-AzUserAssignedIdentity -name $IdentityName -ResourceGroupName $ResourceGroup)

#We import the new definition file
New-AzRoleDefinition -InputFile  ./aibRoleImageCreation.json

#and assign it to our Managed Identity
New-AzRoleAssignment -ObjectId $identity.PrincipalId -RoleDefinitionName $imageRoleDefName -Scope "/subscriptions/$subscriptionID/resourceGroups/$ResourceGroup"
If your image also needs to be on a specific VNET (for example to download items from your file server or join a domain or whatever) the Identity also needs permissions to join the build VM to a VNET. An example of configuring that can be found here. (note that identity is spelled wrong in these examples and you will need to replace the last command)
New-AzRoleAssignment -ObjectId $identity.PrincipalId -RoleDefinitionName $networkRoleDefName -Scope "/subscriptions/$subscriptionID/resourceGroups/$vnetRgName"
To use the Managed Identity in our JSON file, we will need to know the ID, which we can request by:
$identity. Id

#results looks like
/subscriptions/24890e81-xxxx-xxxx-xxxx-xxxxxxxxxxxx/resourcegroups/Images-RG/providers/Microsoft.ManagedIdentity/userAssignedIdentities/AzureImageBuilderID
And you will need to put this in double quotes and append this with : {}
"identity": {
"userAssignedIdentities": {
"/subscriptions/24890e81-xxxx-xxxx-xxxx-xxxxxxxxxxxx/resourcegroups/Images-RG/providers/Microsoft.ManagedIdentity/userAssignedIdentities/AzureImageBuilderID": {}
}
},

Supplying the JSON file
The build of the image is actually in two stages. The first is uploading the JSON file as a ResourceGroupDeployment, the second is starting the build itself. This allows the JSON file to be changed all over again without changing or forcing the actual build.
Submit the JSON file using:
#Name the image template – will be used for checking as well

$imageTemplateName="CustomImageWithVSCode"


New-AzResourceGroupDeployment -Name CustomImageWithVSCode -ResourceGroupName $ResourceGroup -TemplateFile .\CustomImageWithVSCOde.json -imageTemplateName $imageTemplateName -api-version 2020-02-14 -svclocation northeurope
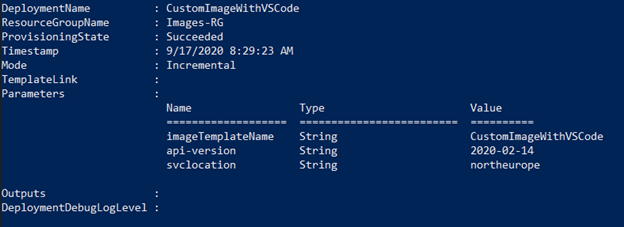
Is the upload is completed successfully, you can force the build of the image by issuing:
Invoke-AzResourceAction -ResourceName $imageTemplateName -ResourceGroupName $imageResourceGroup -ResourceType Microsoft.VirtualMachineImages/imageTemplates -ApiVersion "2020-02-14" -Action Run -Force
Validating
When you submitted the build, there is no direct feedback from the portal, but we can request the API to give us the status. For this we need to have a bearer token which we can grab easily using the following code:
### Step 1: Update context
$currentAzureContext = Get-AzContext

### Step 2: Get instance profile
$azureRmProfile = [Microsoft.Azure.Commands.Common.Authentication.Abstractions.AzureRmProfileProvider]::Instance.Profile
$profileClient = New-Object Microsoft.Azure.Commands.ResourceManager.Common.RMProfileClient($azureRmProfile)

Write-Verbose ("Tenant: {0}" -f  $currentAzureContext.Subscription.Name)

### Step 3: Get token
$token = $profileClient.AcquireAccessToken($currentAzureContext.Tenant.TenantId)
$accessToken=$token.AccessToken
Query
The status can be queried using the following code:
$imageTemplateName="CustomImageWithVSCode"

$managementEp = $currentAzureContext.Environment.ResourceManagerUrl
$urlBuildStatus = [System.String]::Format("{0}subscriptions/{1}/resourceGroups/$imageResourceGroup/providers/Microsoft.VirtualMachineImages/imageTemplates/{2}?api-version=2019-05-01-preview", $managementEp, $currentAzureContext.Subscription.Id,$imageTemplateName)

$buildStatusResult = Invoke-WebRequest -Method GET  -Uri $urlBuildStatus -UseBasicParsing -Headers  @{"Authorization"= ("Bearer " + $accessToken)} -ContentType application/json

$buildJsonStatus =$buildStatusResult.Content

#Get the actual results
$buildJsonStatus
The result will be a JSON formatted file, within that file you will see all the settings (the contents of the JSON file we made earlier) as well as the provisioningState which contains the runState:

After it completes it has built and stored an image in my resource group.
Continuing on our Image
Now that we have an image in our resource group, we might want to adjust it to add additional software to it.
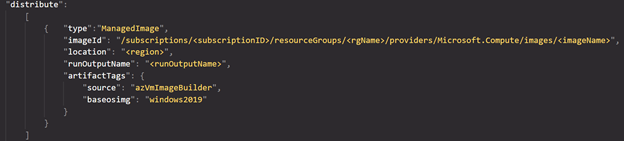
This means changing the source from a marketplace image to a ManagedImage, which we can do by providing the imageID.
        "source": {
            "type": "ManagedImage",
            "imageId": "/subscriptions/<SubID>/resourceGroups/<RGName>/providers/Microsoft.Compute/images/<ImageName>"
        },

Next, change the items you want to apply to the image (additional software and configurations) in the customize hive. And go!
Note that you would have to specify a new deployment name, as updating existing deployments is not yet supported.