It’s been a while between posts, but I promise this will be interesting to Hybrid Infrastructure Admins that also want to have secure VM’s.
As almost usual, the supportability of the described solution here is not yet proven, but I hope it will be soon.
This post will describe how to deploy shielded VM’s onto Azure Stack HCI – the ability to shield VM’s from the Hyper-V administrators and thus allowing you to run tier-0 workloads on HCI.
After playing with my Azure Stack Development Kit – Microsoft released Azure Stack HCI as a new family member in the portfolio. Stack HCI has the advantage that it can run on current hardware, does not require you to procure it as a single unit and luckily for me, it actually runs on “old” Dell R620 hardware. While it has many advantages/disadvantages in setup, management, and hardware compatibility – for me it sorts of still looks like a standard Hyper-V based VM hosting Infrastructure including all the regular tools around it, with some additional seasoning in terms of the ability to run Azure Kubernetes Services in your datacenter, connected to your network.

But what if you wanted to run shielded VM’s; Virtual Machines that are inaccessible for the HCI administrators and only available for the owners of those VM’s? What if you don’t want your VM’s being stolen or ran on any other hardware? For this, Microsoft has released the Host Guardian Service a while ago, and for some reason did not really promote this. With HGS you can:
- Prevent VM’s from running on unauthorized hosts
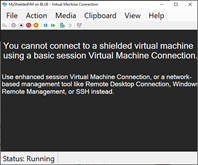
- Prevent Hyper-V administrators to access the console of the VM
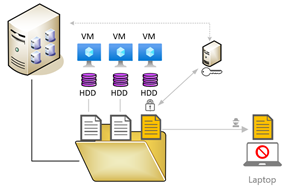
The first point is achieved using BitLocker and the unlock methods. In short, the host will request a private key that is able to unlock the BitLocker encryption of that VM on the HGS server. This means that even when you would copy the VHD itself, the VHD will not boot due to the missing BitLocker key, and yes, you would not get the recovery key either as the volume is protected by an external Key.

The next point is configurable, by implemented policy (on each VM) you can control if the host/cluster administrator is able to connect to the console of the VM itself, or if even that is blocked. If configured, it allows the owner of the application to completely block direct access to the VM to prohibit changes in configuration or peeking into the console.
Why use this at all?
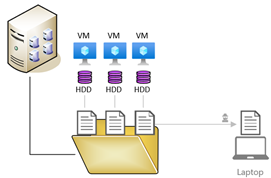
There are many scenario’s that can take advantage of this. In VMWare and Hyper-V, your VM contents are stored in a file. A file that can be copied for offline hacking, a file that can be externally altered without you even knowing – a file that can be moved to any other hyper-visor and be used to run as a VM.
The fact that you can protect your harddrive from the peeking eyes of the administrator of the hosting system, allows you to run your sensitive, tier-0 and other workloads securely. If you have an administrative forest, you can now run those DC’s on the same virtualization infrastructure securely.
If you are using an external hoster, you can make sure, their administrators cannot steal your VM’s and their contents.
In short – security is always better, certainly in situations where you have to trust others with your data.
How?
Essentially what happens is that first of all the drive of the VM is BitLockered. The key to unlock the encryption is an external key, stored in the HGS server. In order to get the key, the Hyper-V server needs to request the key and proof (and provide health/authentication) that it is eligible to unlock the encryption prior to starting the VM.
As the VM needs to be properly secure, we need to ensure no-one is able to tamper with the Operating System image. The only way to do that is to create a template VM, secure that template with a certificate and then use that template (with signature) as the master image.
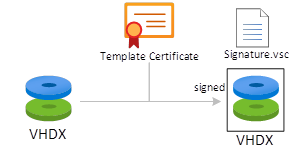
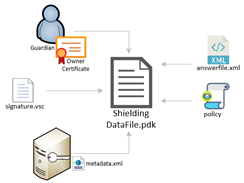
When we have a standard VHDX, the Shielding Tools allow us to sign the contents of that vhdx with a certificate. This certificate can later be used to re-sign the vhdx if any updates are required to it. The signing application returns back the original VHDX and a signature file belonging to that vhdx file in the catalog and in the meantime use that certificate as well to Bitlocker the VHDX and essentially close it for further usage. The preparation of the disk does not specify where the disk can actually be used (on which hosts) as well as if the VM created from this disk is to be fully shielded or just encrypted. This is configured in a PDK file. The PDK file is created by combining multiple input parameters, which are: (1) the guardian (owner) through a certificate, (2) signature VSC catalog, (3) the metadata of the HGS service (containing the trusted hosts), (4) a policy (shielded or just encrypted) and (5) the answerfile (for Windows) for deploying the template.
So, this leaves you with 2 files. The vhdx containing your secure operating system as a generalized template with Bitlocker configured and the pdk file containing the information for that template, and how to provision it, the permissions on where it can run and if it is shielded or just encrypted. These two files can be given to the hoster/administrator of the infrastructure. Because these 2 files are the only ones required to deploy an encrypted or fully shielded VM, and include the username/password and deployment attributes for that VM.
So you give these two files to the admin (or add them to a library) and the infra admin can now deploy this for you.

Architecture
So, how can our HGS service protect our VM’s? Well, the HGS works in many architectural configurations, but I chose the easiest one. HGS will, upon configuration create a whole new AD forest and in there configure the HGS service, the required URL’s and permissions. This way, even if the main Active Directory or Hyper-V service is compromised, the shielded VM’s are still protected from being stolen or at least from running anywhere else, but the approved infrastructure hosts.
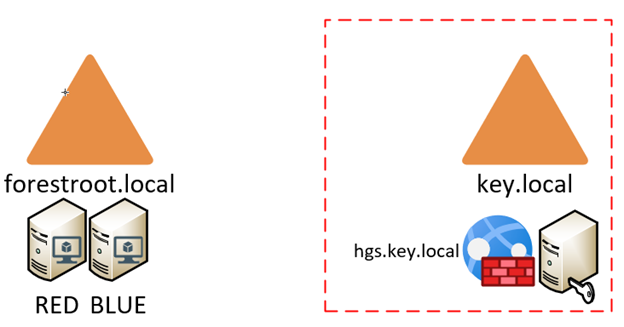
The left side of the above picture shows my regular infrastructure, it hosts my users domain, all workstations servers and in this case also my HCI hosts. Usually you isolate the hosting infrastructure (hyper-v hosts, update servers, etc) from the VM’s running on the hyperconverged infrastructure.
The HSG service can run in multiple modes in order to protect your VM’s and the chosen mode also depends on the hardware capabilities. In short there are 3 modes, TPM; Key and AD. The latter not being recommended (and deprecated for 2019). Given my “old” hardware not being TPM 2.0 compliant – I had to choose the Key based protection.
Installation
Installing the HGS service is a bit apart. You don’t make the server a member of a domain, you don’t create your own forest or domain – the default installation is: take a single Windows Server 2019 (or 2016) in workgroup mode and run the HGS installation from PowerShell. In my case, the server is running on another Hyper-V server – but it could as well be a physical server if needed. The HGS installation will automatically install the required roles and features and configured the server to be a domain controller. After a reboot you will be able to initialize the HGS service which creates a webservice. Certificates are required for your HSG service and in my case, I installed a Certification Authority on the HGS server as well. If you have an existing CA you can create the certificates there and import them into your HGS service, or use self-signed. The installation manual I used is the official one from Microsoft: Deploy the Host Guardian Service | Microsoft Docs.
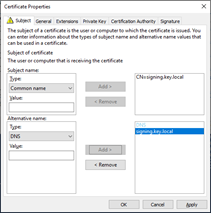
But while the official documentation states you “just” need a signing and an encryption certificate it does not explain how to get these. In short, you will need 2 pfx files, based on a standard certificate with: Common Name & DNS= signing.<domain> and encryption.<domain>. In my case I installed the certificate services on the HGS server (do this after the install-HGSserver and prior to initialize-HGSServer). After installation I copied the computer template and:
- Set the template name to HGS
- Set the compatibility to Windows Server 2016
- Set Allow key to be exported on the Request Handling tab
- Set Supply in the request on the subject name tab
- Set Allow encryption of user data in the Key Usage on the Extensions tab
- Allowed Authenticated Users to Enroll in the Security tab
And used that as the template. Next, I requested the certificates from the CA from certlm.msc (local certificate manager). In there I requested the two certificates individually:
Once the certificates are created, export them (with private key) – and note the password as you will need the pfx and password during the initialization of the HGSServer.
After the initialization of the HGS host, it will spin up a web service under the standard HGS.<domain> URL (in my case http://hgs.key.local). During initialization you can also add TLS/SSL to it by providing a standard SSL certificate with that domain name.
So, next is to make sure that my hosts can actually resolve this URL, and therefore in my forestroot.local DNS I created a conditional forwarder, but a single DNS entry would also work.
Hosts setup
My hosts are managed by my Admin Console running on my administrative server. I also use this server to access the HCI hosts through PowerShell by using Enter-PsSession -ComputerName <host>.
Now that the HGS server is in a ready state, we need to ensure that my hosts can resolve this URL. Using external PSSession’s I tested the URL using:
Invoke-WebRequest -Uri http://hgs.key.local/KeyProtection/service/metadata/2014-07/metadata.xml -OutFile metadata.xml
The host setup depends on the chosen model, but is very well described in the above guide.
So, what now?
After this all is setup, its now time to actually use it. The way you use it is that you pre-create a VM image (VHDX) with the Operating System installed and Generalized. In my case I created a Windows Server 2019 – installed Edge browser and sysprepped it. Then I followed the instructions for creating a protected VHD. Yes indeed, the master VHDX will be protected already – ensuring that only certain persons can deploy it. This also means that the template itself can contain secrets, keys, software, licenses etc and all the stuff you want to have protected.

When you deploy a new shielded VM – it will copy the secured VHDX and boot up the server. An answer file can be embedded into the VHDX to ensure domain join, etc will happen as well. The guide is pretty clean on how, etc.
The next step, to add the VM to the HCI infrastructure is to add the VM to the cluster itself – which instead of using the PSSession from the cluster node, I did from the management server:

Experience on HCI
Following the default guide was actually easy, but now it’s HCI time. While shielded VM’s will show up in your Admin Console, there are a few limitations today. You will not be able to move the VM to another host through the Admin Console, but the system does allow you to perform a failover (live migration) through the legacy Failover Cluster Manager snap-in. Furthermore, configuration of the VM (CPU’s memory, extra disks etc) can still be managed through the Admin Console. And the Admin Console allows you to deploy “regular” VM’s as well.
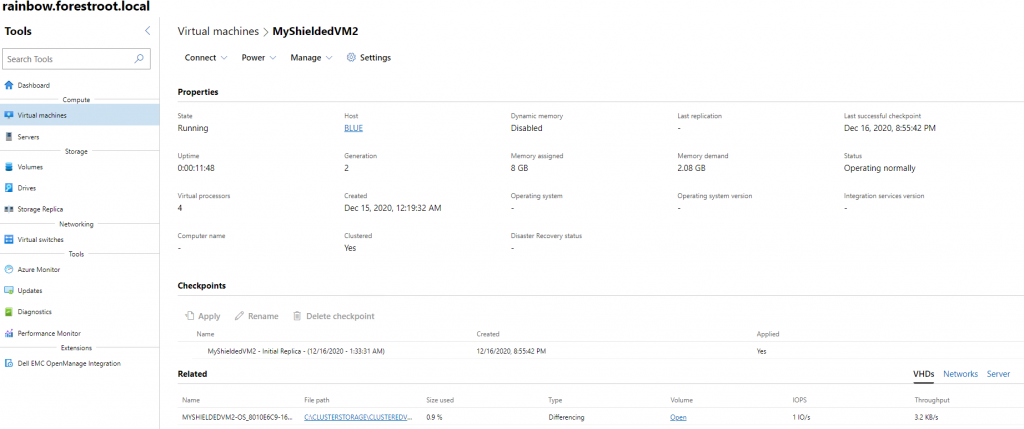
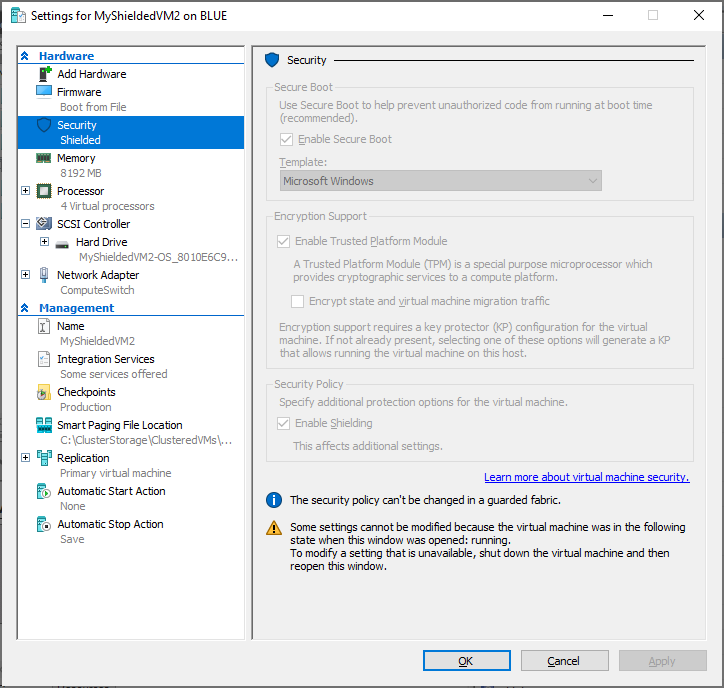
So, after deploying a VM, and adding it to the cluster (via PowerShell) – the Shielded VM shows up in the HCI Virtual Machine overview and allows the infrastructure administrator to start/stop and edit the hardware of the VM. But not allowing access to the VM itself (see picture 1) or being able to extract the information from the vhdx file as it is protected by BitLocker.
Also note, that while the OS disk is BitLockered, it is not possible to replicate the VM to Azure using Azure Site Recovery services.