The URL: Windows Virtual Desktop for the enterprise – Azure Example Scenarios | Microsoft Docs explains a bit on how the integration with Azure Files and Active Directory can be accomplished. However, it does not highlight the creation of the AD object to represent the storage in your Active Directory. So a short post on this topic while (hopefully) Microsoft fixes their documentation.
One thing to note though is that the Azure Files AD/AAD-DS integration only works with the Kerberos protocol. That means that NTLM will not work.
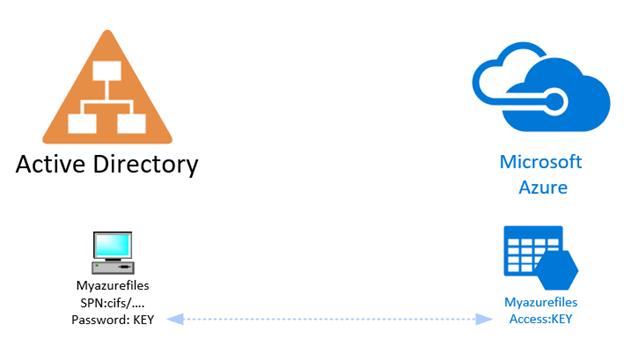
How it works
In order to create a connection between the AD and Azure Files, an object representing Azure Files needs to be created in your domain. This object will have a specific password and a specific SPN (Service Principal Name) for Kerberos to work.
As you might be aware, Azure Files has access keys, in the first command on the above mentioned link, we create a new key with a header:
# Create the Kerberos key on the storage account and get the Kerb1 key as the password for the AD identity to represent the storage account
$ResourceGroupName = "<resource-group-name-here>"
$StorageAccountName = "<storage-account-name-here>"

New-AzStorageAccountKey -ResourceGroupName $ResourceGroupName -Name $StorageAccountName -KeyName kerb1
Get-AzStorageAccountKey -ResourceGroupName $ResourceGroupName -Name $StorageAccountName -ListKerbKey | where-object{$_.Keyname -contains "kerb1"}
The output of the above will look something like this:

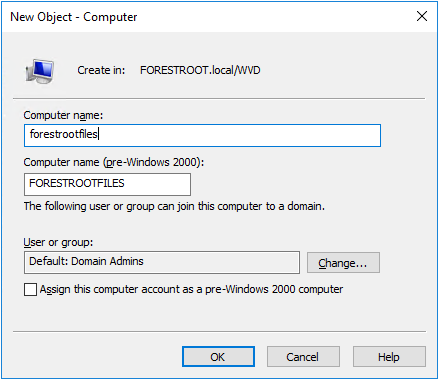
This key will be the password for our computer object in Active Directory. Now, you can create the computer object manually through AD Users & Computers, but you will need a PowerShell with AD CMD’lets to manually set a password as ADUC will not ask you for one. For good practice, I named my object exactly the same as my storage account.
Option 1: with GUI
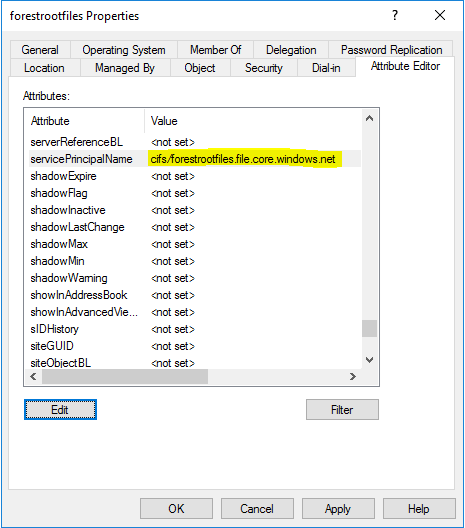
Once the object is created, we need to set the SPN for the storage account. Again this can be done via GUI (enable advanced view in ADUC)
Lastly the password, for this you need to have the powershell CMD’lets installed. We will use the Set-ADAccountPassword option:
(Make sure to add the $ sign to the computer object name)
Set-ADAccountPassword -Identity forestrootfiles$ ‘
-Reset ‘
-NewPassword (ConvertTo-SecureString -AsPlainText “thatreallylongstringjqDzQJZNA==” -Force)
Option 2: With PowerShell only
Obviously you can also do all of the above in PowerShell only:
New-ADComputer forestrootfiles2 -ServicePrincipalNames "cifs/forestrootfiles2.file.core.windows.net" -Path 'OU=WVD,DC=FORESTROOT,DC=local'

#(Make sure to add the $ sign to the computer object name)
Set-ADAccountPassword -Identity forestrootfiles$ `
-Reset `
-NewPassword (ConvertTo-SecureString -AsPlainText "thatreallylongstringjqDzQJZNA==" -Force)
The next part is setting information from your Active Directory on the storage account, this includes, the domain SID, the computer SID and domain GUID, domain name, etc. Most of the information can be retrieved through PowerShell by using: Get-ADDomain
$DomainSID=(Get-ADDomain).DomainSid.Value
$DomainGUID= (Get-ADDomain).objectGuid.guid
$ADDomainName=(Get-ADDomain).DNSRoot
$ADNETBIOS=(Get-ADDomain).NetBiosName
$ADForest=(Get-ADDomain).Forest
And finally the object SID (of the computer object just created)
$ObjectSID=(Get-ADComputer forestrootfiles).SID.Value
(rename the object to the computer object just created – no need for a $)
If needed, you can just output the values of the just set variables and copy them for the next commands:
$DomainSID
$DomainGUID
$ADDomainName
$ADNETBIOS
$ADForest
$ObjectSID
Finally, set the parameters on the Storage Account:
# Set the feature flag on the target storage account and provide the required AD domain information
Set-AzStorageAccount `
        -ResourceGroupName "<your-resource-group-name-here>" `
        -Name "<your-storage-account-name-here>" `
        -EnableActiveDirectoryDomainServicesForFile $true `
        -ActiveDirectoryDomainName $ADDomainName `
        -ActiveDirectoryNetBiosDomainName $ADNetbios `
        -ActiveDirectoryForestName $ADForest `
        -ActiveDirectoryDomainGuid $DomainGUID `
        -ActiveDirectoryDomainsid $DomainSID `
        -ActiveDirectoryAzureStorageSid $ObjectSID
Of if you copied the values (true offline)
Set-AzStorageAccount `
        -ResourceGroupName "<your-resource-group-name-here>" `
        -Name "<your-storage-account-name-here>" `
        -EnableActiveDirectoryDomainServicesForFile $true `
        -ActiveDirectoryDomainName '<ADDomainName value>'`
        -ActiveDirectoryNetBiosDomainName '<ADNetbios>' `
        -ActiveDirectoryForestName '<ADForest>' `
        -ActiveDirectoryDomainGuid '<DomainGUID>' `
        -ActiveDirectoryDomainsid '<DomainSID>' `
        -ActiveDirectoryAzureStorageSid '<ObjectSID>'
And done!